"Failed to Publish" is back. I can publish about once every 12 hours or so. Very frustrating.
As most of you know, whenever possible, I like my Second Look to somehow reflect what our current host at Art Journal Journey is featuring. That means I looked for something that included Alison's chosen theme, Autumn Colors and Inspiration. This post was originally published on October 7, 2015. It was for a challenge and the theme was Autumn.
This was my first ever assemblage made using a book cover for the substrate.
I
thought this looked like autumn, especially after I colored the white
flowers (yes, they all started white) with yellow pan pastels and brown
walnut ink.
I
sprayed each flower with a fixative before I added it to the cover.
I'm out of E6000, my adhesive of choice for anything like this, so I
grabbed the hot glue gun and promptly made a mess of things.
Except
for the very first (and last) photo, these were all taken before I
realized I hadn't cleaned the hot glue strings properly from the piece.
But I'm getting ahead of myself. I started with some autumn fabric and
sprayed it (using a spray adhesive) to the book cover I had gessoed
late last month.
To
that I added fabric I rusted, some of my handmade paper, and an image
of a young girl I fussy cut. I sewed the paper assembly to the rusty
fabric, then was horrified because the yellow from the pan pastel got on
the rusty fabric.
Although I eventually noticed the problem, removing all that pan pastel dust
was a real problem. I also forgot to show the back, which I covered in shaving cream paper I made several years ago.
One
final look at this first altered book cover after I removed the hot
glue spider webs, but before I got rid of the excess pan pastel dust. I
still need to punch holes to add a wire hanging, but I wanted to show
this before time runs out on that challenge.
Materials I used were five white flowers I colored, filler grass from my
yard, commercial fabric, rust dyed fabric, handmade paper (made by me),
a printed image, thread, shaving cream paper (on the back), all on a
gessoed book cover that was about 8 inches by 10 inches (20,32
centimeters by 25,4 centimeters).
Now it's time to share your own Second on the 2nd. The rules are quite
simple and everyone is welcome to join the fun look back. All you have
to do is bring back a post that you are especially proud of, or perhaps
one you shared before anyone knew your blog existed. Any post, any
genre, any artistic endeavor is acceptable, as long as it's been published sometime in the past. Then link below (direct links only, please) and Bleubeard and I, along
with other Second on the 2nd friends, will be by to visit.
Today we welcome a new and very talented first time host toArt Journal Journey. Meet the incredible Tracey of Hotchpotch Creations. Her blog is called New Beginnings.. Creating in my Corner. Tracey has chosen What is the meaning of for her theme this month. I look forward to playing along. I learned I was quite literal with this theme.
For me, the question is
What does it mean when rust forms?
Just look at all that gorgeous rust.
In case you can't read this:
Rust is a naturally occurring phenomenon when steel and iron are exposed to oxygen and water over time.
Other metals may corrode, but there's an actual chemical change when rust occurs.
I even remembered to add the date this month.
For this page, I started with 110 lb. cardstock that I rusted. I have
several tutorials on rust in case you want to know and understand the
process. I then took another page that was rusted darker and used it as
the mat for the words I computer generated, then rusted, although I
didn't leave the words in the rust very long because I was running out
of time. Thank you beyond belief for
visiting today. Tracey, Chris, Erika, Valerie, Yvonne, Bleubeard and I
are delighted you joined us and hope to see you this month at Art Journal Journey with your own take on The Meaning Of. We
welcome art journal pages that meet the size requirements, altered book
pages, canvases, loose or stand alone pages, and digital art. We do
not allow cards, index cards, ATCs, or ATCoins.
It's summer and I want to start dyeing fabric and paper again. I also want to create some rusty fabric like I'm about to show. Many of you have seen at least one of these two posts, but I want to begin by saying I want to make it abundantly clear that you must NEVER, EVER, EVER handle rusted fabric or paper without gloves until it has been neutralized. Please play it safe. Your blood hemoglobin will love you and you will be saving your health. Having said that, I have two posts I want to share with you today. The first is from August, 2014 and I only show the rusting, not the finished project. I call it
Shibori Dyeing Experiment
I got it in my head to try a new shibori experiment. Shibori dyeing is a
way to fold, shape, and secure the fabric prior to dyeing it. In the
past, I've used plastic poles and PVC pipes to wrap the fabric that I
dyed using various inks, sprays, and dyes. Incidentally, tie-dyeing is
considered a form of shibori dyeing.
For this experiment, I replaced my plastic poles with my large rusty
container I found a couple of years ago in my neighbor's dumpster, and
replaced my dyes with vinegar. Additional supplies include a long strip
of recycled bed sheet, a plastic bag, and disposable gloves I wear
anytime I'm working with rust.
TIP: Always wear gloves (preferably disposable) when working with
anything rusty. Never touch the rusted piece with bare hands because
the rust will enter your skin and mess with the hemoglobin in your
blood. Leave the gloves on through the entire process.
Like my regular shibori projects, I wrapped the fabric around the rusty part,
saturated the fabric with vinegar, then placed the entire assembly inside a plastic bag
that I tied tight,
and stored it upside down in the sun.
Four days later I opened the bag and removed my rusted shibori dyed
fabric. Those are rusty leaves that were inside the metal disk that I
didn't notice till I removed the fabric.
Be sure you wear disposable gloves
while you unwind the fabric. Isn't it lovely? Much more subtle than I
had hoped, but better than I expected. I'm so glad I tried this,
because it gives me another tool in my rusting arsenal.
Take the fabric (this is a thin cotton/poly blend) to your favorite
sink, add warm water and baking soda (I use about 1/2 cup to a half
filled sink, but this isn't rocket science, so more or less of either
shouldn't hurt), swish the fabric around in the water/soda mix, then
allow the fabric to soak in the mixture for a few minutes. If the fabric is extra rusty, you may need to perform a second baking soda/water rinse. Once the water runs clear, you can now remove your disposable gloves. The rusted fabric is now safe
to touch. Rinse completely, then hang to dry, or dry in your dryer.
This project was completed over four days. This is not a quick project,
since rust dyeing depends on the heat and humidity levels of your
area. It's not a project you can start and complete in a day. I hope
you enjoyed this experiment. I hope to have a few more before summer
runs its course.
For my second experiment, this is the post I created in March, 2016 I called:
A Rusty Update
As promised these are the results of my latest rust dyeing experiments.
For those who don't remember what I rusted, I decided to show the pieces
before I pulled everything apart. The first rusty tin can
practically fell away from the fabric as I was removing it from the bag,
but everything else was still intact. For some reason, I don't show
the completed paper I rusted. Maybe it is because I was a bit underwhelmed by it all.
As an aside, if you rust PAPER, in order to stop the rusting process and
make it safe for you to handle the finished piece, please use a sealer
of some type. It could be a purchased sealer, a fixative, or cheap
aerosol hairspray. For fixing fabric, of course, you know I use baking
soda and water. And I always wear disposable gloves until after the final rinse or until after BOTH sides of the paper have been sprayed and dried.
It took a bit of manipulating, especially since most gloves I buy are too big for me, but I finally got the rusty wire off
this pipe.
I was shocked, yes SHOCKED, when I opened the fabric that I had wrapped
steel wool around a tin can. I had a horrible mess to clean up, even
before I could soak the fabric three times in baking soda water.
Of course, the end results were well worth the effort because they were truly amazing.
This (and the photo above this one) are from the pipe.
This is from the rusty can that hadn't been held in place with wire.
And this fabric is from the can that had steel wool wrapped around it. Each very different, yet all beautiful in their own way.
Although Second on
the 2nd is normally open for five days, this link will close Monday
afternoon at 4 p.m. when I post our first T party in August. Since my Mr.
Linky is a free
membership, I can only post one link at a time.
Now it's time for you to link your second look on the 2nd. The rules
are quite simple. All you have to do is bring back a post that you are
especially
proud of, or one you shared before anyone knew your blog existed. Any post, any genre, any artistic endeavor is acceptable. The only condition is it must have been published sometime in the past. Then
link below and Bleubeard and I, along with other Second on the 2nd
friends, will be by to visit.
Remember to share something from your blog that you showed previously. Be sure the
link goes directly to your Second on the 2nd post and not your blog in
general.
June is complete and July is ready to be written in. This month the stamps I used to embellish the page were all about holidays and vacations.
I had to improvise for June 30, because I always fill the square out at the end of the day. As for June 29, when I was ready to scan the page, I realized I had written something I shouldn't have that involved the youngsters. That's why I wrote "private" and covered up what I could with a sticker.
July is ready to be written in, and it looks like we are going to have a tea party.
I'm also joining Halle at Halle's Hobbies, who has been an excellent host this month at Art Journal Journey. I have really enjoyed her theme Words to live by, although it has tested my ability and pulled me out of my comfort zone. Since it's the last day of the month, this will be my final Words to live by entry for Art Journal Journey.
I saw this quote and all I could think of was my journal page had to be over the top.
I grabbed items from my cast offs and scraps. I even considered taking a few balls of thread from my "bird nest fodder" box.
I have no idea where I saw this quote and no idea who said it. I just knew I had to use it in my final entry this month.
Simplicity is the removal of the useless and the unnecessary.
Everything from handmade (made by me) to rusted paper were sewn to the substrate.
Corrugated cardboard and items left over from old swaps complete the entry.
I started with 110 lb card stock that I spritzed with my handmade shimmering mists. Once the page was dry (and severely buckled), I began the assembly. Once I liked the composition, I sewed everything in place, including the sentiment I spritzed with copper handmade shimmering mist. Once again, I failed to notice my bobbin thread was gone, so I put in a new bobbin and carried on using different variegated threads.
Thanks for visiting Bleubeard and me today. There are still a few hours remaining to join us at Art Journal Journey
with your own art inspired by Words to live by. And I want to thank Halle for doing such a good job hosting this month.
This post got such a good turnout the first time I showed it, I thought I would share it again. In case this is your first visit to my blog, every year from April 1
through April 22, which most people call Earth Day, but I call
bEARTHday, I feature something I recycle. Actually, this was my first ever Second Thursday Tutorial. It's very fitting because this is also T Stands For Tuesday, even though I'm a bit early. If you are also sharing T day, feel free to add your link below, along with your Second on the 2nd post. If they are the same, please link to InLinkz. However, if your Second look is NOT also a T Tuesday post, please link to both InLinkz and Mr. Linky. If you are here for T Stands For Tuesday ONLY, please link only to Mr. Linky.
This is a post about rusted tea dyeing, and I repeat it in its entirety below. Please be aware, although it may look the same, this is NOT the same tea I sun dyed last Tuesday.
Second Thursday Tutorial: Rusted Tea Dyeing
Welcome to my first ever Second Thursday tutorial, where I will create a
new tutorial each second Thursday of the month. I hope it is helpful
to some of you. Once it goes live, you will find it on my Tutorials Page under Rusted Tea Dyeing.
Some of you remember this photo from T this past Tuesday (Ed note:January 11, 2016). Something I
didn't mention then, but will now, is I wrapped one of the tea bags
around the handle of the container, thus keeping most of it out of the
water. The other 11 tea bags were completely submerged in hot water.
In case you missed the post, you can find it here.
As I pointed out in the T post, green tea has tannins, large quantities, in fact. Tannins in green tea bind to iron, something
I thought might be helpful when rust dyeing fabric.
As with all my tutorials, I'll begin with the supplies I used (from back left clockwise):
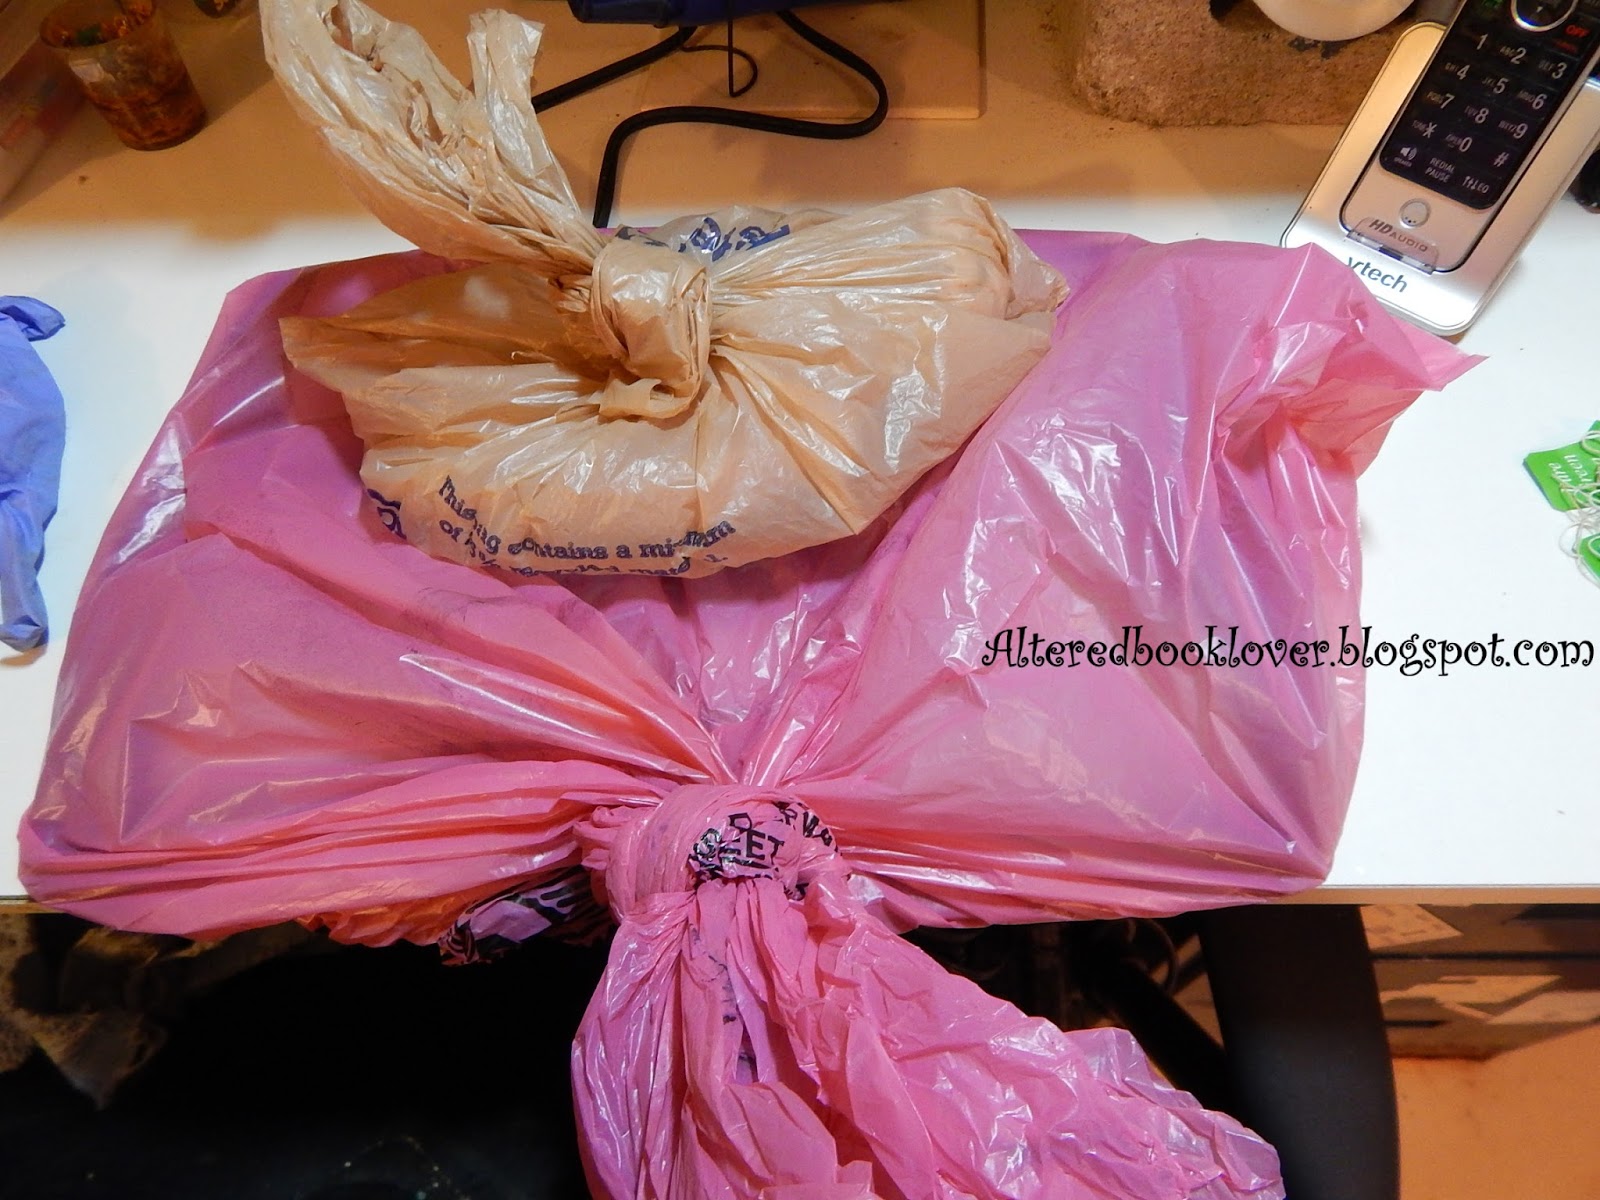
Pink plastic bag (used to cover the table and self-healing mat)
Empty plastic bag
Distilled vinegar 5% (I got this FREE at my local Household Hazardous Waste Swap and Shop, but any vinegar will work)
Bag of rusty chain
Container of pre-rusted bits (that I didn't use in the end)
Three pieces of dry cotton fabric, torn to size from old bed sheets
Container of day old tea and tea bags
Gloves to protect my hands from rust that could get under my skin
Rusty bits to choose from
With one glove on, I added eight intact still wet tea bags to the dry top fabric.
With both gloves on, I laid the extremely heavy rusty chain over the fabric and around the tea bags.
I covered the tea and chain fabric with the other half and hid the chain
under the fold. Then I tried to roll it up, but realized that wasn't
going to work. I had to rethink the action, so
I dug out my rusty cookie sheet I keep tightly wrapped in plastic and
proceeded to try to move the chain and tea covered fabric to the cookie
sheet.
Of course it didn't work, so I had to reassemble everything once the
fabric was spread out on the cookie sheet. Yes, that chain is every bit
as heavy and cumbersome as it looks.
I laid the excess chain on top of the fabric that wasn't exposed to tea
bags and poured a small amount of vinegar over the fabric.
Luckily, I have quite a few pink plastic bags, so I placed the cookie
sheet and its contents in the bag. I also added a tiny bit more
vinegar. Then I wrapped the bag, but I had to remove one of my gloves
because my grip isn't as good as yours probably is.
I used the final four (sounds like college basketball playoffs to me)
tea bags on the second piece of fabric. Note the tea bag at the back
right is the one that was not completely submerged in water. I'll be
curious to see if it makes a difference in the dyeing/rusting process.
I added a few rusty pieces and
rolled the fabric up. I also tucked in the ends, but didn't take a
photo of it. I then placed it in a plastic bag and added a bit of
vinegar.
With no tea bags left, I took some rusty bits with shapes I liked,
added some rust filings
and rolled the dry fabric up around the rusted pieces.
I saturated the fabric with vinegar once it was inside the bag. Then I tied it to keep the moisture inside.
It was now safe to remove my gloves and wash my hands. Since I was
wearing long sleeves, I also removed my clothes and washed them in my
washer after I showered. You can never be too careful around rust,
because it can get in the pores of your skin, or cuts on your hands.
And whatever you do, please don't put your gloved hand anywhere near
your face or eyes. I was hopeful I didn't need the heat from the sun,
which normally activates the rust process. I've never rusted fabric or
paper in the winter before, so this was a new experience.
If you decide to try this technique, all you need are some rusty pieces,
fabric, vinegar, and protective gloves. And PATIENCE, of course. In
lieu of rusty pieces, you can substitute steel wool pads, found at most
hardware and home improvement stores.
In a day or six, depending upon how hot the sun is (or how warm the studio is) where you live,
put on disposable gloves and open your bag to see if the rust has bloomed.
Now is the time YOU are most vulnerable to rust on your skin, so please keep those gloves on.
Realizing the science behind rust made this teabag study even more
enjoyable and enlightening. Not to overstate the science, but I should
explain how these tea bags turned this black color. Remember that green
tea contains huge amounts of tannins, which in turn, bind to iron.
Rust is iron oxide, and for you chemists out there, it is the chemical
Fe2O3, because iron (found in the green tea
tannins) was combined with oxygen and water (or rather liquid from the
tea leaves and vinegar). All I had to do was wait for corrosion to begin. I had
hoped this reaction would occur, but wasn't quite sure until I was able
to test my theory. I admit I never expected this black to emerge,
though.
Of course, I simply wasn't prepared for what I found when I opened the bag with the chain link and tea bags.
Even before it had been washed and cleaned,
this fabric was out of this world.
I confess that rust gets my heart pumping a bit faster, although it's
not because the rust has attacked the hemoglobin in my blood, which is
why I wear gloves, but because I see such beauty in it. It was now
time to rinse the rust out and stop the chemical process.
I did that by soaking and rinsing the fabric in baking soda. I
apologize, I forgot to show a photo of baking soda, but it's the stuff
you use in baking, to keep your refrigerator smelling good, and has
about a hundred other uses. You get it at the grocery store and you can
probably find it at dollar stores, too. I soaked and rinsed three
times, then hand washed the fabric in my liquid laundry detergent. It
was now safe to remove the protective gloves, touch, and dry the fabric.
I admit, I was less than impressed with the fabric that held the metal
filings and lovely shapes. I think it probably could have lived in the
bag a bit longer, since there was no green tea to quickly activate the
rust and there was no sun to heat the bag.
This is the fabric that contained the four tea bags, one of which had
not been completely submerged. I believe you can tell which one was
less effective than the others.
Here is another view of both these fabrics side by side. It's really
obvious which one had tea bags added, and which one didn't. But I'm
stalling, because I wanted to keep you in suspense.
Here is the piece that stole my heart. Not only did the chain produce
lovely effects, what surprised me was how the tea bag "rust" migrated to
the portion of the fabric I placed over the top of the chain.
Although this is NOT a good photo because I tried to hold the camera
above my head and shoot down onto the fabric, you can still see the
patterns that emerged on the side directly exposed to the rusty chain
and tea bags.
Another not especially good photo since I was standing on tip toes and
shooting from overhead, this is the portion that had the chain laid over
the top of it.
I admit this turned out even better than I anticipated and showed what
can be done using green tea bags. So if you don't care for green tea,
this is a good way to rust your fabric using those tea bags you won't
ever use for drinking.
I realize this was an extremely long tutorial, which included the
science behind rust and how the tea bags interacted with it, but I hope
you enjoyed it and learned a bit about it, too. I have never tried
rusting fabric in winter before, preferring to do this outside, where
the bag and the rusty parts can stay until the rust cycle is complete.
However, I needed a quick way to rust fabric and was extremely pleased
with what I got.
Thank you again for sticking through to the end. I hope you found my
first Second Thursday Tutorial informative. I look forward to finding
something for next month's tutorial. Again, I appreciate your
incredibly generous comments and joining me here where art can take many
experimental forms.
Actually, this is Day 2 of 22 in 2018, and I shared a post where I recycled several green tea bags and repurposed a rusty chain and rusty cookie tin to turn them into beautiful rusty fabric.
Now
it's your turn to share your Second on the 2nd. The rules are quite
simple and everyone is welcome to join the fun look back. All you have
to do is bring back a post that you are especially proud of, or perhaps
one you shared before anyone knew your blog existed. It could even be a
post that is as relevant today as it was when you originally posted
it. Any post, any genre, any artistic endeavor is acceptable. Then
link below (direct links only, please) and Bleubeard and
I, along with other Second on the 2nd friends, will be by to visit. Please be aware this link is only open for five days, so
linking on the 2nd is preferred.
Also, please don't forget if your Second on the 2nd post involves a T Tuesday post, please link to InLinkz. However, if your Second look is NOT also a T Tuesday post, please link to both InLinkz and Mr. Linky. If you are here for T Stands For Tuesday ONLY, please link only to Mr. Linky.
If you are here for T Stands For Tuesday ONLY, please link only to Mr. Linky.
<div class="Second on the 2nd button" style="width: 200px; margin: 0 auto;">
<a href="http://alteredbooklover.blogspot.com/" rel="nofollow">
<img src="http://www.halleshobbies.com/secondlook.jpg" alt="Second on the 2nd" width="200" height="200" />
</a>
</div>
Bleubeard and I welcome you
Art, including the journey, background techniques, sewing on both paper and fabric, new experiments, photos, failures, and successes will be shared on this site. I have removed my e-mail address until such time as I can get it to work again. Thank you for understanding. You can always leave a note on my blog and I will visit you.
Please check out my Previous Collaborations link above to see what projects I have been involved in over the past 12 years. Current and ongoing projects only are shown below.
Occasionally, Silent Sunday will showcase photos of my home, neighborhood, or community. A picture is often worth a thousand words.
Feelfree to drop by every second Thursday of the month for my Second Thursday Tutorials. They are interspersed with my other Tutorials found at the link page above.
Click on any lesson you might have missed or want to review
Click on the above image daily and help feed hungry dogs and cats. You can donate cat litter, too. You simply answer two questions (one about cats and one about dogs), and whether your answer is correct or not, you have just donated kibble to help feed both shelter animals and those in need.
I will create the art, critique things I feel are important, and put pen (and sometimes glue) to paper, or fingers to keys, while Bleubeard will mostly watch, supervise, or sleep.
Music that inspires me: my steel drum friend, Joseph Peck


 This was my first ever assemblage made using a book cover for the substrate.
 I
thought this looked like autumn, especially after I colored the white
flowers (yes, they all started white) with yellow pan pastels and brown
walnut ink.
 I
sprayed each flower with a fixative before I added it to the cover.
I'm out of E6000, my adhesive of choice for anything like this, so I
grabbed the hot glue gun and promptly made a mess of things.
 Except
for the very first (and last) photo, these were all taken before I
realized I hadn't cleaned the hot glue strings properly from the piece.
But I'm getting ahead of myself. I started with some autumn fabric and
sprayed it (using a spray adhesive) to the book cover I had gessoed
late last month.
 To
that I added fabric I rusted, some of my handmade paper, and an image
of a young girl I fussy cut. I sewed the paper assembly to the rusty
fabric, then was horrified because the yellow from the pan pastel got on
the rusty fabric.
 Although I eventually noticed the problem, removing all that pan pastel dust
 was a real problem. I also forgot to show the back, which I covered in shaving cream paper I made several years ago.
 One
final look at this first altered book cover after I removed the hot
glue spider webs, but before I got rid of the excess pan pastel dust. I
still need to punch holes to add a wire hanging, but I wanted to show
this before time runs out on that challenge.









 Dollar Exchange Rate