


.JPG)


If you have read the syllabus, you are expecting collage and backgrounds this week. Based on what I've seen in my travels to your blogs, most of you already know how to make collages now that you have created examples of both design elements and design principles.
Believe me, you will have ample time to make lovely collages in the weeks ahead, when we work with magazine images, folded pages, and other techniques. In order to keep your ISP from blowing up, I decided collages could wait.
I am not going to reinvent the wheel this week, either. I have created a host of backgrounds, many I have listed on my "Tutorials" page. So this week I'm going to sit back and let you play. Below I have listed all the supplies you will need for each of these backgrounds and have shown a completed background. I have also provided a link to each of these tutorials, so you can visit the ones you have supplies for. Now I realize most of you won't have supplies for all these backgrounds, and you may not even want to create some of them. I know I don't have a lot of the supplies many of you have. But I hope you will try a few of these. They are, for the most part, low cost alternatives to pricy backgrounds that some of you are used to making.
For those of you who may not know, a substrate in altered book or paper terms is the base material. It can be card stock, scrapbook paper, junk mail, watercolor paper, book pages, or any paper that is used underneath everything else
Alcohol and Acrylic Background
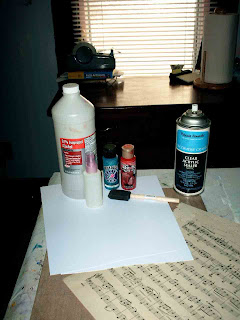 I learned about this technique I call "alcohol and acrylics don't mix" when I accidentally spilled some alcohol I was using to clean stamps on an altered book page.
Supplies I used:
Craft sheet or other protection for your work surface
Your favorite substrate (I used card stock and vintage sheet music)
91% rubbing alcohol (don't use 70%, it simply doesn't work)
Mister bottle
Acrylic paints, cheap, your choice of colors
Foam brush (although I ended up using a credit card)
Clear acrylic sealer (optional)
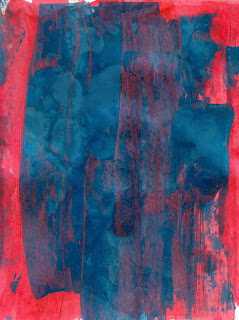 You may need to view the original post in order to see the lovely bubbles you get from this technique.
Bubble Background
 Even if you don't have any paint or reinkers, you can make this background using food coloring.
Supplies from left:
Shallow bowl of water
Dawn dish washing liquid (this brand seems to produce the best effects)
Food coloring
Straw
Substrate of your choice
 Here is how I made these.
Cling Wrap Backgrounds (or Overlays)
 These are easy as long as you have an iron and a craft sheet or parchment paper.
Supplies from upper left:
Various fibers and threads
Cling wrap, heavy duty
Craft sheet or parchment paper
Iron
 They can be used as backgrounds or overlays. See how I made them here.
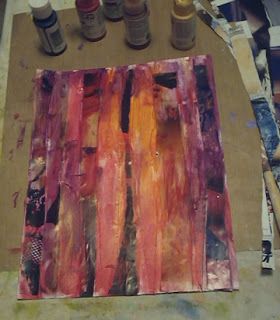
Cling Wrap and Acrylic Background
 These were a lot of fun to make. After I made them, I had an ah-ha moment for those of you who don't have cling wrap. I realized I could use those plastic bags we in America get every time we go to a store.
Supplies from lower left clockwise:
Substrate (I used 12 X 12 heavy white cardstock)
Craft sheet and/or plastic to protect your work surface
Plastic cups (shown with paint in one, water in the other)
Cling wrap (or use plastic grocery type bags)
Cheap acrylic paint
Mica powders (optional)
Foam brush
Not shown: rubber gloves and paper towels
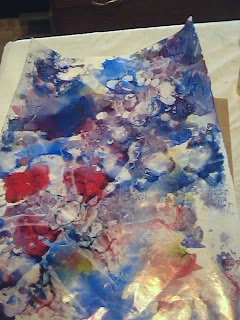
 Probably one of my favorite backgrounds from this technique. You will probably have to go here to enlarge it in order to see all the texture I got.
Melted Crayon Background
 I made two backgrounds, both using crayons. These are the supplies I used (from left):
Warming tray
Iron (I didn't use it)
Heat tool (optional, I didn't need to use)
Foil, preferably heavy duty
Crayons, preferably Crayola brand since they have more pigment
Substrate such as card stock (not shown)
Dress pattern or tissue for second background (not shown)
Beeswax for second background (optional, not shown)
 Although I originally planned to include beeswax for this background, here it is using crayons only.
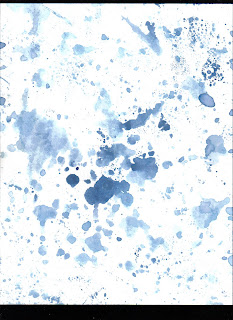
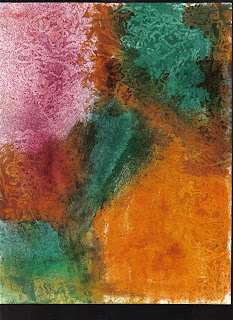
Freezer Paper and Alcohol Ink Backgrounds
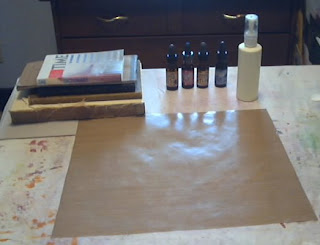
 Here is what I wrote about this technique back in January, 2010:
This is a technique I first demoed in April, 2009. I'm bringing it back because many people followed Tim Holtz's 12 tags of Christmas posts. In one of his posts, he made the comment that you could not use photo paper with AIs because it stayed sticky, but needed to use glossy paper. Since glossy paper is not always available, and since it's rather pricey, here is a low cost alternative to both photo and glossy paper. As an aside, you can tell how new and clean my vinyl table covering is in this photo. I can assure you, it isn't that pristine now.Supplies:
One of my students in my AB 101 online class (ED note: the class I taught before, not this one), Beverly W., came up with the concept behind this fun background. Of course I had to try it, since it fits with my idea of finding alternatives to high priced materials. Beverly doesn't have a web site, but I appreciate her allowing me to use her idea.
Freezer paper
Alcohol Inks (AIs)
Blending solutions
Scissors
Craft sheet or some way to protect your work surface
Optional: rubber gloves
 Isn't this a great alternative to those high priced papers you may or may not own? And there's enough freezer paper left over for at least a thousand projects!
Grunge Backgrounds From Ugly Scrapbook Paper
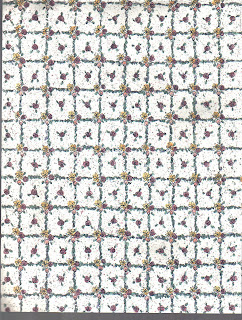 Although I didn't give a supply list for this tutorial, I showed how I changed this ugly background
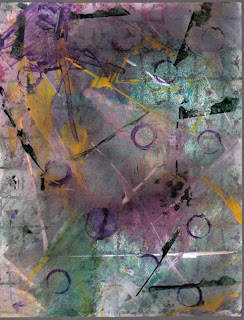 into this. You can see how I made this first background here.
I did provide a supply list the second time around.
Supplies I used:
12 X 12 sheet of scrapbook paper, or any substrate of your choosing
Various paints and glazes of your choice
Gift, old credit, or hotel key cards (be sure they are plastic because the paper ones don't work well)
 Not much help on the supplies, but the results were similar to the first background. And you will get a couple of ideas of how to change that ugly background paper into something you can use in your altered books, art journals, or even on your scrapbook pages.
12 X 12 sheet of scrapbook paper, or any substrate of your choosing
Various paints and glazes of your choice
Gift, old credit, or hotel key cards (be sure they are plastic because the paper ones don't work well)
Not much help on the supplies, but the results were similar to the first background. And you will get a couple of ideas of how to change that ugly background paper into something you can use in your altered books, art journals, or even on your scrapbook pages. Masking Tape and Magazine Image Backgrounds
 This background should appeal to those of you who have been saving magazine images, or who have scrapbook paper you have no idea what to do with.
Supplies I used:
Substrate (I used 140 lb card stock)
Magazine images torn into strips
Alternately, you can use old maps, ugly scrapbook paper, or book pages.
Masking tape (I used 2" permanent so I could tear it easily)
Glue of your choice
Fluid acrylics, colors of your choice
Foam brush (or brush of your choice)
 I was quite happy with the way this page turned out.
Napkin, Glazes, and Rubber Stamp Background

 I suspect you will like this background technique if you are a stamper.
Nevr-Dull and Magazine Image Background
 A bit of Nevr-Dull wadding and a few magazine images are all you need for this background technique.
 Here is the tutorial I made one Sunday.
Oil Pastel and Gesso Background
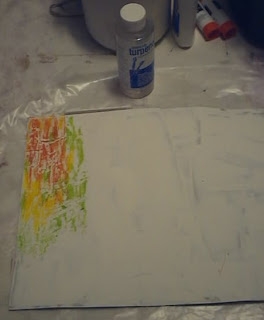 All you need for this background are some oil pastels, turpenol (a turpentine substitute), gesso, and a substrate.
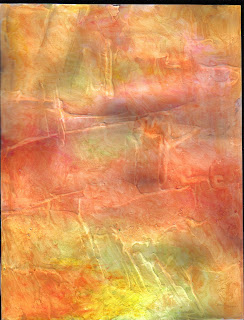 You get something like this when you have blended the oil pastels and the turpenol. Backgrounds are gorgeous and full of texture, too. Incidentally, I read somewhere that baby oil works as the blending agent, but since I have no baby oil (or baby for that matter), I've never tried it.
Paste Paper Backgrounds
 I've made this background many times, but showed it twice. I included various substrates to see how each reacted to the paste.
Supplies I used the first time are from upper left clockwise:
Cups for mixing
Cheap acrylic craft paint
Sta Flo liquid starch (found at discount stores, drug stores, and supermarkets in the laundry section)
Various papers and substates
Credit cards cut using decorative scissors
Foam brush
Knitting needle
Bamboo skewer
Rotary cutter for cutting pie crusts
Comb/pick
Pastry cutter
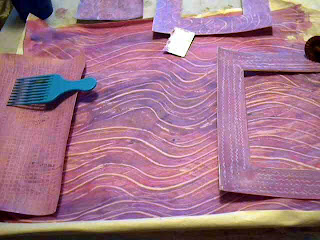 As you can see, the first time I used mostly items that can be found around the house, or that I made, to mark the lines on the various substrates.
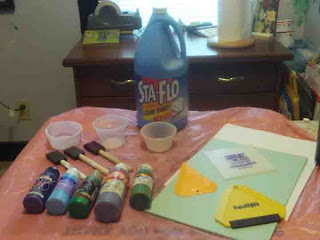 The second time I wasn't quite so original, staying with purchased tools and paper.
Supplies (clockwise from lower left):
Various cheap acrylic craft paints
Foam brushes (or whatever old brush you want to use), one for each color
Plastic cups (one for each color)
Sta-Flo liquid starch (found at discount stores, drug stores, and supermarkets in the laundry section)
Various substrates (I used 110 lb white cardstock and 140 lb green cardstock)
Various tools that will create lines (I used purchased ones, but you could cut up old credit cards, use bamboo skewers, combs, anything that will create a line or pattern)
Protective Sleeve and Reinkers Background
 Supplies:
Dye reinkers
Card stock (CS), or substrate of your choice (2 sheets that will fit the size of your sheet protector)
Clear protector sleeves (mine are 3 ring sleeves)
Scissors
Craft sheet (optional to protect your work surface)
Not shown: Brayer (optional if you have one)
 You can see how I made these here. Please note that unlike the next background, you can use any dye reinker for this project.
Reinkers and Craft Sheet Background
 Those of you who are Tim Holtz fans probably already know about this technique.
Supplies (from left to right):
Various book pages
Card stock
Distress ink reinkers
Water in a spritzer bottle
Heat resistant craft sheet
 Here is one sheet I made using this technique. See the full tutorial here, if you have never made this background. Apparently if you use anything other than Distress Reinkers this technique doesn't work (at least according to Tim Holtz). I've never tried anything else, so I am no help.
Rusty Pages for Backgrounds
 Here is how to make rusty papers.
Supplies:
Paper (I prefer plain, but also included some book pages)
Rusty flat pieces (nails, screws, cut metal, anything with a nice pattern)
Pizza pan or cookie sheet (well rusted with a lip)
Vinegar
Latex or other protective gloves (don't rust anything without using these)
Large plastic bag
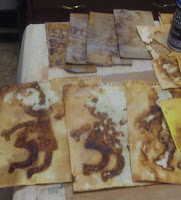 The finished pages are here. Be aware I also sprayed these pages with fixative after they were dry.
Shaving Cream Backgrounds
 Materials:
Shaving cream, cheap and not gel
Paper: various weights and colors, book pages, photographs, most papers will work
Shallow pan (I used a cookie sheet)
Reinkers (I used both dye and pigment inks, but the pigments gave me problems)
Tool such as a pick, comb, faux credit card cut with decorative scissors, or knitting needle
Faux credit card
Something to cover your work surface
Place for papers to dry
 These are like eating potato chips. You can't make just one. I got really carried away, as you will see here.
Smoosh and Twist Background
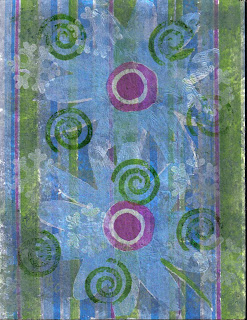
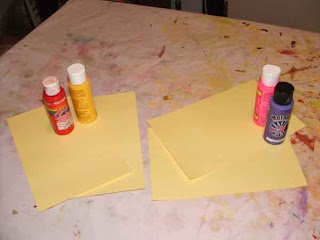 One of the easiest backgrounds I know starts with two identical cuts of paper and two colors of acrylics. See how easy it is to make it here.
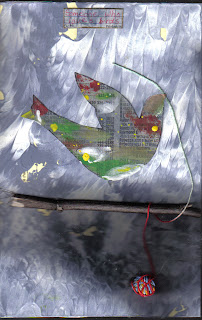 Then see the results you get when you use this background.
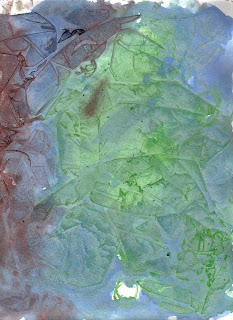
Solvent Ink (Staz-on Reinker) and Alcohol Backgrounds
 This is my "go to" background when I want a background that stays completely flat and doesn't curl or bend out of shape.
Supplies clockwise from bottom left:
Substrate (I used 12 X 12 heavy white scrapbook paper)
Plastic cups for mixing91% denatured alcohol
Staz-on reinkers (I used Mustard, Red, Lime, Purple)Color wash (I used Bottle)
Various CHEAP acrylic paints (I didn't use)Cling wrap (not used because it was not the tutorial I originally planned)
Foam brushCraft sheet and/or plastic to protect your work surface
Not shown: water, paper towels, and rubber gloves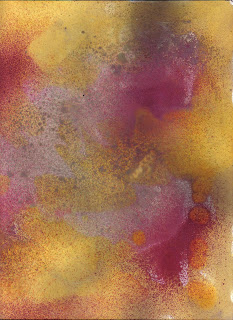 One of the final backgrounds.
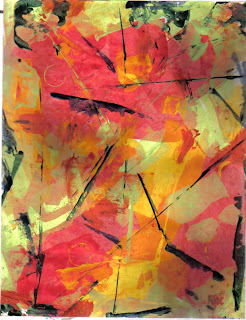
Turpentine and Magazine Images Backgrounds
 I made this project three times. See here for the first time in 2008,
 then again in 2009, and finally
 in 2010. It was about that time my friend Halle sent me some Citra-Solv. I have yet to try it, but I hear it works just as well, if not better, and there is NO horrible smell. However, you can't get around the results. They are superb when you use enough turpentine.
Supplies I used every time:
1967 or any National Geographic Magazine (must be Natl' Geo, because the pages are clay based)
Pan for turpentine
Turpentine (turp)
Foam brush
Butcher paper
Plastic bag to cover the table (since I made these outside every time)
Paint and Tyvek backgrounds
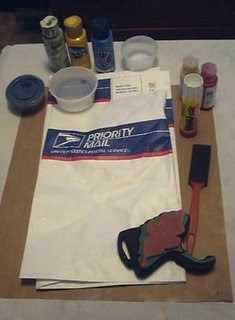 Supplies from top left:
Paints (cheap acrylic)
Water
Fluid acrylic
Pots to mix acrylics in
UHU Original Glue Stic or stick glue of your choice
Tyvek (used postal envelopes*)
Foam brush (or brush of your choice)
Rubber or foam stamps of your choice
Craft sheet or other waterproof material to protect your work surface
Not shown: Staz-on black ink, gesso, corrugated cardboard
*When I created this tutorial, USPS's tyvek envelopes did not have interior writing! That is a recent upgrade, since I suspect they realized some people were using them for art.
 Here is one of several pieces I created and shared.
I happened to be a "UHU gluer" when I created this tutorial, which was an Earth Day post requested by UHU glue.
Glue, Scrap Paper, and Paint Backgrounds

Materials from left:
Pre-made backgrounds (made in same post)
Inexpensive acrylic paints (alternately you can use fluid or tube acrylics)
UHU Stic Original glue stick or glue stick of your choice
BrayerAs noted above, I happened to be a "UHU gluer" when I created this tutorial, therefore the tout for UHU glue. However, any stick glue should work.
 Here are the completed backgrounds.
Watercolor and Leafing Pen Resist
 Materials:
Supplies from left:
Cardstock (or substrate of your choice such as watercolor paper, tags, printer paper, book pages, not shown)
Krylon Silver Leafing Pen
Krylon Gold Leafing Pen
Krylon Copper Leafing Pen
Artist Paint Brush (not foam)
LuminArt Twinkling H20s, at least 2 colors of your choice (or watered down acrylics and mica flakes)
Water
Craft sheet or something to cover your work surface
 The finished pieces and tutorial are here.
Wax Paper Resist
 Instructions for making this one are here, as is a wonderful image that will enlarge to show the texture you get.
Materials you will need (since the instructions are a bit light):
2 sheets of substrate (I used card stock)
Sheet of waxed paper larger than your substrate and crinkled
Various colors and brands of color washes
Iron
Craft sheet or ironing board
Instructions:
1. Spritz both sheets of CS.
2. Place first piece of CS on your craft sheet or ironing board colored side up.
3. Crumple waxed paper and lay on bottom CS.
4. Place second piece of CS on your craft sheet or ironing board colored side down.
5. Using a hot iron, press and hold for three seconds.
Review:
I have shown a few ways to create backgrounds. Many if these can be made directly in your AB, or they can be made using the substrate of your choice and added to your book using the glue that best fits the substrate.
I'm not sure how "acid free" the paint and other supplies I used are, but I believe I warned you in Lesson 1 that "acid free" is not a concern to ABers.
Assignment (totally optional as usual):
I'm hoping now that all theory is complete, more of you will want to join the bi-weekly challenges. These backgrounds are so, so much fun to make, so it should be a fun assignment for you.
Create at least two backgrounds from the ones I showed, OR one of your favorite backgrounds I have not shown. If you are creating your own background, be sure you show what supplies you used and how you made it, so we can replicate it, too. The more backgrounds you create, the more you will have to play with in your AB.
Supplies you will need for Lesson 10:
Magazine images
Your imagination
Your AB
Now it’s time to show us your interpretation of Lesson 8 where you played with magazine images, paint chips, and the like to make your very own color wheel. Please remember to show your homework assignment when I ask for it. You have two weeks to post Lesson 8's assignment (your color wheel and how you played with paint), but I suspect many of you are ready. And please be sure the link is to the specific post or posts, not to your blog in general. And I want to thank all of you for turning off that annoying word verification. You are the BEST!! I've only seen it on a few blogs lately.
You may also post ANY previous assignments here. If you are showing any assignment prior to Lesson 8, just add the lesson number after your name, please.


21 thoughtful remarks:
No matter how I try I forget to add the lesson number, so sorry Elizabeth! Mine is for lesson 7 and 8, but you have already seen it anyway! Wowzers, there are a lot of tutorials to visit, and ideas to formulate with this lesson in backgrounds, there are a few I have been wanting to try and some I have never heard about so I am looking forward to this challenge! waving hi from the hills of North Carolina :)
...Elizabeth what an amazing woman you are, an absolute font of knowledge!...I have very much enjoyed going through this tutorial posting...Mel :)
Thankyou so much for pointing out my spelling error I corrected immediately, daft thing was the bottle was right there in front of me too! :)
whoa, you've put in so muuch work int this post., dear E...thank you so much!!!!
Hi Elizabeth, just popped on to your site quickly before I start the housework! Loads of backgrounds to try, and this is just what I need, however after my admission on my "colour background" page I wonder how many I will actually try - LOL. I'll do my best to find a couple which are right for me. Best thing I have learnt on my quick overview is that I can make the background seperately and then stick it to my page. Excellent as I was having alot of bother with inks showing through the pages. BJ
Hi Elizabeth, thank-you so much for providing so much info again, where on earth do you find the time my lovely?? I am still working on lesson 8 and will hopefully be able to share my colour wheel at least before the next lesson goes up, not sure about any other colour spreads but am hoping to find some time. I had a major blast of inspiration for lesson 7 that I just couldn't ignore, I hope you approve??
Hugs x x x x
You have done it again, Elizabeth! A ton of very useful information. Thanks. I need to add a section or two to my colour wheel and I'll be back to post my link. All this colour is grteat for this last week of grey and rainy! lol
You are a true teacher at heart. I'd forgotten about some of those backgrounds. Awesome post.
Oh my goodness! So many backgrounds to choose from, where to start? Loving the lessons and the practical homework. Hope to offer many examples of the techniques. My lesson 8 is just posted on My Linky. Off to play with paint and paper.
This is such a reference! So many great background ideas here! The masking tape and magazine is just screaming to me! I am a bit partial to masking tape...THANKS for such an overflowing post!
Elizabeth!
UN-bE-lEivE-aBLE!
you are a wealth of information! Always!
so many techniques, so many new ideas i must try.
thanks for all the work you put into this post. what a great reference.
Good grief woman! I need a bigger book to try all of these! Some I've tried and liked before but there are LOTS of new ones - this will either be lots of fun or lots of frustration....I may try some of them outside my book and tip them in if I like them. (is that cheating?? :)) I'm woefully out of sync with my lessons so think I'll go do my color wheel right now, RIGHT NOW and post it, then move on to some of these fab backgrounds. Thanks for the amazing amount of work you're putting into this - we love it!
Wow! There are so many ways to make a background! Your tutorial is more than complete. I hope you don't mind if I send a link to a friend who is an art teacher -- such a treasure trove of info. This makes digital photography look so easy!
ooops! I had to do my colour wheel over but it is up and running now.
This was an awesome post! I had a lot of fun today! Thank you for posting!
Your Lesson 9 has left me speechless Elizabeth...well done you!!!
Seems to me you could write a book on the Lessons you have shared thus far!
Thanks so much for all of the time and energy you are putting into sharing...pretty darn amazing!
oxo
Wow! This post is just full of fun backgrounds and tutorials to explore! Since I will be out of town for the next 2 weeks--I may have to try them as I continue along. Again, thank you, thank you, for all your work in putting this together!
You certainly provided a background for everyone. I'm curious now, do these backgrounds get glued onto a book page or done as a tip in or...? Even though I'm not able to do a book at the moment I'll certainly be giving the backgrounds a try, they would be useful for so many projects.
Darla
I got the rest of my homework up and linked, Elizabeth. I'll use my reading glasses next time. lol
I love shaving cream backgrounds ( many a happy hour spent with JoZarty) , but totally enjoyed using the simple, but effective gesso and stencil jobbie this weekend too...
Well I have done a few experiments with some different background ideas, like the smoosh & twist and the napkin background. I don't have a lot of the chemicals that were used in some of the other background types. But after a lot of experiments, I still like a good old gesso'd bookpage with some images glued on as my favorite basic background!
I am in awe of your site and just love how beautifully you explain everything and on top of it all include all that is needed to enable us to create something that we want to keep. I am just a beginner and have spent many hours studying various websites but this is the best. Thank you so much for sharing your knowledge with us. Wow. A huge wow.
http://unfinisheddreams.blogspot.ca/
Post a Comment