


.JPG)


"Failed to Publish" is back. One minute I could leave comments, the next I couldn't. It started late Wednesday and Blogger continues to reject my comments. My sincere apologies.
I have to admit that up until this post, everything I've created in the past has been something someone else did before me. Even the assemblages are not new concepts. Only the materials are different. Today, however, I can truthfully say, I am sure this is my own creation. This is actually a Second Thursday Tutorial and I posted it on April 14, 2016. Here it is in its entirety.
Using Sharpies to make bakers twine
It's the second Thursday in April, and time for a post dedicated to a
tutorial. It's also Day 14 of 22 days of recycling, repurposing, or
rethinking a project.
 My supplies are:
Sharpies, because I already had them
Index cards I found while going through a drawer in my office
Embroidery thread that was given to me
I knew I would never use the thread under normal circumstances, so instead of letting it go to waste in my craft room, I decided to put it to good use. Since I had already purchased and paid for the Sharpies several years ago, I thought it was time I put them to good use again. After all, craft supplies that "go bad" are a waste of money, and that always makes me sad.
 The
first thing I did was cut two slits at opposite ends of the index
cards. I then wound the thread around the cards. This took forever, but
it was worth it.
The
first thing I did was cut two slits at opposite ends of the index
cards. I then wound the thread around the cards. This took forever, but
it was worth it.
 I
took one Sharpie and drew lines along the length of the wrapped thread,
as shown above. I turned the card over and repeated the process.
I
took one Sharpie and drew lines along the length of the wrapped thread,
as shown above. I turned the card over and repeated the process.
 The next color I used was red.
 I did the same with orange, drawing vertical lines on both sides of the card.
 Next
came green, but I don't think you need to be reminded again. After
all, it's very tedious, yet boring work. I found that if I held onto
the thread as I was drawing a line, I got a better line. If I didn't,
the line seemed to meander off course.
Next
came green, but I don't think you need to be reminded again. After
all, it's very tedious, yet boring work. I found that if I held onto
the thread as I was drawing a line, I got a better line. If I didn't,
the line seemed to meander off course.
 Although
I had a few colors I didn't use, I was out of index cards and didn't
want to cut old file folders and wrap more thread. I had already spent
nearly five hours doing this. Like I said, tedious and boring.
Although
I had a few colors I didn't use, I was out of index cards and didn't
want to cut old file folders and wrap more thread. I had already spent
nearly five hours doing this. Like I said, tedious and boring.
 After I finished the lines, I was mortified to think the ink had bled through to the back. Upon closer inspection, I realized
 I
was looking at ink from the opposite side. Although it had bled
through the index card, it didn't affect the thread on the opposite side
of the card. The good news was, the Sharpies penetrated both sides of
the thread, so no matter which way the twine was twisted, the color
would still be the same.
I
was looking at ink from the opposite side. Although it had bled
through the index card, it didn't affect the thread on the opposite side
of the card. The good news was, the Sharpies penetrated both sides of
the thread, so no matter which way the twine was twisted, the color
would still be the same.
Now this tutorial has gone live you will find it on my Tutorials page under Making bakers twine using Sharpies.
For Day 14 of 22, I repurposed some embroidery thread I will never use for its intended purpose, and turned it into bakers twine, a product I have found to be either inexpensive and inferior in quality, or rather expensive but made with quality twine.
Thank you for your visit and if you decide to make some bakers twine from my tutorial, please let me know and I will feature it and you on my blog
 My supplies are:
Sharpies, because I already had them
Index cards I found while going through a drawer in my office
Embroidery thread that was given to me
I knew I would never use the thread under normal circumstances, so instead of letting it go to waste in my craft room, I decided to put it to good use. Since I had already purchased and paid for the Sharpies several years ago, I thought it was time I put them to good use again. After all, craft supplies that "go bad" are a waste of money, and that always makes me sad.
 The
first thing I did was cut two slits at opposite ends of the index
cards. I then wound the thread around the cards. This took forever, but
it was worth it.
The
first thing I did was cut two slits at opposite ends of the index
cards. I then wound the thread around the cards. This took forever, but
it was worth it.  I
took one Sharpie and drew lines along the length of the wrapped thread,
as shown above. I turned the card over and repeated the process.
I
took one Sharpie and drew lines along the length of the wrapped thread,
as shown above. I turned the card over and repeated the process. The next color I used was red.
  I did the same with orange, drawing vertical lines on both sides of the card.
  Next
came green, but I don't think you need to be reminded again. After
all, it's very tedious, yet boring work. I found that if I held onto
the thread as I was drawing a line, I got a better line. If I didn't,
the line seemed to meander off course.
Next
came green, but I don't think you need to be reminded again. After
all, it's very tedious, yet boring work. I found that if I held onto
the thread as I was drawing a line, I got a better line. If I didn't,
the line seemed to meander off course. Although
I had a few colors I didn't use, I was out of index cards and didn't
want to cut old file folders and wrap more thread. I had already spent
nearly five hours doing this. Like I said, tedious and boring.
Although
I had a few colors I didn't use, I was out of index cards and didn't
want to cut old file folders and wrap more thread. I had already spent
nearly five hours doing this. Like I said, tedious and boring. After I finished the lines, I was mortified to think the ink had bled through to the back. Upon closer inspection, I realized
  I
was looking at ink from the opposite side. Although it had bled
through the index card, it didn't affect the thread on the opposite side
of the card. The good news was, the Sharpies penetrated both sides of
the thread, so no matter which way the twine was twisted, the color
would still be the same.
I
was looking at ink from the opposite side. Although it had bled
through the index card, it didn't affect the thread on the opposite side
of the card. The good news was, the Sharpies penetrated both sides of
the thread, so no matter which way the twine was twisted, the color
would still be the same. Now this tutorial has gone live you will find it on my Tutorials page under Making bakers twine using Sharpies.
For Day 14 of 22, I repurposed some embroidery thread I will never use for its intended purpose, and turned it into bakers twine, a product I have found to be either inexpensive and inferior in quality, or rather expensive but made with quality twine.
Thank you for your visit and if you decide to make some bakers twine from my tutorial, please let me know and I will feature it and you on my blog
.


 Supplies from lower left clockwise:
 Create a wash by mixing 1/2 water and 1/2 acrylic paint. Don't use
expensive paints, since you are watering them down, anyway. This is one
time when cheap is better. At this point, you can add mica powders. I
used a metallic paint on this sheet, so didn't need the mica powder.
Work quickly and make sure there is lots of wash on the page.
Create a wash by mixing 1/2 water and 1/2 acrylic paint. Don't use
expensive paints, since you are watering them down, anyway. This is one
time when cheap is better. At this point, you can add mica powders. I
used a metallic paint on this sheet, so didn't need the mica powder.
Work quickly and make sure there is lots of wash on the page.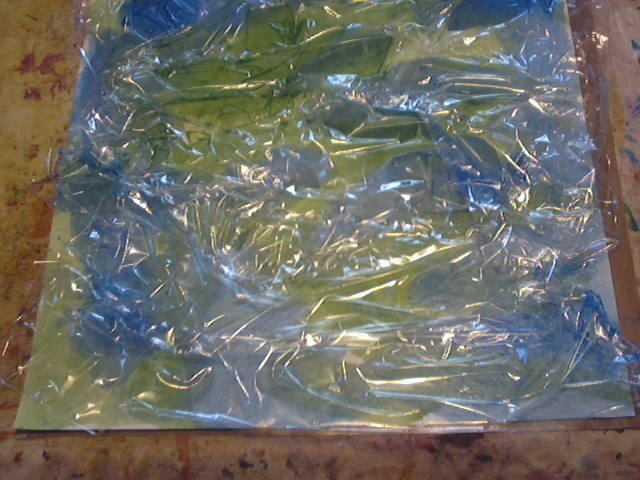 Lay the cling wrap on the wet paper.
  If you haven't crumpled it enough, you can still push and twist the cling wrap at this point. Set aside to dry. Walk away until you are sure the page is dry.
 You can also press the cling wrap with your hands to assure good coverage.
 One of my two favorite pieces happened by accident. This background
was made using pink paint and water only. I reused some of the cling
wrap and thought I had used the clean side, only to find out that the
copper paint from the previous background had transferred to the page.
What a gorgeous accident I created. If only you could
see the true beauty of it.
One of my two favorite pieces happened by accident. This background
was made using pink paint and water only. I reused some of the cling
wrap and thought I had used the clean side, only to find out that the
copper paint from the previous background had transferred to the page.
What a gorgeous accident I created. If only you could
see the true beauty of it. My other favorite background used green, blue, and copper colored
acrylics. The colors sort of bled together in the process and created
this stunning piece.
My other favorite background used green, blue, and copper colored
acrylics. The colors sort of bled together in the process and created
this stunning piece.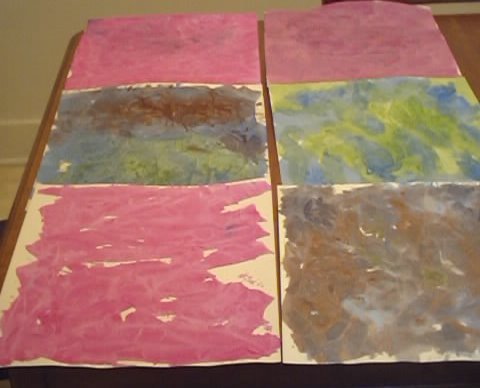 Here are all the pieces I created using this technique. I could have
made more, but I ran out of room to dry them. It's a small craft room
and I had no place to put them outside to dry. The scanned images above
are the top and middle pages in the left column of this photo. The
middle and lower pages in the right column are the ones I demoed above.
Here are all the pieces I created using this technique. I could have
made more, but I ran out of room to dry them. It's a small craft room
and I had no place to put them outside to dry. The scanned images above
are the top and middle pages in the left column of this photo. The
middle and lower pages in the right column are the ones I demoed above.










 Dollar Exchange Rate



