


.JPG)


1) If you have a question, please ask in the comments. I will answer your question to the best of my ability on YOUR blog. I never expect a person to return to my blog to read an answer to your comment or question. Life is too short for you to have to come back to my blog just to see if I have said something in the comments, which, by the way, I will NEVER do.
2) I know many of my International visitors are part of WOYWW. Therefore, I have seen your work desks. What worries me is a few of you (not a lot, but some) keep your computers in the same room and on the same desk that you keep your craft supplies. PLEASE be careful when you start using paint and/or gesso around your computers. Although stamping can get messy, it is NOTHING compared to paint and gesso. They truly ARE messy. So I would like to suggest that you set up a separate area as far away as possible from your computer. I don't want anyone getting gesso in their keyboards!!
Now that is out of the way, let's get on with the lesson. I'm not sure that my blogger font and photo issues have been resolved, but I'm hoping they have been.
This week we will be gessoing the outside of our non-cloth books, creating new end pages for the front, and creating a niche in the back. There is nothing to say you can't create your niche first, then gesso your cover, then create your inside front page. Or, you can create the front page first, then your niche, then prep the outside of your book. However, these should all be finished before we go on to Lesson 4. In what order you finish them is your choice. This is going to be one busy two weeks!!
Lesson 3
Prepping the outside cover of your book
Prepping the inside end pages
Creating a niche
Prepping your outside cover
 If you have a cloth bound book, you will probably not want to prep your book cover using gesso or paint. Also, if you want to use the title of your book, you may not want to gesso it. It's all up to you.
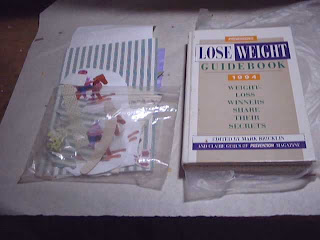 However, you can see how I do it when I have a cardboard type cover, especially if it has a slick finish. For this book, I created my niche first.
 This is the book I am using for my Rocking Horse AB and you can see where I have the niche sectioned off and completed.
Here it is after several coats of gesso. As I mentioned before, if you plan to use the book title as part of your cover, you will not want to gesso it. Also, if you have a beautifully decorated book exterior, feel free to skip gessoing the book cover. Remember, there ARE NO RULES!

This is the book I'm using for Techniques. For this book, I chose to fortify the inside end papers first, then

 I love using old books I got while getting my Bachelor's Degree. We had to rent these books, so when they were outdated, the University put them in the Student Union for anyone to take. Even back then, I was into freebies. Of course, when I got to grad school, we bought our own books and they were mostly ones from my field of study. Some I still use, but most can go into the alterable pile. Guess it's time to actually show how to prep a cover, even though this book is for a completely different project.
 Materials:
Book cover that you want to alter.
Gesso (or your favorite replacement)
Brush to spread gesso (preferably foam)
Sander or sanding block
Tack cloth or any soft cloth (Not shown) Sand the cover using either a sanding block or an electric sander. The electric sander gives a smoother finish. The goal is to knock off the shine such that the sanded book will no longer have a shine or luster. Note how I used a hand sanding block directly under the "introductory readings." The mouse (electric sander) didn't remove the sticker, so I did, then hand sanded where it had been. The advantage to using an electric sander is that it gives a much smoother finish (and doesn't hurt your hands). However, a block sander or a piece of sandpaper, can be used in lieu of an electric sander.
 When sanded, use a soft lint-free cloth or tack cloth to clean the book cover.
 Apply at least two coats of cheap gesso or one coat of expensive gesso to the outside of the book. This is why a foam brush is a better choice for painting the outside of your book.
 I do NOT suggest decorating the outside of your altered book until the very end, but I know some people like to finish their cover first. The advantage to waiting is your cover stays pristine. Plus it gives you time to decide how to decorate the cover, or find that perfect object to place on the outside.
Remember, only gesso your book cover if you are not using the cover as part of your cover design.
Reenforcing your end papers and inside cover
 Several well known AB artists subscribe to the belief that you should reinforce the inside spine of your book by prepping the book ends. I noticed on the ones I didn't reinforce, they were beginning to pull away from the signatures. Since we are making a niche, you only have to prep the inside front of your book. Begin with whatever decorative papers you choose, and completely cover the book end and the first page. Pay particular attention to the spine area. That is the part you want to protect.
 For the above book, I used some hand painted paper towels I got at the gasoline station. They are found where you get the squeegee to wash your car windows, and are the perfect weight for this project. And of course, they are FREE!

 If your book is anything like most, including most school books, the next two pages are connected just outside or beyond the spine. The back of the first page that you have just covered is attached with some type of glue or paste to the next page, which leaves this bit of a bump in your book.
  The page the "bump" is attached to is next to a page that goes all the way to the spine. Be sure to cover it either in full or in part as I did when I prepped my Hands AB. I used a gauzy paper, but mulberry paper is great for this, as is HVAC tape (the silver tape you get at the hardware store), and of course, so is tyvek.
 This is my rocking horse book and it is also the same. The second page of the book is glued to the first
  and I have used some of my handmade paper to reinforce the "bump."
 The inside cover of my rocking horse book already had a bookplate. I tried desperately to remove it from the book, but the glue was too strong and I ended up ripping the book plate.
 Here you can see I added handmade paper and two pages of embossed rocking horses I colored to accentuate the dry embossing. I hope my handmade paper will be as strong as tyvek, the paper towels, or mulberry paper.
My Techniques book just had to be different. Unlike all my other books, including all my school books, some school decided to glue the first pages of the book to the end papers. I tried to show that in this scan, by finding a corner that was not completely glued and turning it under. Therefore, the only end page for this book and any book like this, will be the one attached to the inside book cover.
Old USPS tyvek envelopes didn't have all that writing on the inside. I was shocked when I cut into the envelope, only to find this writing.

Several coats of gesso and paint were required to get the words covered. But in the end, I love the strength tyvek provides.

And I was able to paint the end piece and glue it in place with no problem. For the left side (the inside cover), I used Elmers white glue. For the right side (glued over a page), I used a glue stick.
Creating your niche
 Supplies from left clockwise:
 Wax paper or "Press and Seal" (preferred)
gel medium
old paint brush
clamps or clothespins
rubber band
self healing mat or thick corrugated cardboard
cutting tool with removable blade
ruler
object to go in niche
book, either altered or unaltered
Not shown: 2 sheets of coordinating paper (scrapbook or painted by you)
Please note that I added the niche to this book before I gessoed the outside. If your book has limited pages, you may have to skip making a niche.
 Measure the tallest point of the object to be placed in the niche.
 Measure that same amount of pages (do not include the thickness of the book cover), then add about 1/8 or 0.125 inch (0.3175 cm) more, for your block of pages which will become your niche.
 Place a rubber band around the excess pages and bend the book all the way back, thus causing a nice crease in the book. This will help hold the pages up when you start gluing. DO NOT do this if you already have pages in the book that have been altered. Allow me to repeat: SKIP THIS STEP if your book already has altered pages. However, you should be starting with an undecorated book, so this should not be a problem.
 Place "Press and Seal," wax paper, or freezer paper between the last page of the book and the inside back cover. I use the wrap because for the next to last step, I usually clamp the glued pages (niche) to the cover and I don't want glue to get on the back cover during the drying stage. Then, I hold the glued block of pages (niche) upright, so they don't shift or get distorted, or dry in the wrong place relative to the back cover.
However, I found that when I started with an unaltered book, it was easier to stand the block of glued pages straight up and keep the pages I had banded flat. That means I didn't need the cling wrap, or any other substrate that would keep the block of pages from sticking to the cover. But since that was the way I had always done it, I continued to use the "Press and Seal." The choice is yours. You can skip this step if you like.
So, the general rule of thumb, when making niches like I do, is to use the instructions as I've photographed them if the book is unaltered. For any book that might already have pages that have been altered, use the "Press and Seal" as shown above, follow the instructions until it comes to drying, then clamp the pages to the back cover and support the altered pages, keeping them at a 90 degree angle from the table.
I have to admit, if there's any way you can make your niche before you decorate any pages, like hopefully we are doing, you'll have a much easier time.
 Secure the excess pages with a rubber band, allow the remainder of the pages to go free, and stand the book on one end.
 Place one clamp toward the top of the outer edge of these un-banded pages, as shown in the photo. Using an old paint brush, run the gel medium along the entire top edge of the book.
I like to save my gel medium for special occasions because it is so costly. This happens to be one time gel medium is the ONLY thing I have found to work properly. Wet glues like Elmer's or dry glues like glue sticks, just don't do the trick. However, you only need a small amount, so a small jar of gel medium should get you through the entire course.
 Make sure you have good, even coverage of the gel medium. If necessary, smooth with your fingers.
 Remove the clamp (or clothes pin, if you have no clamps) from the side that held the pages together, and place enough clamps along the top so it is secure. If you get too much gel medium in some areas, the clamps will cause the gel medium to ooze out. Remove the clamps, smooth or remove the excess gel medium, then reclamp. If you don't have enough gel medium, the pages will separate and not stick together. Remove the clamps, add more gel medium and place your clamp over that area. Check to make sure you have covered all the pages.
 Now that your top is glued and secured with clamps, turn your book 90 degrees and add one clamp to the bottom corner (top right in photo) for stability. Run gel medium along the outside edge of the block of pages.
 If you click on the picture for a larger view, you will see a bit of gel medium has spilled onto the front of the niche. Also, the gel medium on the edge is not even. Use a brush or your fingers to smooth out the gel medium
 Use a paper towel to clean any excess gel medium from the front and to smooth the gel medium along the edges. If you allow the gel medium to harden, it will leave a blob that you might have to sand after it has dried.
 Remove the clamp from the bottom edge and clamp the side of your pages. To achieve a good bond, make sure the clamps are close to the edge and not clamped too far down the page. It is now time to also secure the pages in an upright position. I knew my coffee mug was good for something more than holding coffee!
 Clamp the bottom of the book block and give it a final inspection before the gel medium begins to dry. If any of the clamps are causing bulges, unclamp and move, or add more clamps to correct the problem.
 Note how the corners as well as the area closest to the spine are well clamped . Allow to dry at least overnight.
 When your block of pages is completely dry, remove the clamps, keeping the pages straight.
 Apply gel medium a second time. This time the block of pages will be easier to handle, since they are now a single solid block.
 It's hard to see, but there is a bubble directly under the "e" in the word "bubble." This signifies you have missed a portion of the niche that has not been glued in place.
 Be sure there is ample glue in that area, then clamp directly over the bubble.
 Try to clamp in places you didn't clamp before so the outer edges don't end up with ripples.
 Once your block of pages (now known as the niche) is dry, remove the clamps and place a self healing mat between the back cover and block of pages. Remember, I wrapped the cling wrap around the back cover, but you will not need to if you are able to keep the front of the book upright (perpendicular to the niche) during the gluing process.
 This shows the block of pages, self healing mat, cling wrap, and back cover in that order.
 Clamp the block of pages to the back cover, making sure to catch the self healing mat in the clamps. Check that the rest of the book pages stay perpendicular to the niche.
 If you want to put your object behind a window, you will need to remove the first page before the niche (block of pages) and clamp it to the block of pages. I chose not to enclose mine, so I put the page back under the rubber band. By not gluing the block of pages to the back of the book, you will still have the option to cut a window from this page from the back, if you change your mind.
However, for the Hands AB I made for the other class, I used that technique, so I will show you how that is done when we get to that step.
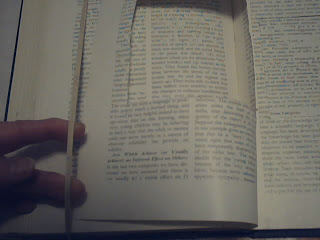
 Place your object on the page in its final spot. Using your ruler or a straight edge, draw lines for the window. Leave enough room for your object to fit comfortably in the niche. Remove the object and begin cutting, one side at a time. Be prepared to change your cutting blade, if and when it starts to rip the pages.
 Note how I broke my own instructions when I cut the niche in my Hands AB. After I glued all the pages together, I first drew the lines for the niche
  and began cutting without adding the clamps to hold the mat in place.
 If you will be enclosing your niche with a cover, cut through the page that is not attached and the first few pages of the block. The idea is to cut a few pages just to establish the size and placement of your niche.
 You can see, I've just started the cutting process. Remove cut pages as you go. It will be much easier than if you saved them till the end.
 Once the entire window is cut in your one loose page, get it out of your way by slipping it under the rubber band. I did not use this step in my rocking horse book, but I wanted to show you the option.
 As you can see, I'm about half way through the window in the niche. To get square corners, I first cut one line (say the top line) one direction, then turn the book and cut the same line the other direction. That seems to keep the corners square, at least for me.
 I'm finally through to the self healing mat. This process can take a long time, so don't get discouraged. You will probably have to change your cutting blade at least once, maybe more depending on the depth of your niche.
 One of many arguments for not gluing the niche to the back cover before cutting it, is that you can really clean up the edges and the corners. Although the irregularities aren't as noticable after you have your decorative papers glued on, if you really want
  When you feel your cuts are smooth, apply gel medium to the window. If there are some ragged edges, the gel medium will help level them out. Rotate the book, so the loose pages are now on the table and the niche is now perpendicular (or upright) to the table.
 This is the trickiest part of the entire process, because you have to fiddle and adjust the clamps until they fit in the window without distorting it. Be sure to get into, or close to, each corner, and as close to the edge of the window as possible.
 Make sure you keep the niche in an upright position while the window is drying.
 When completely dry, remove the clamps, repeat the gluing and clamping process, then allow to dry overnight.
Before you ask, I got these clamps as a gift from my neighbor, who told me she got them at ACE Hardware, a national chain of independent hardware stores found in the US. I have NO idea if they are in other countries, but I suspect if you look for clamps at your big box hardware/home improvement stores, you will find them.
 When everything is dry and all the clamps have been removed and put away, remove your "Press and Seal." Glue a sheet of paper to the back inside cover of your book. In the photo above, it is the dark green with white dots. Then wrap a sheet of coordinating paper around the top, outer edge, and bottom. Glue in place. It is the white paper with green dots. If using a wet glue, you can place clamps around the edges, like you did when you created the niche, so you can hold the paper in place. Now you will want to hold the niche flat and the rest of the book upright until the glue on the decorative page has dried. Then glue the entire niche to the inside back page of your book. Insert your object in place using appropriate glue. For the rocking horse, I used E-6000.
 This is an example of a double niche I created for my Money AB. The top window has a covering on it, the bottom one does not. It was not necessary to glue the coins in place, since they were covered (think shaker card for those of you who scrap or make cards). If you are creating a closed window like the one in the top, be sure to add your overlay before adding your cover to the page. An overlay can be cut from a transparency or a piece of clear plastic from your recycle bin.
You can see I decorated the back cover (in a pale pink) before I glued the niche in place, thus giving it a finished look. Although it's hard to see in this view, I wrapped the decorative paper around the back of the niche before I attached it to the back cover.
As an aside, I want you to know that I have used only gel medium to create this niche. You saw the gel medium in several of the above photos. I have barely made a dent in the jar and I have made three niches so far! Gel medium lasts a LONG time, so a small jar is all you will need unless you are richer than sin and use it for gluing everything.
I realize there is a HUGE amount of information to take in this week, but you can perform these three tasks in any order.
In review:
1. If you have a non cloth book or a title you don't care about using, sand and prepare your cover for painting by applying a coat or two of gesso or other product that will create tooth. If using the cover title as part of your theme, do not apply gesso.
2. Cover the inside of your first page and front end paper using some type of decorative strengthening paper as suggested above, that will protect and stabilize your book ends.
3. Create your niche using gel medium per the photos and instructions.
Supplies you will need for Lesson 4:
Two types of glue: a wet glue and a dry glue. I suggest you use Elmer's (a wet glue) and your favorite glue stick (a dry glue). For this lesson, you will not be using your ATG,
Gesso
A good foam or bristle brush

Leah has designated March as mixed media month. I see this as a perfect opportunity to expose persons visiting CED to altered books, which couldn't get much more mixed if they tried!!
Don't forget to show the results of your second lesson (prepped pages and supplies you have accumulated) via Mr. Linky below. Please be sure your URL points to your specific post and not simply to your blog. And thanks go to each and every one of you for playing.


40 thoughtful remarks:
wonderful tutorial Elizabeth! best description of cutting a niche that I've seen. can't wait to see what everyone does in your class...
Ooooh the niche... I am really looking forward to that bit!! I need clamps... I know I have some at home in Scotland which isn't really very practical for here... so I guess I need to go shopping!!
Lovely tutorial... will need to read it through again... and great photos.
(Pssst, sorry I jumped the gun on the cover... it was sitting looking at me... I at least resisted making a big hole in the pages though!!) ;)
Can't thank you enough for the time and effort you've put into this. It is soooo helpful. A massive efort on your behalf... and VERY generous.
I love the look of niches - thank you for sharing such detailed step by step directions! Now I just need more clamps...don't think my 2 will do it...
Awesome tutorial ~ lots of creative and enduring energy here ~ thanks ~namaste, carol (A Creative Harbor)
Great tutorial ^_^
A beautifully written tutorial Elizabeth...I definitely need more clamps though!!! :D x
Hey Elizabeth...I am here to catch up...I havent seen you or your art work in a while....I love this tutorial. I may be having more time to create soon...I definitely am going to make one of these books they way you do!!!!!
Very thorough as usual, Elizabeth. Perhaps this Wed. I can work on my book. Thanks
You make it all look so easy Elizabeth - the sign of a great teacher. I'm going to start mine tomorrow and will post a link then. Thanks for all the information - and I need more clamps as well, may have to raid Mr B's modelling cupboard.
Oh my word Elizabeth, what a comprehensive tutorial, you DO make it look easy, and I know it's lots of work just to do that. Thanks soooooo much. xox Corrine
What a wealth of information. Thanks for all the work you did to get this posted. I'm going out of town for a week (starting Wed.) so I'll be behind but I'll try to catch up when I return.
Darla
Meant to say 'start on this lesson' as have already done the 'tearing' out bits. Have added my link to my prepped pages and supplies post.
How exciting! Your photos are clear, your descriptions clear and helpful - I can't wait to get started! I'm telling everyone about this class - you're so generous to be sharing your knowledge and I want you to have the widest exposure possible! Thanks again!
Well written instructions, but I think I am going to need a new ink cartridge, LOL. Haven't even been able to get out of house to find a book yet, so as said before, I will be way behind you all. I have picked a theme though. I love to find beautiful trees with unusual shapes - so trees it is. Going to Selby Gardens the 23 and they have a wealth of ancient Banyon/Mangrove trees, and more. Plus a wonderful tree just down the street, so out comes my camera. You are so generous of your time and talent. I know it must take a very long time to do a single tutorial, and it is definitely appreciated.
Wow, this is embarrassing to admit, but I am stressed over this book! I read everyone's comments about how clear the instructions are and I think to myself, I am really dumb. I had to read the signiture part in lesson 2 like 5 times before I could figure that out! The niche is terrifying me but at least I don't have to gesso the outside cover as mine is cloth! So, mind if I clarify something?...are we going ahead and decorating the inside of the cover and first page too? Or just reinforcing? waving hi from the hills of North Carolina :)
Wow! You've added quite a bit to this lesson! Looks great. I actually got out my AB from the class and did a page over the weekend. :)
Well, that all looks very easy (doh!)
Actually you make it look easy.All I have to do is think of what to put in the niche.
I have a cloth cover, so what are we going to do to it if we don't sand and paint it. I realise that is probably another lesson but just wondering briefly
Wow. I popped over from CED2012 and now I want to try altering books. I have wanted to do it but never knew how. Now I know you as a resource. YAY!
I loved finally learning how a niche is made!
ha ha ha ha ha, I already have an altered keyboard, I once super glued the keys... I have since learned to move the keyboard a safe distance away... ( but clearly not far enough to avoid spray paint) you are the most thoughtful guide, and a wonderful teacher. I have thinned my book, and will be preparing my niche over the next two weeks, you are so right about the need to reinforce the spine I have needed to 'repair' round robin altered books that have pulled away at the front or back on many occasions, and often worried that i may not have chosen quite the re-enforcement that the owner would have used given their own free choice. Sage advice indeed.
dx
i haven't decided what to do with my cover but one thing is sure, i need to go get some clamps! thanks for this tutorial, Elizabeth!
Elizabeth... yep.... it's me!! I have a question regarding Gel medium. I have never used it! :( I always opt for Mod Podge because it is sitting in the cubby next to my desk. OK... so my question is which type of gel medium do I use on the niche section? Chris bought me a box with various gel mediums and molding pastes ages ago so I have the following: GOLDEN Soft Gel Medium, GOLDEN Regular Gel Medium, GOLDEN Heavy Gel Medium. They are only 2 fl oz tubs so I am hoping that there will be enough of the right one!! I'm still sourcing my clamps... Chris is home tomorrow and he will take me shopping on Friday to see if we can find them.
Thank you for these excellent instructions! I'm excited to get started and have everything but the gel medium which I will pick up tomorrow with a coupon. I hope to have my photos link up soon, too!
I am a few days behind but hanging in. Can I blame solar flares? How about unseasonably warm temps. I have been "playing" outside.
Looking forward to seeing how the others are doing.
Hi Elizabeth, Your instructions are great! Very informative and detailed. I do like that there are no (or very few) rules. BTW, my computer is nowhere near my messy workspace ... it's actually in another suburb! Really.
Hi Elizabeth,
Obviously far too keen and stuck my niche pages together before taking a photo. No problem, I got out my torn out pages and took a photo of it all with the pegs in place on my drying pages. I have ended up using Glue'n'seal and will let you know how it fairs.
Thanks BJ
Well, how am I for tardy?!!
I've just finished this lesson, but can't link pics..definitely have to have an Apple shaped geek look at my ipad...there are things about it which I consider not working - they'll probably say it's not meant to!!
Loving your thorough and patient and totally suits me lesson, you make me very unafraid to break a rule. Closet rebel!!
Hi Elizabeth!
Now my niche is cut and glued. It was easy to make with your detailed instructions! Thank you so much for this class!
Now there are pics on my blog.
Amazing series. The amount of work you put into this is extraordinary. Thank you!
Hi Elizabeth, Well I didn't seem to have an trouble with using my Inkessentials Glue n'seal for my niche. I found a silver glittered snowflake for my item and have since covered the block with snowflake paper. I have added photos to my blog on the same posting as linked here. I'm really loving my book so far, thanks for the lessons. BJ - off to sort out front section now..................
I am starting to make my niche. I did not need as many pages as I originally put aside, and I was wondering if we need to thin out that section, too? Thank you.
I have takne the plunge and linked the "story so far"!!
Elizabeth - forgot to ask - what is an ATG?
Looking forward to the next lesson - 2 weeks is just right btw. BJ
hi elizabeth,have made my niche and covered and prepped the covers but unable to link my blog to mr linky?
here is a link to my blog anyway
http://craftyspider.blogspot.co.uk/2012/03/woyww-and-my-altered-book.html
thanks for your tutorials,am having fun,x
I have a question about supplies- Is gloss medium the same stuff as gel medium? The guy at the store said it was but I don't entirely trust him becuase he also said they didn't sell gesso and I found it on the shelf right next to the gloss medium he gave me, lol
A few day free of work and study and time to AB. I've made 3 niches,they are in the progress of glue-ing (I don't know if thats a word), prepared my left inside cover. I don't know my theme yet. I would like to just put everyting interesting in it.
Mr. Linky won't let me add so here's my link:
http://marikocreations.blogspot.com/2012/04/altered-book-lessons-1-2.html
Where Mr. Linky says "you are next" it won't let me click on it, I can click on other peoples links. Am I doing something wrong? Let me know by email please,I am registered on Linky's site and logged in.
I have sanded and gesso'd my cover, and my niche block is drying overnight. I haven't picked out anything to put in it yet, but I'm sure I'll find something. Need to wait until tomorrow to do the next step on the niche. So far, so good!
Thanks for all the information - and I need more clamps as well.
HVAC SEO
The association was also invited to attend a reception at the Empire Club of the NYGOP, which was hosted by Chairman Edward Cox. A representative of the DCU MBA program was also in attendance. For more details about manifestation of education, visit this site right here.
Post a Comment