Darcy, our gracious host at
Art and Sole, is once again kind enough to add my link to this month's Artful Readers Club list. For some reason, I keep hoping I'll somehow be able to see the links, but that has not happened.
This month I'm reviewing
-
ISBN-13: 9781600611889
- Publisher: F+W Media, Inc.
- Publication date: 11/26/2009
- Edition description: Original
- Pages: 128
- Product dimensions: 8.20 (w) x 10.80 (h) x 0.60 (d)
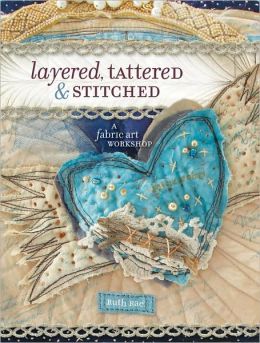
This is what the book looks like on my workbench.
In fact, after my friend Kathy left me a bunch of books and magazines a couple of weeks ago, I now have two of them. Although the cover colors are a bit different, the contents are the same. And one of them could be yours!
Even though the images on the front are beautiful, the back was what drew me in. Those of you who visit my blog regularly know that as a rule, I never cut my fabric. Any time I can tear fabric, I'm a happy camper. That's why I've always said I am not a seamstress, but a crude sewer, who tries never to measure anything. So I knew this book was for me when I saw the words "tear, burn, stitch."
As with most books of this type, the author, Ruth Rae, begins with a table of contents.
She then explains the types of tools and supplies you will need in order to make the projects in this book. I'm glad I know what most things are, because there are no photos to aid you.
One of the things Rae recommends is to buy either white or natural colored muslin by the
bolt.
I suggest you save your money and buy old cotton bed sheets at thrift stores. They work just as well for any project in this book. And they can be painted, dyed, stenciled, etc., just like muslin without the high price. I should caution though that it is difficult to know the thread count of thrift store bed sheets, and some can be quite thread bare when you buy them. So be sure to feel the sheets before buying. Stains don't matter, but thread count does.
Rae begins by showing how to make a card from scraps of fabric and stitches.
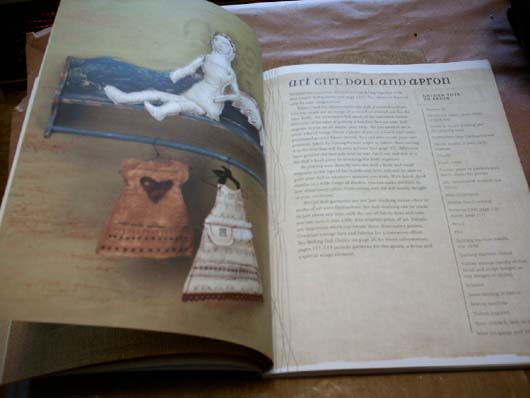
Next, she shows an art doll and doll dresses.
You might think this would be my inspiration piece, but I assure you, I have no desire to make doll dresses.
That is because I participated in a monthly Dress Up project in 2010, and you can see each month's entry by scrolling down a bit in
Previous Collaborations, one of the categories found at the top of my blog.
I was enthralled by this ancestry album, but I need a lot more time to find just the right images and ephemera before I tackle anything this intense.
One of the things you will see is me making gift mailers sometime in April when I focus on repurposed/recycled products and projects. I have no idea what masking paper is, but I will use red rosin paper. In fact, it will be the same paper that is protecting my work surface below this book and craft sheet at this very moment.
It looks like an easy project, but at the moment, I have nothing I need to wrap.
Although I don't wear jewelry, I liked the idea of a wrist cuff, something I must try one of these days when I figure out a way to add the enclosures without using hand stitching, something I am simply incapable of doing. (As an aside, I was born with a rare form of arthritis, and am unable to grip a needle)
I saw this darling gift cone and thought it would make an excellent gift for my dear friend Sally. I can make it, put it on her door on May Day, and surprise her with something sweet or flowery from my garden.
I've burned felt and transparencies, and even overheated tyvek before, so this was not a new concept to me.
One thing I look forward to is working with a piece of plexiglass, since I have some in my garage.
I enjoyed reading about how to make this wall hanging,
and may create a few banners for my friends who live far away. Of course, if they live in the UK, I will make them a bunting (which, my dear non-British friends, is the same thing)! It looks like a project that would be light enough weight to mail without breaking anyone's bank. I can also see it as a collaboration project, with all the letters created in different sizes and fonts.
The book concludes with several pages of templates, including a dress pattern.
Did I enjoy the book? It took me twice through before I felt comfortable reading Rae's instructions. Although they were clear, I thought she left out a few steps, or didn't explain things I read the first time around. However, I can look at most photos and know what I'm supposed to do. I love to read the written word, but I'm also a visual learner when it comes to art. So, the second time around I appreciated the book far more.
I didn't have to look far to find inspiration, either. Although this book was a journal made with blank pages,
and Rae hand sewed all the stitching, you can tell I was happy to see this beauty.
As I said before, although Rae used only white blank pages in her journal, I began mine by sewing red, white, and pink pages with minutia and scraps, and turned two signatures into 96 pages once the 24 originals were folded in half.
Next I found an old, old tyvek envelope (which was free from the US post office) and decided to color it
using various shades of pink and red distress reinkers.
I decided to add a bit of blue to make purple after all the red was on the page.
Next, I made the spine using a piece of fabric I used throughout the cover. I was quite impressed with this, since I have no feed dogs and no free motion ability on my machine.
When the tyvek was dry, I cut it to size for the inside cover. I added two pockets, one of which is a used hand wipe I got free at the grocery store. I colored it in a watered down pink wash. It is large enough to hold minutia, bits of ephemera, and notes. The other pocket will hold pens or pencils.
Next I created the outside cover. In all truthfulness, this is the second one I've made. Remember how I said I don't like to measure? I also don't like to cut, but you MUST cut felt, because there is no way to tear it. The first cover was big enough for an elephant to live in, so I had to save it for a different project.
The original white felt turned pink was made using pink fluid acrylic and water, a recipe Rae provided. I also used the left over paint to color another piece of tyvek that I cut into hearts. Originally I planned to burn the hearts, but decided that didn't exactly fit with the LOVE theme. For the back, I added more fabric and a dictionary definition of "Lover."
Next, I sewed the two signatures into the book.
Back in January, I made another one of these books, and several people asked how I attached the signatures. You can see I sewed them into the book using my sewing machine and a zipper foot. I simply DO NOT sew by hand!! I realize this is not the best photo, but the page you are seeing is a thin sheet of vellum, over which I've added two hearts I cut from security envelopes. The images that are barely seen are on the next page, which is pink with green ephemera.
This is a picture of the spine area and front of the scrappy journal.
And finally, a picture showing the various red, pink, and white pages I used that make up this LOVE journal.
By now, I'm sure you are bored to tears, but I didn't want to leave out any parts. Did you remember I said YOU could win the other "Layered, tattered, and stitched?" All you have to do is leave a comment on THIS POST anytime between now and our next ARC, which will be April 26. I know some people don't always post the day the ARC comes out, so I want to give everyone a chance to win this book. I would give it 4 out of 5 stars, which says a lot for me. And before you ask, I will ship anywhere in this world. I can't ship to Mars or Venus though! And if you win, I'll notify you by leaving a comment on your blog.
As a bit of an early tease announcement for those of you who visit or follow my
blog on a regular basis, and for those of you who normally just visit here
once a month, beginning Monday, April 1, I'll offer 22 days in which I show how to
rethink, reduce, reuse,
recycle, re-invent, recover, restore, or repurpose something in order to save it from the trash. It all leads up to Earth Day, or "bEARTHday" in my world.
I'd also like to add another "R" word, one you don't see with the other Rs. That word is respect: respect for our planet, respect for trash as art, and respect what you as an artist can achieve. That leads me to ask you to respect other ARC members by visiting their blogs, too. And don't forget to leave a comment on this post if you want to be included in this giveaway.


.jpeg)


.JPG)


44 thoughtful remarks:
Great book review. The book looks like it has lots of inspiration in it. Love the book you made : D. My daughter says I hoard trash. I say no, the trash is in the trashcan. These are art supplies lol.
Love your review Elizabeth, it looks like a very pleasant book to browse through for inspiration.
Your journals are gorgeous, with your own inimitable style as always.
Hope you are well my lovely??
Huge hugs x x x x
Love your stitched book and the fact that you used it up, love recycling too. I have that book you are reading and some of the projects are quite wonderful, that ancestry album is enthralling....thanks for the review. xox
Nice review...very in depth. Thanks for the chance and the second book. :)
Thank you for the review :) I think I NEED this book! lol Really..been wanting a book like this so thanks for the chance to win.
I have that book but guess what, I was thinking about selling it back to Amazon! Now, I think I had better take another look. I really like your book and the techniques you've used from the book. Sometimes it takes some one to show me what I've missed! Thanks.
The book sounds lovely! Not to much thinking, lots of creating!
I love, love, love your scrap-love-journal!!! ♥♥♥
I want to make one... NOW!!! :)
Thanks for the wonderful review!!!
Great book review but an even better tutorial on how you make your scrappy journal. I haven't felt creative lately but you make me want to get my sketchbook out.
Darla
thanks for your in depth review of what looks like a great book - and your generosity in offering your extra copy as a giveaway. The book you made inspired by the book ( :) ) is fabulous!
You had me at "Respect" and then I fell in love all over again, when you spoke about re-purposing, reusing, rethinking...
What a detailed review, and the art it inspired is simply perfect. It would be one of those pieces that make people smile ever time their eyes land on it. Okay, I'm smiling just thinking about it.
I just started following. Can't wait to watch you "restore, recover, rethink" specially with April 5th being my bEARTHday ;-)
Great review, Elizabeth! Totally inspiring book and posting by you :-)
Great review - thanks for giving us your take on projects!
Your LOVE journal is wonderful. It looks very tactile and usable. I have never yet made 'signatures' and sewn them into a journal but can see this is the next step for me. I enjoyed your review of the book.
Janet xx
hello elizabeth - i really love these scrappy journals you make - i wanted to ask you a question about the paper you are using because when i sew mine with the machine the paper tears along the seams -
i'd be honored if you are able to answer me and let me know about this (:
each time i try to sew anything onto paper using the machine (me and hand stitching are not friends) it just rips where the stitching is.
maybe you are able to tell me where i am going wrong.
anyway, i don't have a blog but my email address is amymcdonald_xo@hotmail.com
and i have a web page with a contact form if you prefer to answer me that way. i think it goes directly to my email. the link is amymcdonaldxo,wordpress
okay (: thank you so very much in advance (:
xxa
I was not 'bored to tears'...I think this was an amazing post! loved your review and the narrative about how you constructed your book. Wonderful work dear!
Looks like a super book. Just thought you ought to know I didn't do the art on my Maundy Thursday post it was what was done at church which really spoke to me. Happt Easter BJ
Always looking for a great book such as this. I've not been creating much these days in the way of art, but alays enjoy visiting your blog and seeing what you're up to. Thanks for visiting me.
Thanks so much for the great book review on Ruth Rae's book and your art and stitching in your pink book. Very springish and lovely!
roxanne
So good to see a review of an art/craft book, and what a review! Really original way to present the content with your comments on each section as well.
Not boring at all. I found every bit interesting, and am lost in admiration for the way you produce such lovely, original work under the difficulties you mention.
The book you made is super.
Thanks for such an enjoyable review - made my day.
Your LOVE book is wonderful Elizabeth and what a treat to get to see your creative process...thank you as always for taking the time and effort to share that with us (I know it takes lots of extra time!)
I admire Ruth Rae's creativity and was very interested in this book...you could do reviews for a living I'm sure!
Great review
AND
thank you VERY much for the chance to be the lucky winner of your giveaway!
Happy Easter to you
oxo
Oh wow how wonderful this all looks you have given us such a detailed review how but can we not go out and buy this book I wonder!
Thanks for showing the whole process of your art making too. I am now in love with that book.
ManonX
Fabulous review Elizabeth, very thorough as always. i have had this book in my Amazon wish list for a while, nice to see what's actually inside. love the journal you made. i am a big fan of Tyvek, we simply do not get the envelopes over here and if we did they certainly wouldn't be free hahaha
Have you tried heating it? hold a heat gun over it and it will start to melt and curl up and bubble, the textures you can create are amazing. if you heat long enough you get holes. Try making tyvek beads, roll them up wrap with threads and then heat.
I made a fabric cuff a couple years ago, i have worn it quite a lot, and though its big I do like it and it always gets compliments.
Heres my post on it
http://art-and-sole.blogspot.co.uk/2010/08/ok-this-is-super-quick-post.html
and here the free pdf I put on Scribd http://www.scribd.com/doc/36472506/Free-Machine-Embroidery-Cuff
love the 365 journal (I am nearly ready with my April page).
great review of Ruth Rae's book, I already have it and found, like you, the instructions a little lacking, but her photos are clear and I also guessed what to do. There are some beautiful projects in there, I love your take on her journal.
kyla
Amazing review Elizabeth...very thorough :D Love the idea of burning and tearing fabric, and your final project is just awesome :D XXX
I loved that you got all into details. :) Fabulous what you did there.
Your review is really brilliant, going into so much detail and making reading the review a joy. The project you made is beautiful and makes me want to get my sewing machine out and get busy. Thankyou.
Love your review and what you created and how you made it to suit your needs also.
Bored to tears? Hardly! I always sit enthralled and am then surprised when I get to the end of your posts :)
This one has been recommended to me a few times by Amazon and it's one that has yo-yoed on and off my wish list. This year I have come to the conclusion that I should stop moaning about not being as good at art & craft as I'd like and do something about it. Which means concentrating on the areas I want to improve (I don't have that enviable quality that so many crafters have in mastering almost every area of the craft world) so I am concentrating on painting, drawing and the odd bit of mixed media... and admiring what others do while accepting I don't/can't do that particular thing. Maybe supporting them by buying a handmade thing or two.... what this long waffle is saying is, thank you for such an in depth review. I don't think I'd ever do the projects justice and so I can finally stop putting it on and off my wishlist. Did any of that make any sense at all? :)
I adore the book you made. Thank you so much for the step by steps as it's so fascinating seeing it all come together.
BTw, thank you for your gorgeous comment over at mine :) No scalpel used on the mask. Just small scissors (Those yellow and black ones)You made me so chuffed when you said that. You wouldn't believe how much!
I am so amazed and inspired by your creations...Thank you for the FAB review on Ruth Rae's book...I'm such a pushover for torn fabrics/threads/textures/ recycled papers...your scrappy journal is so yummy! aloha.
Great review, interesting sounding book. Some fun ideas. Your love journal is wonderful, like the different coloured pages.
Jen x
Thanks for a such a thorough review! I wish I had your skills. The artwork is lovely. Michelle V.
Sounds like a beautiful and inspiring book Elizabeth... I do love the work of Ruth Rae... and your scrappy journal is stunning... love the gorgeous pages... and the progress photos... a truly wonderful review...
Jenny ♥
I am not bored lol! This is a great review and your Love journal is beautiful x
I really enjoyed the review that you did on this book Elizabeth. It sounds like a book that I could definitely use, especially along with the journal that you made! I hope I win it.
http://moorewhimmsies.blogspot.com
Oh my goodness I would just love to try to make a journal like this! Wonderful job!
I must order this book!
Thank you for taking time to post.
Where is that beautiful garden located. We are going cherry blossom looking this weekend. Hugs!
Hi, first time I visited your blog and I am enchanted.
Ow I don't have trash in my home, ll 'trash' in fact are parts off not-yet- started=projects ;)
Would like you to visit my blog, but most is in ditch:
http://eennieuwestart.wordpress.com/2013/04/03/tadah-de-vogelvilla-the-birdhouse-jewelry-display/
greetings,
Cecile
BOTH books look beautiful. I definitely learn best by seeing things done, so all the pictures you put in your "how-to" are GREAT. I loved the pictures of the artwork in the book you reviewed, though. Thanks for sharing. I love your blog!! I'm so glad I saw the link on Magpie's Nest on Wordpress. Keep up the amazing work.
Oh that's a great review, the book sounds like lots of fun and I adore what you've created!
Oh my! What fabulous, fabulous art work!
Thanks for a great book review too.
Hugs xx
foulkes.susan@gmail.com
Good review and project. Thanks, Elizabeth!
Thanks for the reminder. I have no idea how Imissed this. I would love to call this book my own. You know where I live (grin).
XX Rachel XX
Brilliant piece of work there and love the way you guide us through the book. It's not really for me as I am not a fabric or sewing person ... Although tempted to get myself a sewing machine at some point!
Thanks for leaving your review.
Catherine
Glad I didn't miss my chance! Count me in! :)
Lovely inspiration from your book and you made one as well. fabby work and i loved your hanging on Darcy's page. I am joining in ARC this month. fab review. Dxx
Post a Comment