


.jpeg)


.JPG)


 Backgrounds were fun for many of you. They gave you the chance to explore new techniques and review a few old ones. Backgrounds can be fun to make as backgrounds only. But they can also be used to make embellishments or central images. I made this hand from the brown paper bag background tutorial, then added it to a simple background of direct to paper ink pads.
 Magazine and book images, as well as junk mail, are fodder for your art. They are often the backbone of most of my altered pages. A bit of sewing never hurts, either. Again, I cut pages I intended for backgrounds and turned them into an integral part of my spread.
  Both magazine images and junk mail were used for these spreads. I framed the spread on the left with hearts and added a larger one to the central image. I used beige scrapbook paper for the hearts to coordinate with the adjoining page.
What do you do if you have two disparate images? You tie them together using color, which I did on the backgrounds.
 I added the paintbrush for interest and effect. The beauty of ABs is you can put just about anything in your book. It's all up to you. However, even though I color coordinated these two pages, I was unhappy with them. Not too long after I created this two page spread, my friend Patty Szymkowicz e-mailed me a scan of this very image. She said hers came from Country Living. I'm not sure where mine came from, but I told her I had one and asked how she might use it in a spread. How surprised I was when I was going through my Hands AB and saw I had already used that very image. I liked Patty's idea for a spread, and although I didn't use it, it got me thinking about what I had that I could use and what type of spread I wanted.
The first thing I did was carefully remove the hand image along with the paintbrush which had been attached using E-6000 and didn't easily come off.
 In order to rework this spread, I started by pairing the paintbrush with the hand that looked like mine after a painting session. I rationalized that the paintbrush and painted hand made more sense together, than the one I had originally used it with. To make the background, I used red and green pigment inks that I actually spread around using my fingers. Remember when we worked with the color wheel? Everyone should remember red and green are complimentary colors and are opposite on the color wheel, so adding them together creates brown. Although I never quite got the brown I was hoping for, I did manage to get some decent tan and was able to tone down the red a bit.
After removing the hand from the page in the spread above, I knew how I wanted to treat it. When Patty suggested a buffalo or a cactus, I thought about a road trip across the country. Many times I drove that stretch of lonely highway through New Mexico and Arizona on my way to Southern California. The image reminded me of those desolate highways, where mesas and blue skies were often my only companions.
I guess I need to apologize to both Chevrolet and the Beach Boys for intentionally garbling their lyrics. I came up with "See the USA in your little Duese coup." I used some of my deli paper and an image of an early 1930s Duesenberg to complete this new page.
 Since the paintbrush didn't give up easily, or go quietly, that meant I had to cover the background it was torn from in some way. I used pigment ink to color around the circle image I cut from a magazine, then cut strips of sheet music and scrapbook paper, including leftover strips I had used on the left side. After I attached them to the book page, I added the central image and three flower petals. TIP: If you are unhappy with an AB page, you can always rework it.
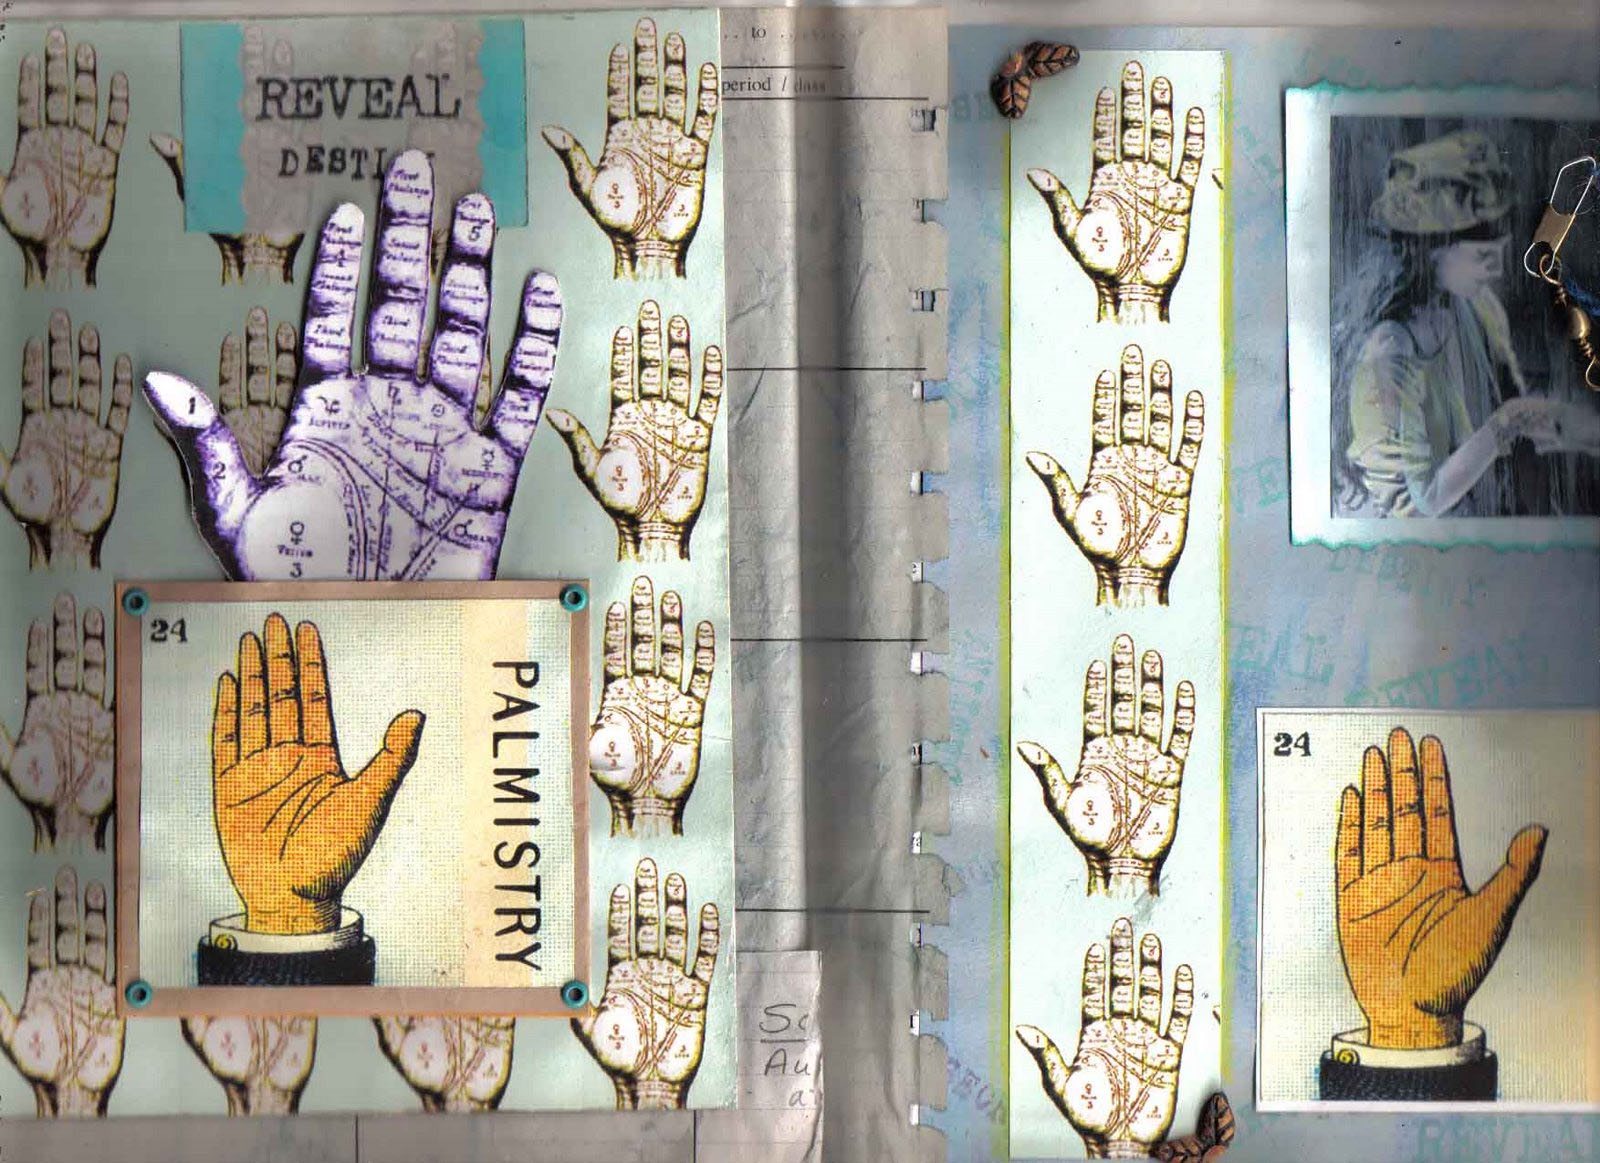 I realize this is one HUGE scanned image, but I wanted it large so you could see the details. Click to see it regular size. I wanted to show you don't need to be afraid to use your computer and printer. This spread which relies on repetition, lines, and asymmetry (remember those dreaded Design Principles and Elements?), was created primarily from images I printed on my computer. It also has two hidden pockets and a regular pocket.
 By enlarging the palm image and printing it in purple, it stands out from the smaller brown images, even though it is the same one.
 The Palmistry pocket is accented with an image that sticks out past the page's edge. The repetitive hands connect the left side to the right. Two hidden pockets are accented with beads and various embellishments.
 Although I have already shown the page on the right, the page on the left was made using scraps of fancy papers, scrapbook papers, and photo corners. Even though the two pages have the same blue and red colors, they are quite different and have very different background colors. To help pull them together, I used a string of fibers and beads. You can see the finished piece in the first photo of this lesson.
 I began by selecting three fibers that complimented or coordinated with the colors in the two pages. If you are still not sure which colors work well together, get out your hand made color chart and go from there.
 Next, I added beads to both ends of the same three fibers.
 I grabbed one end of the three fibers in one hand and gave them a twist to hold them together with the other hand.
 I stood the book on end and opened it such that the gap between the spine and the signatures was exposed. I began stuffing the bundle into the hole.
 Sometimes you have to fidget with it, but eventually, it will go through.
 Once you get the bundle started, continue holding onto the fibers because now is the time you will lift your book from your work surface and let gravity take over.
 You now have one half of the fibers dangling on the page, and one half through the hole.
 Pull the fibers up until the bead or charm closest to the page on each of the fibers just clears the page. Cut off any excess fibers and knot.
 Loosely twist the fibers together, then run a bead of glue along the length of the gutter. If some of the fibers don't get tacked down, lift slightly and add a touch more glue.
 Using a bamboo skewer that has glue on it, lift a portion of the fibers inside the spine and tack them down.
 Leave your page open until the glue dries. Now your two different pages will coordinate and the two disparate colors will be less noticeable.
 It's OK to combine computer generated images (hands and arms) with rubber stamps (even if you have to borrow the stamps), like I did on this page I added to the back of my button page. To jazz it up a bit, I added two eyelets, and strung a piece of broken leather shoelace and beads thru the eyelets.
 Layering is always fun and you can use pages from old books (even a day planner) to add interest to your pages. You could also use pages you have removed from your AB. Remember when we made frames? I used German scrap as a partial frame for this piece.
 Interactive and textural pages can be fun, too. For these pages, I used magazine images over a tissue paper background that I purposely scrunched.
 Sometimes the magazine images are cut off, as was the case of the thumb in this image. In that case, position the image at the edge of the page, and your viewer will believe you planned it.
 Interactive pages involve your viewers.
 It's always fun to watch their faces when they twist and turn images (in this case the hands were printed on acetate/transparency) to reveal the hidden picture beneath.
HOMEWORK (always appreciated, but never mandatory):
Create at least one spread (providing you have enough pages in your book) and document what you learned and which techniques you applied to your page. Or you can create one or two tags, or an ATC that represent your theme. Document as above.
Alternately, take photos or scans of your favorite pages and document how you used more than one technique you learned on your pages. These techniques may have been unintentional when you first created the page or pages, but now you know what they represent, show what you have learned.
Materials needed for Lesson 20:
For our final lesson, we will decorate our book covers. Although I encourage you to do this as the assignment for Lesson 20, I don't think you should decorate your cover unless you are completely finished with your AB. If you have other pages you want to make in this book, please do so before you decorate the cover. That means all you need are your book and the decorations you want to use on the cover.
Elizabeth's homework:
You won't want to miss next Sunday when I show selected homework completed by my students. Their work puts mine to shame. However, I hope to have at least one of my completed altered books scanned and ready for you to view.
It's share time.
I'm sure all of you who are still completing your homework are more than ready to show your transfers and/or pop-up pages. In fact, I've had the pleasure and opportunity to see a few of these pages. As always, please be sure the link is to the specific post or posts, not to your blog in general. You may also post ANY previous lesson here. Just add the lesson number after your name, please. And thank you SO much for sticking with this class. I've really enjoyed teaching this class, and from your homework, you seem to appreciate and enjoy it, too. Thanks again.
_______________________________________


15 thoughtful remarks:
Woohoo what a great hand book, so many techniques and thoughtful spreads. Fantastic illustrating and demonstrating it all Elizabeth. xox
Such a great book.
Wow - yet another fabulous lesson my lovely, thank-you. Its sooooo good to see it all come together as you have demonstrated with your amazing 'hands' AB, it re-affirms all the previous lessons and truly helps tie them all together in my head (lol, as messy and confuddled as it is in there!!).
Tee hee, sieve head me totally forgot to show my niche which I did right at the beginning of the course, hopefully I will link it up soon along with a few other offerings. Please may I nag for your address again?? Any comments you put on my blog have to be approved first if that helps? My e-mail is dawntrew@hotmail.co.uk if you are able to do it that way maybe??
Huge hugs x x x x
I always thoroughly enjoy my visits here. I read and re-read in-case I have missed anything and am thinking about maybe doing an AB myself. It wouldn't be as complex as the things you do around here as I don't have the materials nor skills to know what some of them even are, haha, but 'adapt & overcome' is a good philosophy don't you think. I'm still very much in the thinking stage just now, plus in the middle of working on several other projects too (aren't we all), but it is something I would enjoy I feel. Thank you for the continued inspiration and wonderfully detailed lessons, warts and all. Have a great week. Mo :0) x
What a fabulous book!! I have to "hand" it to you- you are one creative person! Your line about if you don't like an altered book page you can always rework it is one the reasons I am drawn to mixed media and altered books!
WOW, what a post! Your hand book looks fantastic. Thanks for the lesson and the continued inspiration, Elizabeth! I would love to be a fly on the wall when you are creating:)
Have a great week!
gGby xo
Once again you've outdone yourself! You've shared bits of this AB before, but it's nice to see it all here and tying it all in to the lessons. You've put SO much effort into these lessons and helping us see all the possibilities of AB. Though I haven't kept up with the lessons, my book sits quietly on my shelf waiting for my return....:) I just love that you're so generous with your knowledge and sharing what worked and didn't for you so we can all learn together.
Crochet is what I do, but I've always been intrigued by ABs. I do keep journals which are a mix of writing and drawing/doodles/sketching. Creating my own AB seemed a very daunting undertaking - until I found you and your wonderful lesson plans. I don't know if I'll ever make a true AB, but I know that I'll be reading your lessons and incorporating ideas into my journal. Thank-you for sharing such great information and for making this medium seem doable to me!
Got to "hand" it to you - that is a great AB.
Like the fibres bit - must read that again.........and apply.
You've seen my Pop-up but I have linked anyways.
BJ - awaiting the cover lesson as my book is full :)
Wonderful job of pulling all the lessons together! I'm working hard to fill all the pages--seems there were more left than I thought! The book is quite wide so I am trying to keep them simple. I may even remove a few more--unless you think this is a bad idea!
Your Handbook is absolutely stunning! I love the interactive transparencies, and the page with the palmistry hands repeated is awesome too...oh, and the fibers. It's all terrific! You are an excellent teacher.
Fabulous book Eliabeth, so many different hands all put together in a very creative way. Loving those fibres. I seem to be a bit confused by the lesson numbers. Not matter I still have lots of work to do to catch up. Off to try some more transfers.
Your work is quite fascinating. After doing all this I can certainly appreciate all you have gone through in your own books. I am almost finished bringing it all together. I've linked to show where I am at currently. pant, pant!
Your books are amazing sweetie, I have spent ages savouring them since you posted them. Thank-you for taking the time to put them on.
I have now linked my latest offerings for you and I hope to get some more done and linked soon. Lol, i'm determined to 'finish' my book before the course finishes.
Huge hugs x
Hi Elizabeth, I changed my comments settings from Registered users to anyone, maybe that will help. Please try and if it doesn't work I will try again.
Post a Comment