


.JPG)


 Once again, I'm linking to CED and will update my Linky Followers entry. I guess I should encourage all of you to join the Linky Followers, since the Google Friends Connect will be gone soon. Not sure what will happen with the RSS feeds.
 Let's begin with color. I have started with analogous colors (seen next to each other on the color wheel), then combined them with
 tints (pale due to the addition of white) primary colors added to the blue. Note how the blues and greens begin to recede as the lighter colors are added.
 While making the above background, I also made another one for my Houses AB and glued it onto one of the pages. After both of these books were dry, I added more
 yellow, one is light buttermilk, one is yellow glow, and one is bright yellow. Instead of painting more stripes, I will be adding stamping. Yes, I plan to stamp! Of course, I will be using found items rather than stamps.
 The bright yellow rings were made using a yogurt cup.
 The lighter yellow circles were made using the open end of a cap from discarded glue.
 The glow yellow was quite runny and did not make a good impression on the page or on me! For this I used the closed end of the same cap as above.
 I quickly realized I did not have enough colors on my palette, so grabbed a few more. Please note that ANY craft paint can be used for this background. It does not have to be expensive paint.
 For the pink, I used a part from a glue runner (or dispenser). This one came from UHU, a glue runner I found difficult to use.
 Another part of the same glue runner was this wheel that I used to stamp the Midnight Blue.
 The yellow glow was not drying well and it kept spreading on the page, so I added some dark green using the end of a paint brush. I hoped it would look like the yellow circle was planned.
 Finally, I added the rings of pale blue using the cap from the paint. I really wish I had not added these because they were not positioned the way I would have liked. Live and learn. I need to stop before I turn the final bit into a disaster!
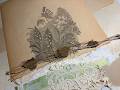
 Call me lazy, or call me rushed, I didn't scan the finished pages of either book. The house above I call the "Background House" because it was made using backgrounds, one of which I created today. This spread is not finished, but for the sake of time, I am calling it ready to show, at least.
 I also sort of tried to decorate my color wheel. It's not the best color wheel around, but I am calling it finished.
Paper Bag Background
This is one background I made several years ago. I thought it would be fun to make it again, since I had a few paper bags on hand.
 Supplies from left clockwise:
Paper bags
Bucket of water
Mica powders (I used a brand called LuminArte, but you could use Perfect Pearls, Pearl Ex, Cosmic Shimmer, or any brand you might have)
White PVA glue (I used Elmer's School Glue)
Latex or other protective glove
Not shown: Paint brush, Stirrer
Tip: Use some type of covering, preferably plastic, under your work surface.
 Begin by taking your paper bags apart at the seams. This is the most time consuming part of the process.
 Add glue to the water. I added about half the 4 oz container of glue and probably didn't add as much as I should have. This should be approximately 50/50, but I think I had way too much water and not enough glue.
 Stir the glue into the water until well mixed.
 If you don't want messy hands, put on gloves. Scrunch one of the paper bags and
 dip it into the glue/water mix. Continue scrunching and moving it around in the mix until it is well saturated. Wring it out and place on your work surface.
 Do the same for the other bags. My hands don't wring things very well, so I had a lot of the mix left on the bags. However, as usual, do as I suggest, not as I do!
 Open your bags and lay them relatively flat on your work surface. Open one of your mica powder colors and sprinkle it around on the wet bag.
NOTE: Not all mica powders are equal. The brand I have has no binder in it. That means it needs a binder in order for it to stay on the paper. For this technique, the glue in the water becomes the binder, so you don't need the type/brand that has the binder already in it. However, if that's the only brand you have, feel free to use it.
 Continue sprinkling mica powders on your wet paper bags until you have used all the colors you want for that specific bag.
 Dip an old paint brush in the glue/water mix and run it over the paper. You can make swirls, run the brush in a long line, or dip it up and down into the powder, whatever makes you happy.
 Hang to dry. By this time, there should be nothing dripping. Stand back and admire your art.
 When completely dry, remove from the hanger and flatten. You might want to iron your pieces. Cut your paper bags to size and glue to your book page, card stock, or other substrate. There is no way to see all the shimmer from these powders because they simply don't show up on camera (especially MY camera).
Staz-on and Alcohol Background
I think I misled you with this background before. I want to show it as it should be.
 You will need from back left, clockwise:
91% Isopropyl (also called rubbing) Alcohol (do not use 70%)
Staz-on Reinkers
Foam Brushes
Cups for mixing
Substrate (I use 110 lb card stock)
 I know there are lots of "permanent" inks on the market, but for me, the only brand I have is Staz-on. Be sure to use a different foam brush for each color. You can save them for reuse, too.
 Start by placing a bit of alcohol in each of your cups, then add at least 8-10 drops of reinker to the alcohol. Stir the contents of each cup.
 Using a different brush for each color, apply the contents of each cup on your paper. If they are still wet, the colors will blend, but more than likely they will be dry by the time you get to the next color. I personally like to apply one color to all the papers before going to the next color, but you might want to work on one page at a time.
 Again, I didn't take time to scan these, but you can see how quickly and flat they dry.
Once again, this is a long winded post and I didn't have time to go back and review it. Feel free to add your color examples to the Linky here, but please wait till next week to add your backgrounds. Have a super week and thanks for playing along on this AB journey.
_____________________________


16 thoughtful remarks:
I love that you show all your steps and tell how you created your art. I know that takes a lot of time and effort. Thanks! Looks like fun was had. ;)
So impressive, Elizabeth. I love seeing the process and your colors are wonderful! Thanks for taking the time to document how you approach this creative work.
...amazing work Elizabeth...so much to take in, loVed the paper bag step-by-step boy you can have so much fun and so great of you to take the time & effort needed for these pic's...superb posting...Mel :)
I do hope you are feeling better..... if you can create all this magic when feeling a 'bit under the weather' what must you be like when you are well!!!?? loving it all. xx
I can't believe how techniques you shared while you weren't feeling well- and they are all such great ideas!
Hope you're feeling better today!
Stephanie
These are all great techniques that give such colorful results. I don't have the shimmer type stuff but I really like the results of the paper bag.
Darla
Thanks, Elizabeth. I set aside today for backgrounds so this is just great. I really like the first one. The circles are just wonderful.
Oh, oh, oh, oh!!!! I have needed a nudge to use my mica powders ( which I own all sorts of but haven't used in so long) and the stazon reinkers use was genius. Can you tell I am excited? Thanks for the inspiration!
Oh great, now I want mica powders...lol I really liked the paper bag technique and I think that has given me an idea of how to finish off my background page for the homework. I sure hope you get to feeling better soon! btw, my post last night wasn't even finished, lol, I didn't notice it until it had gone live, so I finished adding a few pictures and comments, you really didn't miss much but it's typical me ;p waving hi from the hills of North Carolina :)
Wow, huge amounts of stuff in this post. I laughed at your didn't feel like finishing the pages. They are your pages right! Those paper bags are fantastic, what fun to make, I am definitely putting that one on the list.....Circles are always on my agenda, always showing up somewhere. xox
Oh and check out bloglovin, I have been putting on my buds there so I can follow them with a quick read. xox
I love the stripes and circles of the first background. I am now going to look in my stash for a large cog to use as a stamp. DUH! Why didn't I think of that one before. Maybe I don't have one so the thought never occurred. That's what I'm going with....
I really like the effect of the paper bag technique to use as background. I've been missing your blogs lately because I have a pulled tendon in my leg that has turned into something worse! I know how you feel about getting up aching. You managed a great blog post in spite of it. I scrolled down to see the devastating storm you had. It sickened me to see those tomato plants all trampled. You still have time, if you have spirit, to put in new ones. Maybe you already have.
Great post, as usual!
Wow, I just started following your blog and I have learned so much in a week. I just love this post.
I learned something new with each tutorial.
Looking forward to more of your interesting and informative tutorials.
FANTASTIC!!!!!!!!!!!!!!!!!!!
Barb
Great results again Elizabeth, I particularly like the paper bag process, I will have to try it
Well, I see I will now have to go back and check out a lot of your posts. Soaking with the glue in the water is a neat idea - now I wonder if adding some gesso to the water would sort of pre-prime it with a bit of a wash effect?
Now the piano-hinge. ....
:)
MA
Post a Comment