


.jpeg)


.JPG)


 Supplies (clockwise from lower left):
Background of your choice (I used a calendar page)
UHU temporary/repositionable glue roller
UHU stick glue
Floss threader
Ribbon or fiber of your choice
Awl
Die cut letters
Self healing mat
Not shown: Scissors, substrate (I used a page in my altered book)
 Here are the two glues I used in the project. I specifically wanted to try the new (at least to me) repositionable glue roller.
 Run the glue roller over the back of each letter. Don't worry if there are holes. The glue will only stick to the tag, not the table.
 Position the letters on the background. Note that the letters weren't evenly positioned on the page. By using a repositionable glue, you can gently lift the tags/letters and place them where you want them.
 Once you are happy with the position of the letters, press them to the background.
 Punch holes using your awl and self healing mat.
  Because the glue is holding the letters, they won't move while you pound away on the awl.
 Once all the holes are punched, remove the mat and thread your fiber through the eye of the thread flosser.
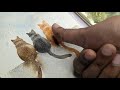
 Locate your first hole and guide your floss threader through it, holding onto the thread as shown.
 Leave a small tail on the back side and secure with UHU glue stick. Allow glue to dry before proceeding.
 Another nice thing about the repositionable glue is you can pick the page up and the tags will stay in place. Guide the thread flosser and fiber through the back side of the second hole
 then into the first hole again. Your fiber should now look like the above photo.
 Bring your thread from hole three into hole two. Keep doing this until you have threaded the fiber through all the holes. Even though the E came unlodged in the above photo, it was easy to line up the hole in the tag to the hole in page and return the piece to the right position. To secure the E even better, I added a bit more glue. I was very conservative when I first started using this roller.
 When finished, the back will look like this. Cut your fiber, again leaving a short tail.
 Secure the tail using UHU glue stick and allow to dry.
 Glue the finished page to your substrate using the UHU glue stick, thus hiding the fiber on the back. Gently lift the tags from their places on the page. Now they will dangle when someone moves the page or plays with them, but will stay in place and not get damaged when the book is closed.
As an aside, this is a picture of penguins on ice in the Weddell Sea in Antarctica. I found the picture in a 2006 Nature Conservancy calendar.


1 thoughtful remarks:
Thank you for giving me ideas of what to do with repositionable tape rollers.
Rachel
Post a Comment