


.jpg)


.JPG)


 I made this ATC using magazine images and a Thesaurus definition. I rounded the corners using a punch. I showed the magazine image to Dana the other day when she was here. I hope she can see how I altered it. I almost named this one "Teach your children well," lyrics from an old Crosby, Stills, Nash, and Young song because of the ribbons of music. At the last minute, I decided a definition would be better because several arts are represented in the picture.
 Thursday, April 30, 2009
Inspiration
I made this ATC using magazine images and a Thesaurus definition. I rounded the corners using a punch. I showed the magazine image to Dana the other day when she was here. I hope she can see how I altered it. I almost named this one "Teach your children well," lyrics from an old Crosby, Stills, Nash, and Young song because of the ribbons of music. At the last minute, I decided a definition would be better because several arts are represented in the picture. Wednesday, April 29, 2009
A really cute survey
A dear friend sent me this NON art questionnaire. I liked it so much, I thought I might share. Feel free to copy the questions and post them to your blog, too.
I give you money and send you into the grocery store to pick up 5 items.You can only pick one thing from the following departments… what is it?
1. Produce : Bananas
2. Bakery : 14 grain whole wheat bread
3. Meat: Sorry, I have to skip that department unless you can buy beans there
4. Dairy : 1/2 and 1/2
5. Dry goods : brown rice
Let’s say we’re heading out for a weekend getaway. You’re only allowed to bring 3 articles of clothing with you. So, what’s in your bag?
1. Bra
2. Sun dress
3. Rebox
So, what 4 things do you find yourself doing every single day, and if you didn’t get to do, you probably wouldn’t be in the best mood?
1. Drinking french roast coffee with 1/2 and 1/2
2. Making art
3. Visiting my Yahoo sites
4. Loving/petting Bleubeard
You’re driving down the road, and suddenly you’re hit with this sense of road rage. What 3 factors probably contributed to it?
1. People pulling out in front of me, then going slow
2. People hogging the left lane (highway traffic, not in town)
3. People tailgating me
Sweet, you just scored a whole afternoon to yourself. We’re talking a 3 hour block with nobody around. What 5 activities might we find you doing?
1. Cleaning my guest bedroom
2. Organizing
3. Changing out my winter clothes for my summer clothes
4. Making art
5. Watching Jeopardy!
We’re going to the zoo. But, it looks like it could start storming, so it’ll have to be a quick visit. What 3 exhibits do we have to get to?
1. Meercats
2. Lions
3. Tiger Trek
You just scored tickets to the taping of any show of your choice that comes on t.v.. You can pick between 5, so what are you deciding between?
1. Life
2. Castle
3. Saving Grace
4. The Closer
5. Damages
You’re hungry for ice cream. I’ll give you a triple dipper ice cream cone. What 3 flavors can I pile on for ya?
1. Chocolate
2. Pistachio
3. Chunky cherry
Somebody stole your purse/wallet…in order to get it back, you have to name 5 things you know are inside to claim it. So, what’s in there?
1. My driver's license
2. Ink pen that lights up and blinks four colors in neon
3. Carmex
4. Home Depot gift card
5. House key on "Elizabeth" keychain clipped on outside ring
(I have a very small purse and I'm pretty low maintenance)
You are at a job fair, and asked in what areas you are interested in pursuing a career. Let’s pretend you have every talent and ability to be whatever you wanted, so what 4 careers would best describe what you want to be?
1. Statistician
2. Human factors consultant
3. Artist
4. Artist
If you could go back and talk to the old you, when you were in high/middle school, and inform yourself of 4 things, what would you say?
1. Be true to yourself and your beliefs
2. Don't ever be a snob
3. Treat everyone equal because they are
4. Keep those grades high. You'll need them to get into a good university.
In two days, the Disintegration project comes to an end. Be sure to check all your favorite blogs to see their end results. Partipant links are on Seth Apter's sidebar. Over 120 artists took this challenge, including myself. I can't wait to see how disintegrated the elements made my book. Had I known, I could have just left it in my basement and it would have had basically the same effect.
I give you money and send you into the grocery store to pick up 5 items.You can only pick one thing from the following departments… what is it?
1. Produce : Bananas
2. Bakery : 14 grain whole wheat bread
3. Meat: Sorry, I have to skip that department unless you can buy beans there
4. Dairy : 1/2 and 1/2
5. Dry goods : brown rice
Let’s say we’re heading out for a weekend getaway. You’re only allowed to bring 3 articles of clothing with you. So, what’s in your bag?
1. Bra
2. Sun dress
3. Rebox
So, what 4 things do you find yourself doing every single day, and if you didn’t get to do, you probably wouldn’t be in the best mood?
1. Drinking french roast coffee with 1/2 and 1/2
2. Making art
3. Visiting my Yahoo sites
4. Loving/petting Bleubeard
You’re driving down the road, and suddenly you’re hit with this sense of road rage. What 3 factors probably contributed to it?
1. People pulling out in front of me, then going slow
2. People hogging the left lane (highway traffic, not in town)
3. People tailgating me
Sweet, you just scored a whole afternoon to yourself. We’re talking a 3 hour block with nobody around. What 5 activities might we find you doing?
1. Cleaning my guest bedroom
2. Organizing
3. Changing out my winter clothes for my summer clothes
4. Making art
5. Watching Jeopardy!
We’re going to the zoo. But, it looks like it could start storming, so it’ll have to be a quick visit. What 3 exhibits do we have to get to?
1. Meercats
2. Lions
3. Tiger Trek
You just scored tickets to the taping of any show of your choice that comes on t.v.. You can pick between 5, so what are you deciding between?
1. Life
2. Castle
3. Saving Grace
4. The Closer
5. Damages
You’re hungry for ice cream. I’ll give you a triple dipper ice cream cone. What 3 flavors can I pile on for ya?
1. Chocolate
2. Pistachio
3. Chunky cherry
Somebody stole your purse/wallet…in order to get it back, you have to name 5 things you know are inside to claim it. So, what’s in there?
1. My driver's license
2. Ink pen that lights up and blinks four colors in neon
3. Carmex
4. Home Depot gift card
5. House key on "Elizabeth" keychain clipped on outside ring
(I have a very small purse and I'm pretty low maintenance)
You are at a job fair, and asked in what areas you are interested in pursuing a career. Let’s pretend you have every talent and ability to be whatever you wanted, so what 4 careers would best describe what you want to be?
1. Statistician
2. Human factors consultant
3. Artist
4. Artist
If you could go back and talk to the old you, when you were in high/middle school, and inform yourself of 4 things, what would you say?
1. Be true to yourself and your beliefs
2. Don't ever be a snob
3. Treat everyone equal because they are
4. Keep those grades high. You'll need them to get into a good university.
In two days, the Disintegration project comes to an end. Be sure to check all your favorite blogs to see their end results. Partipant links are on Seth Apter's sidebar. Over 120 artists took this challenge, including myself. I can't wait to see how disintegrated the elements made my book. Had I known, I could have just left it in my basement and it would have had basically the same effect
Tuesday, April 28, 2009
Modified Leafing Pen Background
We're discussing "gold leafing" on ABC and decided now would be a great time to post this background technique I made back in 2007. This technique was taken from Bernie Berlin's "Artist Trading CardsWorkshop: Create, Collect, Swap." (ISBN-10: 1581808488) As usual, I modified it with supplies I had on hand because I had no liquid watercolors, 140 lb watercolor paper, or canvas.
 Supplies from left:
Cardstock (or substrate of your choice such as tags, printer paper, book pages, not shown)
Krylon Silver Leafing Pen
Krylon Gold Leafing Pen
Krylon Copper Leafing Pen
Artist Paint Brush (not foam)
LuminArt Twinkling H20s, at least 2 colors of your choice
Water
Rubber stamps and stamp pad (Optional, not shown and not used)
Freezer paper or something to cover your work surface
Alternates:
Bernie used liquid watercolors
Bernie said watercolor paper 140 lb worked best, but I had no trouble with any weight paper I used
I also used watered down acrylics and mica flakes
Artist's canvas
 Add water to Twinkling H20 pots and set aside.
 Using Copper, Gold, and/or Silver Leafing Pens, draw swirls and lines in a pleasing pattern onto the cardstock.
 Thin lines work best. Be sure to let the pen go off the page. Allow to dry.
 Apply first color of Twinkling H20 to the cardstock, beginning with the lightest color. I highly recommend using an artist's paint brush (anything with bristles) over a foam brush. The foam brush will absorb (and waste) the H20s and won't give the desired effect you want from your H20s.
 Apply second color. Allow H20s to blend and bleed together, or allow one color to dry before applying the second color. These will give two different effects. If you want the colors to bleed together and diffuse, lightly wet your substrate before adding any watercolor, but after using the leafing pen. If you don't let the H20s activate, they will go on too heavy. If that happens, just drop water from your paint brush onto the H20.
Pick colors that compliment each other and coordinate with your leafing pen. I used cool colors with the silver pen and warm colors with the gold and copper pens. I put the first color in both upper corners and the lower middle. The second color went in the top middle and the lower two corners. The third color filled in the white areas.
 When dry, stamp all over the page (this is an optional step).
 Although Bernie suggests stamping as the final step, I'm not much of a stamper, so I eliminated that step. I liked the clean look I got in the final product.
These are really addictive. As an alternative, I used watered down acrylics (cheap paint in a bottle) that I added mica powders to. They worked fine as long as they were the consistency of watercolors.
Monday, April 27, 2009
Rainy Day Monday
 Yesterday we got nearly 6 inches of rain in about 4 hours. At one point the National Weather Service (located near the Wichita Airport) reported 2" of rain in one hour. Needless to say, I had a flood. I went to my basement to see if I had water, and walked in three inches of water. Things were floating along the hall on top of the water. It was frustrating. After sucking water in my shop vac for over 5 hours last night and two to three today, I am so sore I can barely move.
 However, I knew I had to make some art today, so here it is. I call it Rainy Day Monday. The background is a magazine image that I fell in love with. The bird is a stencil gifted me by Cindy,and my new background stamp (or a small portion of it) from Mrs. O'Leary's (Joanie, the owner, makes her own and they are fantastic). I know it's a bit late in the day, but at least I got to make art today.
It may be a rainy day, but I'm alive and my front yard is growing faster than weeds. So, even though things are not the best in my basement, I'm so happy I can do what I love to do in between using machines (shop vacs, pumps, and industrial fans).
Click the image for a larger view.
Sunday, April 26, 2009


Saturday, April 25, 2009
Anything but paper ATCs
I'm hosting an "Anything but paper" ATC swap on ABC. Here are my nine ATCs I will be swapping.
 The bottom layer is my Tyvek backgrounds I made for Earth Day, along with some rubber stamping. The overlay is the Cling Wrap that I demoed yesterday. I attached the two layers using eyelets.
 Here is a single ATC, which I will keep for myself showing the hidden beauty underneath.
 The bottom layer is my Tyvek backgrounds I made for Earth Day, along with some rubber stamping. The overlay is the Cling Wrap that I demoed yesterday. I attached the two layers using eyelets.
 Here is a single ATC, which I will keep for myself showing the hidden beauty underneath.
Friday, April 24, 2009
Cling Wrap Backgrounds
This is a fast and fun technique that makes marvelous backgrounds or overlays.
 Supplies from upper left:
Various fibers and threads
Cling wrap, heavy duty
Craft sheet or parchment paper
Iron
 Lay the craft sheet or parchment paper on a table or ironing board. Remove a strip of cling wrap shorter than your craft sheet or parchment paper. Pre-heat your iron to cotton.
 Position a few strands of thread, fibers, ribbon, and/or string on the cling wrap. It's alright to leave gaps and spaces.
 Lay a second piece of cling wrap on top of the ribbon and threads.
 Using your hands, press the second sheet down well and smooth it out, working from the middle to all the sides.
 Lay a second craft sheet or piece of parchment paper over the cling wrap. With your iron on hot, begin ironing the piece. Note that my top craft sheet is shorter than the bottom one and the cling wrap sandwich. I ironed to the edge, then repositioned my craft sheet over the remainder of the cling wrap.
 I found through trial and error that the best results came when I kept the iron in constant motion and pressed hard in spots where there were no fibers. You can actually see the ridges left by the fibers through the craft sheet. Not sure if you can see them through parchment paper.
 Here is a photo of two finished pieces I made. This is a really quick and easy background. You can use this as a background or as an overlay by attaching it with eyelets or brads.
Use thicker cling wrap. Thin cling wrap leaves obvious holes in the piece, no matter how cool you set your iron temperature.
This is a great way to use those extra threads and small bits of fibers and lace you have lying around.
Thursday, April 23, 2009
Wednesday, April 22, 2009
Happy EARTH Day, Happy Birthday, Basement Sneak Peek
Yesterday was supposed to be our first play date, formally dubbed "We 3 Art" by Kathy. However, I had no water, thanks to the City turning it off before Dana and Kathy arrived. So, since it was my day to host, I asked them to bring their calendars and a notebook so we could decide what each of us would "teach/host" in the upcoming months.
 Although I had hot tea, coffee, muffins, and a kitchen table ready for us, Kathy and Dana would probably prefer a place where water flowed freely.
 These were my current projects and my notebook. Now all I needed was for the gals to show up.
 I gave Kathy a gift for her birthday, which was April 11. Here she's opening it. I wrapped it in layer after layer of dress pattern tissue and tied it with colorful fibers. Now she has a gift within a gift.
 In addition to the other ATC I made for Kathy, I made this one from more of my Tyvek paper. She loves Da Vinci, so this one was right up her alley.
After opening my gifts (which I failed to take photos of), we went to the basement for the big reveal.
 I welcomed them both with this sign on my white board that I propped up on my work bench.
 Dana commented that Kat's name was first, so I changed the sign. I was more than willing to give them "equal billing."
 Here is Kathy standing next to the dehumidifier that takes up a large portion of the room. Since the fans and dehumidifier will be leaving later in the week, I decided to wait to show the basement reveal until all the heavy machinery
 was out of the basement. I couldn't get a single good photo where the equipment wasn't partly blocking the view.
 At least Dana and Kathy were able to make their way around the machines.
And that was where I stopped taking photos. Don't ask why. I took my camera with me, but failed to take a single photo all day. Guess I was just not thinking. It really was a day to rest and "veg out," at least for me. I hope to have the equipment out of the basement before the weekend, so you'll be able to see what Dana and Kathy got to see yesterday.
 Although I had hot tea, coffee, muffins, and a kitchen table ready for us, Kathy and Dana would probably prefer a place where water flowed freely.
 These were my current projects and my notebook. Now all I needed was for the gals to show up.
 I gave Kathy a gift for her birthday, which was April 11. Here she's opening it. I wrapped it in layer after layer of dress pattern tissue and tied it with colorful fibers. Now she has a gift within a gift.
  In addition to the other ATC I made for Kathy, I made this one from more of my Tyvek paper. She loves Da Vinci, so this one was right up her alley.
After opening my gifts (which I failed to take photos of), we went to the basement for the big reveal.
 I welcomed them both with this sign on my white board that I propped up on my work bench.
 Dana commented that Kat's name was first, so I changed the sign. I was more than willing to give them "equal billing."
 Here is Kathy standing next to the dehumidifier that takes up a large portion of the room. Since the fans and dehumidifier will be leaving later in the week, I decided to wait to show the basement reveal until all the heavy machinery
  At least Dana and Kathy were able to make their way around the machines.
 And that was where I stopped taking photos. Don't ask why. I took my camera with me, but failed to take a single photo all day. Guess I was just not thinking. It really was a day to rest and "veg out," at least for me. I hope to have the equipment out of the basement before the weekend, so you'll be able to see what Dana and Kathy got to see yesterday.
Tuesday, April 21, 2009
A UHU glue Earth Day project
Everyone knows that April 22 is Earth Day. It's been that day since the early 70s, no matter what day of the week it lands on. So why am I posting an Earth Day recycling tutorial using UHU glue the day before Earth Day? Those who know me, know that April 22 is my birthday. Although I will be "celebrating" my birthday taking my neighbor Sally around town to two appointments tomorrow, today, while you are playing around with this technique, I will be celebrating my birthday with my two friends Dana and Kathy. They will get to see the basement, although we won't be playing there tomorrow due to the fact the City is shutting off our (six blocks of my street) water for 12 hours. However, I will have my camera and you will get to see the "big reveal" too.
Since I will have so much to show my readers, I will post this early, so you too can enjoy recycling on Earth Day as much as I do.
So here is my gift to you: UHU Glue and Tyvek, a perfect combination.
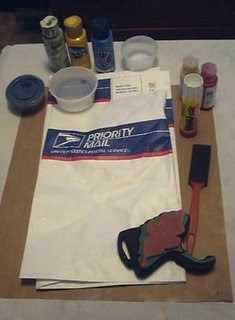 Supplies from top left:
Paints (cheap acrylic)
Water
Fluid acrylic
Pots to mix acrylics in
UHU Original Glue SticTyvek (used postal envelopes)
Foam brush (or brush of your choice)
Rubber or foam stamps of your choice
Craft sheet or other waterproof material to protect your work surface
Not shown: Staz-on black ink, gesso
 Carefully tear the envelopes apart at the seams and remove any postage stamps and labels. Use the inside of the envelope for this technique and save the stamps to use in a later project.
 As an optional step, you can cut the two end flaps off if you like.
 Dampen the Tyvek with your sponge brush. There's no need to saturate it with water, just get it damp. Drop a few drops of fluid acrylic on the Tyvek and spread around with the wet brush. See how the fluid acrylic disperses onto the dampened envelope.
 Add as many colors as you like until you are happy with the look. Allow the colors to bleed together for a mottled look. Be aware that the paint will dry much lighter than it appears when it's wet.
 Be careful. These are addictive. I ended up making 15 sheets before I stopped. They are so much fun.
 When dry, begin by stamping with a decorative rubber or foam stamp of your choice using Staz-on or any solvent based ink.
 Tear a piece of corrugated cardboard to expose the corrugations. Use as a stamp.
 Paint any circle with gesso. I used one of the water pots, but you can also use any jar lid.
 Stamp randomly on the envelope. When you are happy with the results, set aside, allowing the gesso to dry, and continue decorating your other pieces.
 When you are finished, decide what type of project you want to make. I wanted to play with ATCs, since they are a good size to experiment with. Cut the piece twice the width of the project and the correct length. For the ATCs I cut the pieces 3 1/2" X 5". Pre-fold the piece before gluing.
 Open the piece and turn it over so you are looking at the inside. Because the paint bleeds through to the back, they must be covered. What better way than to make them double sided.
 I've tried other glues and they just don't work with Tyvek. The very best glue for Tyvek is UHU Original Stik which is distributed exclusively by Saunders in the US. One of the bonuses is that you can see where you've glued, so you know you are getting good coverage.
 Fold the insides together and press until you have a good seal. Pick the side that compliments your art for the front and the other side for your information.
 Use your corrugated cardboard to add lines to the back for your ATC information, and use it on the front to compliment your design.
 Did you guess what the ATC I posted yesterday was made of? The beautiful bonus with this material is the lovely threads of pattern in the Tyvek that is highlighted by the paint.
 This is my Earth Day creation. Green truly IS beautiful. Even the embellishment came from an old eyeglass nose piece that I attached using my favorite UHU Glue: Twist & Glue. It bonds to most materials and dries clear.
Since I will have so much to show my readers, I will post this early, so you too can enjoy recycling on Earth Day as much as I do.
So here is my gift to you: UHU Glue and Tyvek, a perfect combination.
 Supplies from top left:
Paints (cheap acrylic)
Water
Fluid acrylic
Pots to mix acrylics in
UHU Original Glue SticTyvek (used postal envelopes)
Foam brush (or brush of your choice)
Rubber or foam stamps of your choice
Craft sheet or other waterproof material to protect your work surface
Not shown: Staz-on black ink, gesso
 Carefully tear the envelopes apart at the seams and remove any postage stamps and labels. Use the inside of the envelope for this technique and save the stamps to use in a later project.
 As an optional step, you can cut the two end flaps off if you like.
  Dampen the Tyvek with your sponge brush. There's no need to saturate it with water, just get it damp. Drop a few drops of fluid acrylic on the Tyvek and spread around with the wet brush. See how the fluid acrylic disperses onto the dampened envelope.
 Add as many colors as you like until you are happy with the look. Allow the colors to bleed together for a mottled look. Be aware that the paint will dry much lighter than it appears when it's wet.
Set aside to dry on a waterproof surface. The paint will seep through the Tyvek to the back side, so be careful where you lay the pieces as they dry. Also, by the time you have all the colors on the envelope, there will be some paint puddles.
 Be careful. These are addictive. I ended up making 15 sheets before I stopped. They are so much fun.
  When dry, begin by stamping with a decorative rubber or foam stamp of your choice using Staz-on or any solvent based ink.
 Tear a piece of corrugated cardboard to expose the corrugations. Use as a stamp.
 Paint any circle with gesso. I used one of the water pots, but you can also use any jar lid.
 Stamp randomly on the envelope. When you are happy with the results, set aside, allowing the gesso to dry, and continue decorating your other pieces.
 When you are finished, decide what type of project you want to make. I wanted to play with ATCs, since they are a good size to experiment with. Cut the piece twice the width of the project and the correct length. For the ATCs I cut the pieces 3 1/2" X 5". Pre-fold the piece before gluing.
 Open the piece and turn it over so you are looking at the inside. Because the paint bleeds through to the back, they must be covered. What better way than to make them double sided.
 I've tried other glues and they just don't work with Tyvek. The very best glue for Tyvek is UHU Original Stik which is distributed exclusively by Saunders in the US. One of the bonuses is that you can see where you've glued, so you know you are getting good coverage.
  Fold the insides together and press until you have a good seal. Pick the side that compliments your art for the front and the other side for your information.
 Use your corrugated cardboard to add lines to the back for your ATC information, and use it on the front to compliment your design.
 Did you guess what the ATC I posted yesterday was made of? The beautiful bonus with this material is the lovely threads of pattern in the Tyvek that is highlighted by the paint.
 This is my Earth Day creation. Green truly IS beautiful. Even the embellishment came from an old eyeglass nose piece that I attached using my favorite UHU Glue: Twist & Glue. It bonds to most materials and dries clear.
So spend your day recycling art materials. You will save money and save the planet in the process. You will make my birthday very meaningful if you recycle just one thing tomorrow. Have an artful and fun day today and tomorrow, both the planet's and my bEARTHday.
Monday, April 20, 2009
Endangered, an ATC
 A sneak peek at an Earth Day technique. Can you guess what the ATC is made of? It's not paper. Click on it to see if you can guess. It's definitely a recycled material.
Subscribe to:
Posts (Atom)


