


.jpg)


.JPG)


I've been wanting to get back into dyeing fabric, so today I thought I would head back to October, 2011 and share the
Tale of the Honey Bear
 This story begins with a honey bear. This honey bear originally held
honey, but now it holds nothing. However, because it is so pliable, it
is the perfect solution for a person like myself, born with a rare form
of arthritis, who can't squeeze a pastry tube. This honey bear will
help tell the tale of a fabric technique I have shown before, but have
now modified.
This story begins with a honey bear. This honey bear originally held
honey, but now it holds nothing. However, because it is so pliable, it
is the perfect solution for a person like myself, born with a rare form
of arthritis, who can't squeeze a pastry tube. This honey bear will
help tell the tale of a fabric technique I have shown before, but have
now modified. Oh look. The honey bear is hiding!
 On the other hand, Bleubeard is not
hiding, but wandering out into the shady part of the grass (or what is
left of it after this long, record breaking, hot, very dry summer). ED: Sounds like the summer of 2018, but I swear this post is from 2011.
On the other hand, Bleubeard is not
hiding, but wandering out into the shady part of the grass (or what is
left of it after this long, record breaking, hot, very dry summer). ED: Sounds like the summer of 2018, but I swear this post is from 2011. He appears to be studying where the shade ends and the sun begins.
 We'll leave him to his devices while we check out the materials for this
project. You can see I've now added a few items to the table that I
initially failed to bring outside.
We'll leave him to his devices while we check out the materials for this
project. You can see I've now added a few items to the table that I
initially failed to bring outside.Materials clockwise from back left:
Bleubeard (OK, he's just for show and not part of the materials)
Bucket filled with four cups of water
Empty cup to use in design
Several plastic bags, some new, some used, to cover work surface and hold fabric in place
Flour designated for crafting only
Fabric torn in various sizes
Empty honey bear container
Squeegee
Painters tape (low tack)
1 cup measuring cup partially filled with additional water
1/2 cup measuring cup
Chop sticks for stirring and writing
Plastic bag to cover work surface
 The tale begins with the 4 cups of cold water, a chop stick for
stirring, flour, and part of an old sheet that was taped to the plastic
for stability.
The tale begins with the 4 cups of cold water, a chop stick for
stirring, flour, and part of an old sheet that was taped to the plastic
for stability.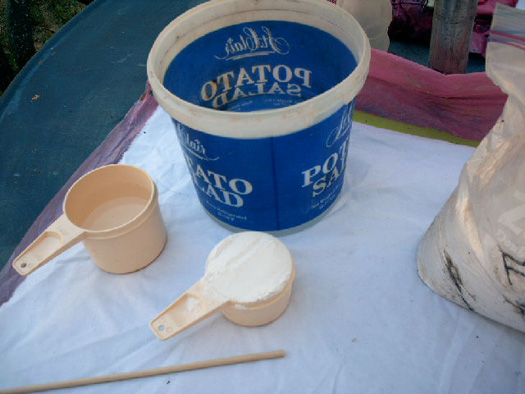 It continues when I measure the flour which I plan to add 1/2 cup at a time, beating until all lumps are gone.
 It didn't take long until I realized the chop stick was not the right
tool for stirring 4 cups of flour into the water, so it was off to the
house for a "bigger stick."
It didn't take long until I realized the chop stick was not the right
tool for stirring 4 cups of flour into the water, so it was off to the
house for a "bigger stick." A whisk made much quicker work of the process.
 Once the flour was well mixed with the water,
 the little honey bear took over to tell the tale.
 Because his squeeze top would leak at this angle, I placed the cover
back on him. You can see the flour/water mixture is quite wet and took
well to the fabric. The honey bear is pleased.
Because his squeeze top would leak at this angle, I placed the cover
back on him. You can see the flour/water mixture is quite wet and took
well to the fabric. The honey bear is pleased. The little honey bear held a lot of mix, as is evident even after I
added the mix to the second fabric. I'm not very good with "random"
patterns, but I really tried to make these random both in size and
position.
The little honey bear held a lot of mix, as is evident even after I
added the mix to the second fabric. I'm not very good with "random"
patterns, but I really tried to make these random both in size and
position. There was still some flour/water mix left in the honey bear after I
attempted writing. Now you see why I don't like my handwriting.
There was still some flour/water mix left in the honey bear after I
attempted writing. Now you see why I don't like my handwriting. Finally, after all kinds of squiggles and words of love, the honey bear was now quite empty!
I left each piece of fabric taped to its plastic backing and laid them on the ground to dry.
 I replaced the honey bear's lid and placed it aside so it wouldn't dry
before I could clean it. Then I added another 1/2 cup of flour, because
I felt the mix was a bit too thin for spreading.
I replaced the honey bear's lid and placed it aside so it wouldn't dry
before I could clean it. Then I added another 1/2 cup of flour, because
I felt the mix was a bit too thin for spreading.Next, I ran a bead of mix across the above fabric and used the squeegee to spread the mix. However, I accidentally deleted the photo of that step. And when it was gone, it was most assuredly and most horribly gone (to paraphrase the Wizard of Oz)!
 You can see the results of the squeegeed fabric with the word "love"
written several times using a chop stick (ED: sgraffito technique). When I tried to lift the
fabric, it was now too heavy, so I left it in place and
You can see the results of the squeegeed fabric with the word "love"
written several times using a chop stick (ED: sgraffito technique). When I tried to lift the
fabric, it was now too heavy, so I left it in place and moved to the other side, only to discover where Bleubeard had been
napping after I started to pull the chair away from the table to take
the photo.
moved to the other side, only to discover where Bleubeard had been
napping after I started to pull the chair away from the table to take
the photo.  You can see the squeegee in the upper left of the photo. I used the
same technique on this fabric, running a thick bead of mix along the top
of the fabric and using the squeegee to spread the mix. I then used
the old cup to make circular impressions in the mix.
You can see the squeegee in the upper left of the photo. I used the
same technique on this fabric, running a thick bead of mix along the top
of the fabric and using the squeegee to spread the mix. I then used
the old cup to make circular impressions in the mix. It was quite windy by this time, so I had to weigh the plastic down on the edges while the fabric dried a bit. I then cleaned the materials that had mix in or on them and returned them to their proper storage places. Once dry enough to move, I took all the fabric pieces with the plastic intact, inside overnight.
 The next morning, although it was quite windy, I hung each of the fabric
pieces on the line. Some of the pieces are beginning to curl at the
bottom. This is to be expected.
The next morning, although it was quite windy, I hung each of the fabric
pieces on the line. Some of the pieces are beginning to curl at the
bottom. This is to be expected. You can see the flour/water mix is beginning to dry, because it is starting to change colors. As an aside, don't you just adore my clothespin bag made by a friend? She used tea dyed fabric in the design.
 For now, this is my favorite piece, maybe because it took the longest to
make, and maybe because I anticipate visualizing how it will look once
the paint is added.
For now, this is my favorite piece, maybe because it took the longest to
make, and maybe because I anticipate visualizing how it will look once
the paint is added.  I began with this rag I used to clean up the remains of the flour/water
mix. The honey bear has served his purpose, has been cleaned, and is now safely
tucked away in his hiding place in the basement.
I began with this rag I used to clean up the remains of the flour/water
mix. The honey bear has served his purpose, has been cleaned, and is now safely
tucked away in his hiding place in the basement.A bit of explanation about resist dyeing. Using flour is basically the same as using wax, only less difficult to remove afterward because it doesn't require an iron or steaming process. You can also use oatmeal, mashed potatoes, or malt-o-meal. Ideally, you should add a bit of liquid fabric softener (the brand I use is Sta Flo) when you mix the flour with the water, but I forgot mine and was too lazy to get it.
 The flour resist dries hard and sticks to the fabric, even when exposed
to gale force Kansas winds. It doesn't come off easily by itself, but
can be removed with water. One way to add a batik look to the dried
flour is to scrunch the fabric, then straighten it out. In order to put
a few breaks in the flour resist, I had to peel it away. The fabric is
still attached to the plastic bag via the low tack tape at one end,
because I have enough spilled color on my worktable as it is.
The flour resist dries hard and sticks to the fabric, even when exposed
to gale force Kansas winds. It doesn't come off easily by itself, but
can be removed with water. One way to add a batik look to the dried
flour is to scrunch the fabric, then straighten it out. In order to put
a few breaks in the flour resist, I had to peel it away. The fabric is
still attached to the plastic bag via the low tack tape at one end,
because I have enough spilled color on my worktable as it is. I began by adding a bit of Golden fluid acrylic to the fabric. Remember, anywhere there is flour, there will be NO paint. That's why it is known as a resist technique.
Also be aware that you cannot use color mists and dyes using this technique. The mists and dyes will wash away when you remove the flour. I suspect you could use Staz-on reinkers, since they are waterproof, but I prefer to simply use acrylic paint.
 The fabric has now been painted. I could have kept it off the flour,
but it was easier to paint the entire cloth. I broke down and thinned
the fluid acrylics with a bit of water because I wasn't getting the
coverage I expected. The flour began to smell like . . . WET FLOUR.
The fabric has now been painted. I could have kept it off the flour,
but it was easier to paint the entire cloth. I broke down and thinned
the fluid acrylics with a bit of water because I wasn't getting the
coverage I expected. The flour began to smell like . . . WET FLOUR. This is a lousy photo, but I took it late, late at night and the
lighting in the living room is ambient, rather than illuminating.
Another good reason for keeping the plastic backing, was evident as I
left the various fabrics to dry on my area rug. I used red acrylic only
for these three fabrics.
This is a lousy photo, but I took it late, late at night and the
lighting in the living room is ambient, rather than illuminating.
Another good reason for keeping the plastic backing, was evident as I
left the various fabrics to dry on my area rug. I used red acrylic only
for these three fabrics. The next day it rained. And rained, and rained, and rained. In fact,
it rained for two solid days. When I was finally able to make it
outside, I set these pieces on my garden fence because it was close to
my outdoor faucet and hose. Then I turned the sprayer to the "fiercest"
setting and proceeded to blast my fabric until the flour was loosened.
The next day it rained. And rained, and rained, and rained. In fact,
it rained for two solid days. When I was finally able to make it
outside, I set these pieces on my garden fence because it was close to
my outdoor faucet and hose. Then I turned the sprayer to the "fiercest"
setting and proceeded to blast my fabric until the flour was loosened.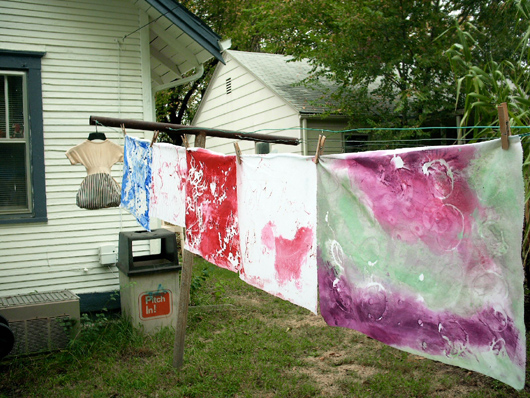 When all the flour had been removed, I washed the fabric and hung it on the line.
 Under no circumstances can you remove
this flour in your house. You must use a bucket of water, allow the
fabric to soak, then use a scrub brush to remove the dried on flour.
Alternately, you can use the power position on your hose sprayer like I
did. I was afraid to use my power washer because I feared it would damage the fabric.
Under no circumstances can you remove
this flour in your house. You must use a bucket of water, allow the
fabric to soak, then use a scrub brush to remove the dried on flour.
Alternately, you can use the power position on your hose sprayer like I
did. I was afraid to use my power washer because I feared it would damage the fabric.The above design turned out to be one of my favorite pieces. I used lavender and pale green acrylic paints on this piece. Somehow, I allowed the watered down acrylic to bleed under some of the flour, but I felt that added to the charm of this piece. Be aware this piece will dry lighter than it is at the moment.
 You can see the "love" was nearly lost in this fabric on the right made
using the squeegee and a chop stick. The only place it took color was
where I watered down the red acrylic paint. The one on the left was a
better example of painted fabric using my beloved honey bear. The white
is where the honey bear left his mark.
You can see the "love" was nearly lost in this fabric on the right made
using the squeegee and a chop stick. The only place it took color was
where I watered down the red acrylic paint. The one on the left was a
better example of painted fabric using my beloved honey bear. The white
is where the honey bear left his mark.  The piece on the left is the one I showed in the beginning of this post.
It held the leftover paste that I cracked. I really like those random
cracks. The marks on the fabric on the right were made using the metal
cup. It turned out rather bland, I thought once all the flour was
washed away.
The piece on the left is the one I showed in the beginning of this post.
It held the leftover paste that I cracked. I really like those random
cracks. The marks on the fabric on the right were made using the metal
cup. It turned out rather bland, I thought once all the flour was
washed away. A small portion of the piece I really liked is shown above. I used my
scanner to show the subtle marks that didn't show when the fabric was
still wet on the clothesline.
A small portion of the piece I really liked is shown above. I used my
scanner to show the subtle marks that didn't show when the fabric was
still wet on the clothesline. This piece looks like some of the flour paste is still on it, but I assure you, there is no flour left in this fabric.
 This piece is a hoot! I laid a magazine on the back of the fabric and
it showed through the scan. That shows how thin this sheet was.
This piece is a hoot! I laid a magazine on the back of the fabric and
it showed through the scan. That shows how thin this sheet was. The same thing happened to the "love" fabric. That sheet was quite
thin, too. I could have rescanned, but I had already put the fabric
away before I checked the scans. Sometimes it doesn't pay to be
organized.
The same thing happened to the "love" fabric. That sheet was quite
thin, too. I could have rescanned, but I had already put the fabric
away before I checked the scans. Sometimes it doesn't pay to be
organized.Ruminations:
I now believe there is a fine line between the amount of flour and water I used. I do not believe equal parts of flour and water are the way to go. I will need to experiment with the quantities of each, but I think I started with too much water and didn't add enough flour to the mix. I hope to experiment some more before the weather turns too chilly to work outside.
The final chapter in this saga will occur when I actually make something out of these various fabrics. I truly hope this tutorial has been helpful and addressed any questions you might have had about this technique.
_______________________________________________________
Now it's time to share your own Second on the 2nd. The rules are quite simple and everyone is welcome to join the fun look back. All you have to do is bring back a post that you are especially proud of, or perhaps one you shared before anyone knew your blog existed. Any post, any genre, any artistic endeavor is acceptable. Then link below (direct links only, please) and Bleubeard and I, along with other Second on the 2nd friends, will be by to visit. Please be aware this link is only open for five days, so linking on the 2nd is preferred.


23 thoughtful remarks:
I don't have the space for such experiments but enjoyed reading your Second post. You got some interesting results.
That was pretty amazing, Elizabeth. I would get less information in a book on the subject. Of course I was distracted by a certain young cat photo-bombing the demonstration. So nice to see Bleubeard "helping" in his youth. Back to the demo - I now understand a good bit of this technique that puzzled me before, thanks to the extensive words and visuals. I enjoyed your marvellous sense of humour, as always, with the antics of the honey bear and the episode where you stirred the thick paste with a chopstick, all lovely touches that we rarely get in a book.
I hope you have caught up on your sleep. Thanks for the nice comment on my "Yellow" piece which appeared very early this morning.
Are we going to love yellow by the end of the month?
Love from Sheila
Lovely to see Bleubeard wandering about in the garden. I don't have room to do experiments like this, and I must admit it disturbs me to see flour being used, when so many people in the world have nothing to eat. Thanks for all the catch up comments on my blog! Valerie
That is a great tutorial, with interesting results.
Can you remember what you eventually did with those fabrics?
Lovely to see Bluebeard moving in on the scene.
Have a good weekend,
Lisca
Interesting experiments Elizabeth. My favourite is the green and purple piece of fabric.
Hope you aren't freezing in your corner of the world.
I like the bear and Bleubeard getting into some of the photos. I didn't know about this Second on the 2nd so I'll see if I can find something to re-post.
Wow! This process seems like it took you quite some time, but it seems like a cooler version of tie dying, and I like it a lot. I've had those honey bottles and always just thrown them away, but I'm thinking they would be perfect to use for glue or sauces. Once again, you've taught me something very neat and new! Happy Saturday and Hugs..RO
Wow, learn something new every day. Most definitely this is an outdoor sport. My favorite piece is the blue one, but they all turned out great. Love your honey bear and Bleubeard was a good supervisor.
I don't have nearly enough room for this, but I love what you created here. I also love seeing the honey bear with a new purpose in life :)
I would have never guessed that flour could be used for a resist on fabric. This is amazing.
Thanks for re-sharing it.
This is very cool and loads of fun. I didn't know about the flour as a resist either. And as always, your tutorials are really so well documented, they are a little book in themselves.
Thanks for catching up with me after your trip. You must be swamped!
I am absolutely thrilled about your results Elizabeth! A fabulous technique - never hear d about this yet!
Happy Second on the 2nd!
Hugs, Susi
How fun to see this technique. I didn't know you back 8 years ago so it is fun to see this blast from the past. And I have heard of batik but not with flour and water so it is cool learn this. Like you, I have a hankering to play with fabric and color but right now with single digit temperatures it is not a good time. Oh nice weather. Happy second on the second. And now that my daughter and her beau have left I can finally get onto the computer! hugs-Erika
This is such a great post for me to read as it reminded me of the time I used flour and water for the very same technique with one of my classes - we only used small squares and it washed out quite well in buckets. The results were not as spectacular as yours but we had some usable pieces to make stitches into to make calendars for parents. I had forgotten all about it until I saw this so thanks for the memory trigger! Lovely to see a youthful Bluebeard too! I recall you saying he doesn't go outside now...or do I??? Hugs, Chrisx
I totally remember this post! So much work you went to on this experiment. You are always so much better at documenting than I am.
Happy Second on the 2nd!
ACK!! I just thought I posted and even linked up and my flippin post is gone!!!!!!! UGH! I may be back to try again...or not. GRRR
What an amazing technique - I'd never come across it before. So happy that you shared this again, and thank you for all the detailed how-to tips and thoughts. The dyed fabrics are so cool, each one unique and special in its own way.
Alison x
A fabulous revisit post Elizabeth and you shared a great technique.
I loved the photos and of course seeing the handsome Bluebeard in the garden with you was lovely to see, even though he was looking for a shady spot to curl up and have a nap.
Yvonne xx
I remember this post so well Elizabeth and I am still amazed at the wonderful effects that you achieve with on the fabrics.
Great to see Bluebeard going walk about and finding some sunshine and shade.
Have a great day and thank you for revisiting this wonderful post
Love Chrissie xx
I love these revisits and reposts Elizabeth you are so generous with your experiments. There's a comfort in working on fabric no matter what medium is being thrown at it, it's such a forgiving background for so many things. Your washing line reminded me of mine last summer, much more interesting than hanging our usual washing out to dry. Fabulous outcomes and i'm wondering of you every got round to using it all..
Sending creative wishes your way.
Sunday HUgs Tracey x
Hi again Elizabeth. Thank you for your kind words on my blog. And yes, you may add my blog to your left sidebar. I would be honored by you doing so. I also list blogs under the heading "Blogger Sites (5 Most Recent Shown)" on my blog, and you and wonderful Bleubeard are there already! :-) I add more people as I find them, but I didn't think to ask them for permission first. I hope I haven't offended anyone by doing so. After seeing this blog post of yours, with Bleubeard sneaking into some of the photos, I'm thinking I should make a post showing my handsome cat, so I'll try to do that in the near future. Unlike Bleubeard, my cat is very uncooperative once he sees the camera. He feels the need to get up close to discover what it is, instead staying where he was for my perfect photo of him. :-)
thanks so much for linking me up-I will need to wait til I can see before I can visit-good thing I was type lol
my husband saw clear the first day. my first eye done a thursday could not see til sunday but because my other eye could still see close up I got by better. this second eye also done on thursday I still can not see today-and since both eyes have been done I knew I would lose close up vision but so far no intermediate vision either. every person and every eye is different and it takes a month to heal each eye. so like Barbara said I need patience-which I don't have when it comes to not being able to read
I see the doctor on wednesday morning, I know sometimes he has to do a strong antiobiotic wash to clear the film that is across my vision I will visit everyone when I can thanks
This is a very interesting technique Elizabeth !! thanks so much for sharing it with us. the results are amazing. I have used flour with water just to become the fabric stronger, and then I can cut with a scissors, but not this way... wonderful !
love the mug with the dogs !!
I wish you a very nice afternoon, take care
Big hugs, Caty
Post a Comment