


.jpg)


.JPG)


 I realize I'm a bit early sharing this post. I shared so many tutorials last month, I didn't feel the need to create one for the second Thursday of the month. And because there are so many, many photos and techniques this week, I've decided to break it into two posts. It will also allow more drying time for the pages, several of which took nearly three days to dry.
 For all of these techniques, I will be using 90 lb watercolor paper. You can see the specifics here.
 For all of these techniques, I have included these specific products. I will add others as needed, but all will take these. From back to front:
Used pie tin
Instant coffee that got damp, then dried in one mass in my basement studio
Parchment paper (or any product that will keep excess water off your table)
Watercolor papers cut to 6 X 9 inches (15,24 X 22,9 cm)
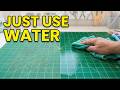
 For this first technique, we are going to do a bit of blowing. I have included a spoon and a straw.
  For the first technique, I withdrew blobs of coffee from the jar using the spoon.
 Using the straw, I blew into it over the various blobs of coffee.
 I had to remember to keep rotating the paper so the blobs were distributed. Some of the coffee blobs overlapped each other. I tried to wipe up the excess coffee using a paper (kitchen) towel (which I didn't think to show).
 The next technique is quite simple. I accidentally got some excess coffee on the paper when I was transferring the coffee to the pie tin, but didn't feel that would hurt anything.
 I pressed the bottom of the take-out cup to the coffee in the pie tin and stamped circles on the watercolor paper.
 I swiped the next watercolor paper on the parchment paper to remove excess coffee. I wanted the effect. I have added another "stamp" from my stash of things to stamp with.
  I was really very happy with the marks this made.
 I couldn't have been more pleased.
 Then I turned the "stamp" over and stamped the other side at a 90 degree angle.
 This made me very happy, too.
 I look forward to seeing this one after it's dry.
 These three are finally dry. I see a great deal of potential for great backgrounds.
 Now let's play with a little resist. I'm using sea salt, but I might throw in a bit of rock salt, too.
 I have to add coffee to the watercolor paper first, though.
 After adding the sea salt, I applied more coffee so it would saturate the salt.
 While the other paper was drying, I decided to play with my food.
 Rice absorbed the coffee nicely.
 Once the rice was dry, and it had been removed from the paper,
 this became my favorite design. Personally, I'd like to make about a dozen of these.
 What was possibly more interesting was when I turned the watercolor paper over. The pattern on the back was note-worthy, too.
  Who knew rice could be so interesting from an art standpoint.
 Finally, it was time to remove the sea salt from the watercolor paper.
 This pattern was interesting, but what I was most pleased with
 was how the coffee sparkled when I moved it back and forth in my hand. Sadly, the camera doesn't pick up that sparkle. When I showed them to my friend Scott, he asked if I added glitter to the page. I told him no, that was the magic of the salt.
Ruminations:
1. I need an area where I can dry my papers. I had to wait while some dried because I didn't have enough space on my table and counter to dry all of these at once.
2. I used a paper/kitchen towel to wipe up excess coffee, but when I did, I often disturbed the pattern. I'm sure there is a magic amount of coffee that should be used with this paper, but I haven't found it yet.
3. By far and away, my favorite was the watercolor paper and rice.
I don't expect you to create a tutorial, or even make coffee infused papers. However, I'd still love for you to share your own drink inspired post this week. It can be
gifts you received, photos, a place you visited, movies, postcards, mail
art, junk mail, catalogs, books, sketches, mixed
media, drawings, paintings, tags, scrapbooking, or other art that is
digital, hybrid, or traditional, as long as it in some way relates back
to a drink, any drink. Regardless,
please share below and Bleubeard and I, along with the rest of the T
gang will be by to visit. Please link only your T post and not your
blog in general. Bleubeard would like to remind you that old photos are acceptable because they may be taken
any time, not just on Tuesday and most assuredly not just this year.
When this post goes live, you'll be able to access it forever on my Tutorials page.


32 thoughtful remarks:
You got some fascinating papers with your coffee ☕ experiments. I'm sure the papers must smell good, too. Happy T Day, hugs, Valerie
My reaction to your project was the same as Valerie-Jael's: your art must also have a great aroma. The best thing about that: you can't reproduce it online.
be well... mae at maefood.blogspot.com
You are so clever. You will do amazing things with this artwork.
Hi Elizabeth, such a fun tutorial I really enjoyed it. I never would have thought to use coffee in this way or the rice-great ideas!! thanks for sharing with us
Intriguing - and lovely.
This is a great tutorial, Elizabeth. Loads of ideas for coffee stained background papers. My favorites are the first three. Especially the one you stamped with that circles thingy. As well as the one stamped with the bottom of the take out cup. Quite fascinating all the designs you created.
I love mark making and playing with salt but I never thought of rice! Brilliant idea! I like how that turned out. :)
What a fun idea for T day. It's something different and that's always a good thing. I like the results. I never do well with the straw blowing. I always get a bit light headed, but yours is amazing. I do like the rice one also. It does remind me of Staphylococcus bacteria on a microscope slide, but that doesn't make it bad. It could make a cool science page. I think my favorite was your salt one. What a fabulous collection you made. I'm looking forward to the next post. Have a wonderful T day. Hugs-Erika
Now I will be on the watch for some of these backgrounds in your art. I always love your wonderful backgrounds, they are works of art in themselves. I especially like the first one here!
Beautiful backgrounds! I agree, I like the rice one the most. Really cool!
Happy Tea Day,
Kate
I really love the rice one, too. It's my favorite but the blogs are also wonderful! Well, they all are!
The rice is my favorite, too! Great idea - also the salt! Next time Ingo makes real coffee, I´ll give it a go, thank you for teaching :-)
great fun, and theymake nice patterns. I don't have much drying room either.
Amazing results with the coffee experiments, using the rice gave awesome effects and you now have fantastic starting pages for your art. I hope you got to drink some coffee as well.
Stay safe.
Yvonne xx
You are AMAZING. X
THANK YOU, Elizabeth. I know the salt technique, but until now I have not tried it. But I am in love with the rice technique! I will try it soon. Kisses, my friend.
All are fun, but the rice looks the coolest to me and I am going t try it soon. Great techniques and very fun way to play with your drinks, Elizabeth!
Happy T day. Hugz
Wow, so many beautiful papers! The coffee stained the paper wonderfully and it looks like you had fun with all those different techniques too 😀. I hope they are all fully dried now so you can use them. Happy T Day wishes! Hugs, Jo x
The various ways that you crafters find to display your creative talents never ceases to amaze and impress!
...this is something that I should try!
I never thought of using rice. That was my favorite pattern.
Cool tutorial! I like the textures and designs left behind on your paper. Very interesting. Nicely done, my friend!
What a fun play with coffee! I'm with you- I love the rice results. But really all of them are interesting.
I love your experiments and how you are so good at documenting them. I kind of stink at that process.
Happy T day my friend! And thanks again!!
Great ideas, and I'd be hard-pressed to pick a favorite. Sounds like fun. The color came out darker than I'd've expected, and I like that. Happy T Tuesday!
Ohhh I love this tutorial! You are always so cleaver in your art. Have a very nice day.
Wow! These are all fantastic -I love the blown one and that 'stamp' looked brilliant. I'll be giving rice a go for sure.
I know how difficult it is to find drying space my floor is a dangerous place sometimes!!
When I have excess liquid to mop I sometimes tear small amounts of paper towel and dip in the corners where the excess is - that way it doesn't distort the pattern.
The step-outs on your tutorials are always so interesting and really specific and clear. You really are so creative in trying new, different techniques and excellent at how you share them.
Elizabeth, these are really neat !!! the middle one { first trio} reminds me of leaves in fall !! hope this finds you and bleu and squiggles happy and healthy; we've been off the grid for what...89 years ☺☺♥♥♥
Thank You!
Oh my! You´ve had some fun! You got some very interesting patterns there. I do like the pattern on the back, although it didn´t seem to fill the page. The rice was the best, I agree.
Happy T-Day,
Lisca
I love painting with coffee! Beautiful results Elizabeth.
Post a Comment