


.jpg)


.jpg)


.JPG)


Some of you remember that one of my goals this year was to sort and eliminate any art supplies I was no longer interested in using. I decided to use my polymer clay and see if it was actually worth saving.
This is possibly one of the longest Second Thursday posts I have ever created. It took three days to create and a full day to edit the over 300 photos I took. I suggest you grab a favorite drink because this is going to take awhile.
 As I always do, I began by sharing my supplies I would be working with. I have so many this time, I had to break them down into various photos. These are the cookie cutters I might use in this project. I want to make it abundantly clear, once you use these cutters in your art, never ever, EVER use them for food preparation. Period.
 The tiny cutters contained in zippered plastic bags are those I was given when I created a tutorial for polymer clay one year. In my opinion, they are worthless. The metal ones in the background in a zippered bag are ones I like to use, along with hearts in the plastic bag.
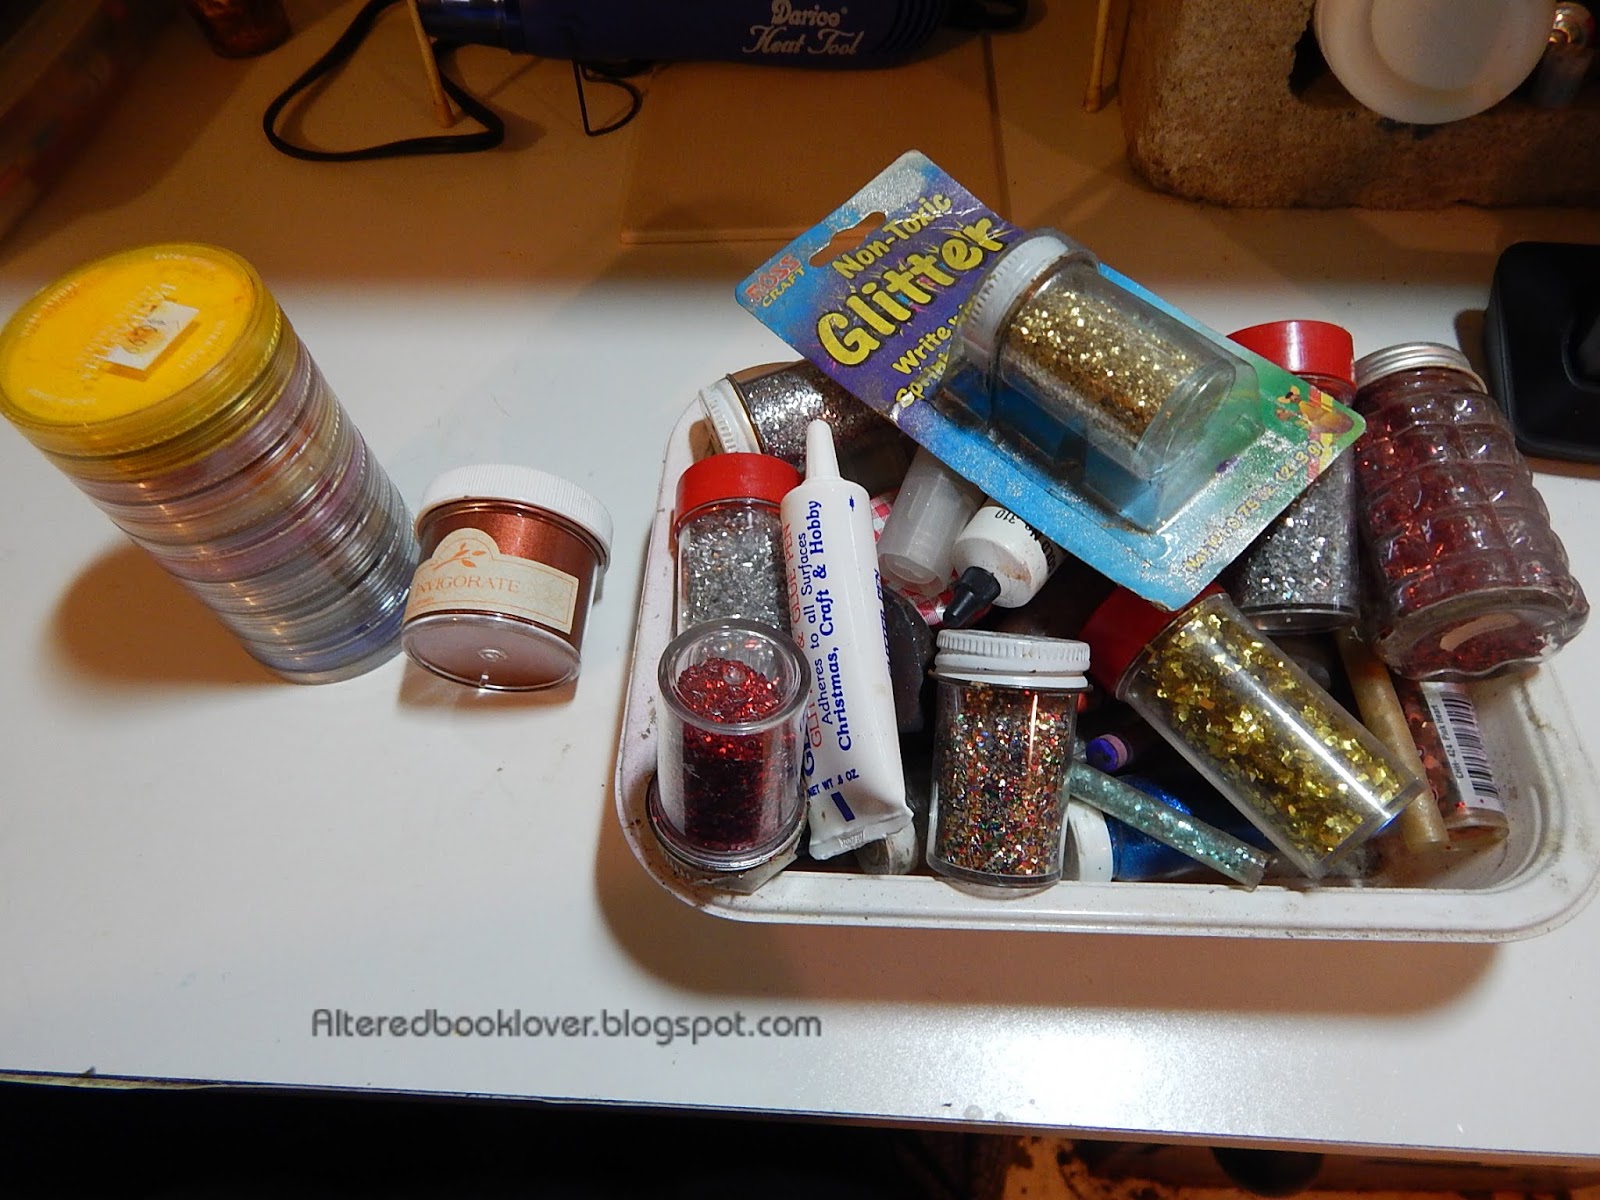 Pan pastels, mica powder, and glitter are next.
  I had big plans to use these pan pastels with the clay, but as far as I'm concerned they were a worthless product I purchased thinking how "cool" they were, at least until I realized you have to set them with a fixative, or you smear your project. They are not cheap, either!
 Copper mica powder. I knew I would use this.
 Lots of people use foil to tent their clay when it's baking. I've never done that, but though I'd include it just in case. The plastic wrap was to use with those worthless tiny cutters, but it didn't work for me. You also need some index cards on which to bake your clay.
 In lieu of index cards, you can use parchment paper. Index cards are cheaper, though, so you know what I'll be using.
  Oh MY! This is a mess. What in the world was I thinking? This was in such a mess, you can't tell this is where I keep my cutters and my molds, most of which are hand made using low-temp hot melt glue. If that isn't an oxymoron, I don't know what is!
 After about an hour, this is what it looked like. These are cutting instruments, like tissue blades, a ripple blade, various shavers, cutters, old dental tools for making marks, and a full set of Xacto knives. There is also dental floss for removing stubborn clay, sand paper, and Future Floor wax for sealing the clay. The doll heads will become molds if I ever get around to it.
 These are many of the molds I have made using my glue gun and a piece of metal.
 These are commercial molds. I purchased a few of them from a lady who was selling them, and I have purchased others at craft stores. They are pliable, and usually produce great results. On the bottom left is my bottle of Liquid Sculpey, a product I've never gotten to work for me. It's also rather expensive.
 These are the tools I was sent when I agreed to create a tutorial a few years ago for Sculpey. The best thing I got were the two handles that hold a tissue blade (which scares me). Now I know up from down, cutting side from dull side.
 It only took sorting a container and 12 photos to get through the accessories.
  When I pulled my polymer clay off the shelf and opened the lid, I was once again appalled.
  My Sculpey glaze, purchased at a garage sale, and my liquid Sculpey are waiting to be used. Several years ago, I read a comparison between the glaze and water soluble varnish. You know. The kind you use on your furniture and other wood you want to protect from the elements. The general consensus was the varnish lasted longer and wore better than the Sculpey glaze. Glad I didn't pay full price for mine!
  Here are the remains of the Sculpey clay after I used some for my tutorial. I find it frustrating that every time I move this clay, it shifts. You can never keep it straight unless you never use it!
 Although MOST polymer clay artists will tell you it doesn't matter what brands of clay you use, you can mix the brands to make different colors.
 Yes, I have bunches and bunches and bunches of old clay that should be used or it will get too hard to soften. I've never had that problem, though.
  After about another hour, this is what my polymer clay container looked like. I decided to use all the clay that had already been opened and stored in plastic bags. I'm glad I didn't bother breaking out any new clay, because all these bags kept me busy for at nearly 11 hours. Seriously.
I forgot to mention, I leave my unbaked open clay in their original packages in plastic bags. NEVER wrap them in paper. Paper leaches all the plasticizer out of the clay.
 I straightened this again, but didn't expect it to stay.
 The lid even fit well on the container, too. I put the never-opened clay back on the shelf and was now ready to make art.
 Finally, after 20 photos of supplies and such, I pulled out two colors of clay
 and began working them together to soften them. It is my belief you should wear gloves (even if they don't fit, like mine don't). Look how much clay color has gotten onto the gloves already. Although polymer clay is supposed to be non-toxic, I don't want that clay on my hands so it can leach into my blood stream. Whether you are using gloves or not, be
sure to wash your hands well after you have manipulated the clay. Don't
touch your face or mouth while working with clay, either. Better safe than sorry, is my belief!
and began working them together to soften them. It is my belief you should wear gloves (even if they don't fit, like mine don't). Look how much clay color has gotten onto the gloves already. Although polymer clay is supposed to be non-toxic, I don't want that clay on my hands so it can leach into my blood stream. Whether you are using gloves or not, be
sure to wash your hands well after you have manipulated the clay. Don't
touch your face or mouth while working with clay, either. Better safe than sorry, is my belief! Although I have a dedicated pasta machine, I didn't want to get it out because these are small pieces I'm making today. Instead, I decided to use wooden paint stirrers. If you don't have paint stirrers, you can use six (or more) playing cards on each side of the index card that is holding the clay.
 Note how the clay has already stained the index card. That is why you never wrap clay in anything except its original wrap and a plastic zip bag.
 I still had clay left over, so rolled it out onto the index card and cut an angel.
 With a small amount of clay left, I pulled out the glitter and added a hefty amount to the remaining clay.
 Somehow, most of the glitter landed on my studio floor, my clothes, and in my hair, but the beads didn't appear to show much glitter at all.
 Next, I decided to see if I could learn how to mix various colors of clay.
 Although I could have blended it further, I fell in love with this mottled ball.
 Next it was time to soften, blend, blend, and blend some more until my fingers felt like they would fall off.
  After nearly 11 hours of blending, shaping, and molding, this is what I got.
 These are now ready to bake. I want to make sure no two pieces are touching any other piece.
 Next it was time for a bit of assembly.
 One wing was on, but I got the toothpick a bit wonky and it left a bump on the heart.
 While trying to straighten the toothpick on the left and add the one on the right, my fingernails got in the way. Every time I picked up a piece of molded clay, my fingernails left a gouge mark. I even tried to smooth them with water, but that didn't work, either.
 I would just have to live with my failures.
 I placed more unbaked clay on the index card
 and placed it in the toaster oven tray.
  While that clay was baking for 45 minutes at 265 F in my toaster oven, I rolled out more clay, this time using two paint stirrers per side.
 You can see the mark left on the index card created by the clay.
 The other clay was still baking, and these were ready to bake. I now have ONE quarter of silver clay and a pinch of white clay left after all that clay I started with yesterday. I was pleased.
EDIT: My friend Erika asked if I have a separate clay oven.
 When I taught my altered book class (see my right sidebar), here is what I wrote:
 A friend gave me this toaster oven many years ago because she was going to throw it away. I didn't bother cleaning it after she gave it to me, because I knew the only thing I would ever cook in it would be polymer clay. I received it in this condition, and it has never seen a cleaning rag or oven cleaner. I've seen some of the new toaster ovens designed to bake clay that are sold at Hobby Lobby and other craft stores. My art friend Kathy has one. The element is in the top, whether you are baking, toasting, or broiling. My toaster oven has two separate elements, and that's why I've never had any of my clay burn. (That may be why some clay artists feel the need to tent their polymer clay)
 Further:
You can see I keep the temperature set to 265 F., no matter what type of clay I'm baking. I may have just been lucky, but it always works for me. To heat and bake, I simply plug in the cord. I don't even move the toaster oven anymore. I can't see baking the clay in anything other than my toaster oven.
 I specifically designed this tag for Try it on Tuesday's latest challenge Something Old, Something New and Tag Tuesday's latest challenge New Beginnings.
 We'll begin with the old. Obviously the clay is old, but it was blended and manipulated using several colors and newly baked. I made the tag from a used file folder, which is obviously old, but the design is new.
 The washi tape has been around a long time, as has the rubber stamp. It's a TH and yes, wood mounted red rubber.
 The mold and cookie cutters are old, but again, the face was blended, manipulated, molded, and newly baked. The assembly was newly put together, too.
 The tag background was brushed with Twinkling H2Os, which are older than old.
Once this tutorial goes live, you can find it on my Tutorials page under Bleubeard's lovely face.
Thanks for sticking with me through this, my longest Second Thursday Tutorial to date. And thanks go to Try it on Tuesday and Tag Tuesday for their latest challenges. I hope to see you both places, too.


23 thoughtful remarks:
Oh what fun this looks, love the way you get right into it...
Pan pastels, I have had mine for ever and never got into them either, tried but they just don't work for me.xx
Wonderful ideas, looks like you had fun. Valerie
Sorry, and thanks so much for making the gorgeous tag for Tag Tuesday, much appreciated, Valerie
Another info packed post, Elisabeth - wow! So many supplies, but I probably have quite a few clay supplies I never use, lol.
Love your faces. They're amazing... I have some other people made, but never tried it myself. You are definitely multi talented.
Thank you so much for sharing your clay bakes with us at TIOT this week.
Cath x
You have some nice polymer clay pieces for art this year. It might have taken a while but it looks worth it in the end. Do you have a separate clay oven? And have you decided to make more clay art or are you now done? I have done a lot of clay mosaics but it has been quite awhile and I have a bunch of clay things sitting around also. You are right about how much time it takes to do the clay work, especially when you aren't set and can't just walk over and begin. I enjoyed the tutorial this week and it might even inspire me to get back to my clay mosaic work. Hugs-Erika
Oh my gosh! I am totally impressed with your little polymer pieces - The faces are so pretty and I really adore how informative this tutorial is! You are a heroine with this clay and I learned that maybe my one package of unopened airdry fimo maybe is still to use?! I will see???!!! Had the package in hands lately and thought if I should throw it away as it felt a bit hard.
I simply LOVE LOVE LOVE this tag and can tell you that we are proud and happy to have it in this fortnight's collection at Try It On Tuesday!
Thank you for joining us again dear Elizabeth!
Thank you for the tutorial - I really enjoyed every step and photo! You are a lucky artist with your studio and the extra oven!
Love this little things you created - such beautiful colors!
Big hugs, happy rest of the day!
Susi
This was a thorough and instructive post- and what a full and productive day of play you had! This is one supply I've never tried, so appreciate seeing all that is involved. I'm reminded, as with so many of our projects, the supplies and storage required is a big part of the effort. Well done!
I still remember making necklaces with Fimo clay.
I like your piece of art Elizabeth.
Not long. Thorough :)
I've used play-doh and other types of "clay" that harden with time but never anything that had to be baked. This was fascinating, and I like the idea of including the pieces as part of a tag or card. Thanks for sharing your process :)
Wow you got some amazing results with the clay and your post if full of information. You have quite a stash of products for your clay projects.
I am thrilled you made the fantastic tag and added it to our Try it on Tuesdays theme, thank you for joining us there.
Did you ever try Hairspray to fix your Pans Pastels, I seem to remember reading that it did work and was much cheaper than the recommended products.
Yvonne xx
What a fabulous tutorial! I so enjoyed following along and the tag you created is amazing 😁. I love the design and the sparkle, your angel looks such a beauty! I smiled at the comment about your Twinkling H2Os being older than old ...lol 😉. Thanks so much for joining us at Try it on Tuesday! J 😊 x
WOW, Elizabeth! Thank you for sharing the tutorial! I have never used polymer clay!!! I am so happy that I visited your blog today and learned how. And I want to thank you SO MUCH for stopping by my blog and leaving such nice comments there. Happy New Year! HUGS!
Fabulous tutorial, Elizabeth. You make me want to get out my clay and play. Eileen xoxo
I love your clay pieces. So vibrant and full of color.
You have enough supplies to open a craft store. Heh.
Have a creative day:)
I think the clay pieces are awesome. the faces are amazing, job well done, and don't count the nail imprints as failures; rather as personalization !! ☺☺♥♥
I loved the mottled blues you blended and the faces you made. So very cool. I have played with the polymer clay and have an older toaster oven to use. I got a new one for the kitchen one time. I certainly don't have that much clay. I did burn some one time, but that's because I rolled it too thin. Now you have me wondering where the toaster oven and clay stuff are.
I haven't had my clay out for a long time! I know I won't be able to until this summer, but your post sure has me thinking about it.
Looks like you had a lot of fun! :)
Sorry Elizabeth tried to leave a comment yesterday on this Fab tag but computer was saying *NO* due to updates.. It's amazing when we put stash together exactly how much we have gathered or been given. I try and keep everything together but it doesn't always work out that way.
I love the face on your Tag, she looks so at peace and happy with the world.
Polymer clay is such a versatile medium, I use it a lot for handmade beads and embellishments. I have a trolley full of baking trays, cutters, shaper's, and roller's along with a rainbow of colours in my cupboard under the stairs but it's difficult to to get to. So a small pack of black and white stays ready to hand.
I need a Craft Palace to store everything wall to wall haa haa!!
Happy (weekend) now.. Hugs Tracey xx
Wonderful pieces
Thank you for joining us at TRY IT ON TUESDAY
Have a nice weeekend
Well, I say three cheers to you. I love what you made. I've given polymer a try and it's never been my media. Just looking at all the supplies made me laugh -- I wonder how much you actually kept when all was said and done! I've been doing that with paper a bit and will probably do a bigger purge this year, leaving enough for some collage work but not what I have which is way too much.
And thank you, thank you for saying you were GIVEN something, rather than gifted, which is like nails on a chalkboard to me. One of those recent turns of phrase that I wish could turn right back. Gift. Given. Giving. Got/Received. vs. Gifted, gifted, gifting. SCREAMS!
OK -- this is going to be a long comment because I don't have your email to reply directly. I hate clogging your blog to do it but here goes! First, thanks for all the good words on the England posts and I'm glad you are along for the ride. Since you contribute to PBS, you should check out pbspassport.org (I think -- or else pbs.org) and their wonderful video collection. I don't know if Mr. Selfridge is on it -- the back episodes -- but there's tons of good material!
I'm so glad you are interested in Victoria. She was quite a fascinating character/woman, wasn't she? So I know you'll be watching the third season of the series starting tomorrow -- and historian Lucy Worsley's programs after about her wedding to Albert and how they recreated it for the series.
And finally, thank you MUCH for the VERY good tip about putting a backing of another tree behind the paint chip trees. I may or may not have figured that out by myself until I was sitting down at a table and saw the writing on the back! I have to head to Home Depot in the next week or two so I may start my paint chip collection then (as it is to the paint department I will be visiting!). I loved those! Cheerio!
Oh E, it does make me smile that you had to strop and tidy and sort before you could carry on. I bought a huge lump of white Fumo last month, I had in mind to make some porcelain looking tree decorations.....my weak pathetic hands couldn’t make it manipulable enough, gosh it was such hard work. Appreciate all your tips here, especially the colour blending, and adding the glitter..that made me smile too!
You have been very creative - love the way you used polymer for your tag.
Oh My! Those faces are so lovely - I am so pleased that you entered at Try It On Tuesday with one of them! I think I will need to revisit this page in the morning when I am not so sleepy!! Hugs, Chrisxx
Post a Comment