


.jpeg)


.JPG)


 For Day 6 of AEDM, I'm starting with some of my handmade shimmering mists, as well as my choice of paper. I've mentioned before that you should choose your paper (which is the substrate) based on how you are going to use your backgrounds or masterboard. If creating ATCs, moos, or inchies, heavy cardstock weight paper is probably best. The cardstock can be either 12 inch by 12 inch (what I'll be using) or a different format, depending on what country you live in and what is available in your area.
For postcards, you need even heavier paper, such as 300 lb. watercolor paper. If you choose to layer part of the masterboard over a greeting card substrate, consider using printer/copier paper, which will keep the cost of mailing the card down.
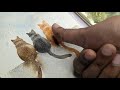
 My friend Sally was getting rid of this. I'm not sure what it's called, what it was originally intended for, or where it came from, but it reminded me of plastic canvas, only with larger windows. Since she didn't want it, I brought it home, and am finally going to see if it will make a background or a mess. It is a bit rubbery, so it will wash well, too.
 I smoothed the folds out over one of the substrates, and had a second one ready to lay over the top.
  With the overlay in place, I sprayed various shimmering mists on the paper. While the paper and the overlay were still wet, I laid the second cardstock on top and pressed lightly.
  When I turned the top page over, all I could say was "oh WOW." I'm in love. In love with this technique, that is.
 I got five backgrounds or the first layer of a masterboard out of this one bit of spraying, and it took practically no time at all. The hardest part was getting the various sprays to spray properly before everything dried. I'm sure anyone who has used those sprayers/misters has had trouble at least once!
 Next, I added a different rubber piece to the mix and sprayed. Once again, I liked the second paper I laid over the rubber circle even better than the one that sprayed through the rubber piece.
 I forgot to show the piece I used for a second layer, and washed it before I took a photo. Here it is after it was washed and dried. Remember, sprays should be cleaned off any mask or stencil after use or the moisture from the spray mists could activate the previous colors. That could be a good thing or a disaster, depending on the colors you activated.
I hope you enjoyed this new background technique, brought on by a piece of rubbery material that was headed for the recycle bin. I will add it to my Tutorials page so you'll have it for future reference.
Today is Day 6 of AEDM and I created some backgrounds that can be turned into a masterboard. As always, I appreciate your visit and continued support of this month's projects.


24 thoughtful remarks:
Wow. that turned out terrific! love the patterns created! The rubbery product looks like a non-skid pad. I have used it for a shelf-liner to keep dishes or pans from sliding when stored vertically, but it may be originally intended to put under rugs to keep them from slipping...? I like this use as a stencil much better! ♥
Love the design you created with your 'stencil'. It looks like the stuff you put under mats and small carpets to stop them slipping about on the floor. You really put it to good use. BTW, The rust sculptures in the castle ruins here are really beautiful, I love looking at them, but never saw kids playing on them yet! I might get arrested if I put my sheets there! Have a nice day, hugs, Valerie
Ok, that's damn awesome! You make me want to collect things I can spray through. I can't wait to see what you do with these!
Love this Elizabeth- it makes a fabulous stencil and you got some great backgrounds. Hope you'll use them in one of your next day's art projects!!
That´s creative! The thing you got from Sally looks like one of those anti-slip things one puts under carpets. I have become a bit more brave about splashing paint around, but I see I have a long way to go!
I love using found objects as stencils and stamps etc. Yours is wonderful! What a great effect. I hope you'll show us the next stage in your masterboard. I love doing them, they are such a great way to start a project or several off.
I love this! You are always opening up my mind to what can be part of the creation process. Thx!
Oh my goodness. I love these so much! I want to go out and grab more sprays and go wild with abandon and reckless artsy-ness. you always inspire me, always!
I love how this is coming along and that you used the rug slip stuff to do it, our very own recycle queen!! I have used it in cupboards for keeping glasses from being damaged when stored, its quite useful and now has a craft use too!
oooh what a great background-and an equally great save of a "new stencil"!! We have a roll of similar material and use it under a carpet to prevent skidding. Thanks for sharing!
I think making backgrounds is so fun! These turned out great!
That's a fantastic set of papers, you will have fun using them. Love how the stencil worked out with the lovely colours you used. I love using left over materials as well.
Yvonne xx
Fantastic! Love all the bright colors. Yes, I always have trouble with sprayers and misters clogging up. Drives me nuts, but when they are working they are wonderful. So smart of you to keep these! :)
I really like these! Thanks for sharing your method.
Those are gorgeous! Thanks for sharing.
blessings
~*~
Those anti skid pads come in handy for a number of things :) I use them between the plastic containers I store my collage papers in. I also use them like you did or as stamps. Fun stuff . I like your pages.
Looks like a fun day of creating. I was thinking before you said they were rubbery that it was latch hook rug mesh but obviously I would have been wrong. :)
elizabeth, i used to have such a Thing to prevent the carpet from slipping around (and falling thus). as i don´t Need it any longer, i also cut pieces of it and use it like stencils (as you do) and i cut a small Piece to glue it onto a Piece of Wood and it is fantastic for stamping texture! Bonus: i can even stamp with acrylics without cleaning afterwards (which would ruin every rubber stamp). a fun Thing to Play with! and you did:))
This is awesome! I love how you created this out of 'trash'. It looks like a printing technique and very abstract. Great work.
Fun fun. I would want to play with it too. Makes great marks. Xox
Hi, as I am new to art this is something I never tried. But it seem so much fun. So far I´m only in the digital world but I might be inspired to try "the real world" :)
These results are fantastic! I love using household stuff for printing and stencils - your use of the sprays in different colours has inspired me! Hugs, Chrisx
Your pages turned out great!
Super use of those inventive stencils E.
oxo
These backgrounds turned out fantastic!
Post a Comment