Not being able to post to my blog for a month has taken a toll on my resolutions. I have not been able to post a tutorial during February, so I'm going to do that today. This tutorial will be divided into two parts because there are so many steps. So I hope you'll come back tomorrow when I finish it. It actually took me several days to dye this fabric. It was not one of those tasks you can do in an afternoon.
I first saw this fabric dyeing technique years ago on a blog or web site, but when I tried to find it again, I couldn't. So not only could I not find it, I couldn't exactly remember how it was accomplished. I admit this is a fly-by-the-seat-of-my-pants technique that turned out good in some spots, and not so good in others. However, the idea behind it is just another way I have found to dye fabric without using harmful chemicals or dyes.
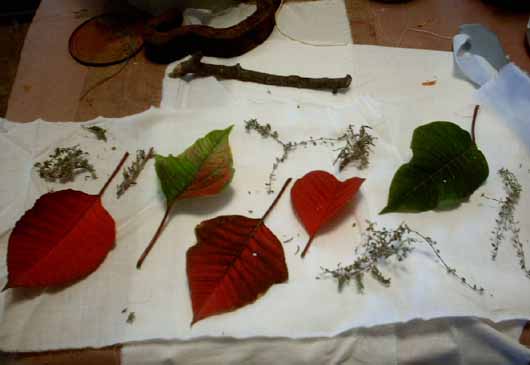
I began by gathering all my supplies.
Clockwise from back left:
Stainless steel pot (dedicated to crafts only)
Rusted cast iron piece
Wax linen thread
Crochet thread
Fabric (old bed sheets torn to a manageable size)
Sticks from my yard (various shapes and diameters, but no wider than the diameter of the pot)
Rusty can lid
(Not shown: various leaves, herbs, and onion skins; protective gloves)
First, I took the stainless steel pot to the kitchen and filled it with water. I put the water on to heat. Back in the craft room, I laid out one of the pieces of fabric. Next I gathered several leaves from my poinsettia, as well as pieces of thyme I harvested last autumn from my garden and spread them out in what I hoped was a pleasing manner on my fabric.
I wrapped the herb and leaf fabric around one of the sticks and tied it as tightly as I possibly could using the crochet thread.
I created the second bundle basically the same, but this time I remembered to photograph how I started the bundle before I wrapped it.
For the third piece, I slipped on protective gloves, then wrapped more thyme along with yellow onion skins inside the rusty cast iron piece, then bound it using the wax linen.
By this time I was nearly out of most everything except poinsettia leaves and fabric, so I wrapped the remaining skins and herbs, along with the majority of the final leaves in another stick, and tied the bundle using crochet thread.
Finally, I wrapped several small pieces of fabric in the last of the leaves and onion skins around a rusty lid and tied it off with more crochet thread.
A couple of things I should mention is always start with the stick, rusty piece, or whatever you are wrapping your fabric and leaf bundle around. Be sure to wear gloves any time you are working with rust or rusty pieces.
Tomorrow we make sure the water has heated sufficiently to a slow simmer, and finish this tutorial.


.JPG)


7 thoughtful remarks:
Can't wait to read about what happens next and see the finished product. I just need to find some good old rusty stuff.
Darla
Oh...I can hardly wait to see the results!!! FUN!!!
can't wait to see how this turns out! x
This looks really interesting! I can't wait to see how it all turns out.
I'm sorry you had trouble commenting on my blog--it seems you did not in the past, and I haven't changed anything...so maybe this was a one-time annoyance! I hope so!
Now that looks like a witches brew of sorts!! Can't wait to see how it all turns out, I am imagining some sort of tie dye effect from my youth!! LOL
Thanks for sharing your info. I really appreciate your
efforts and I will be waiting for your next post thanks
once again.
my weblog; Quantrim slimming
I never have seen this way of dyening fabric. I'd love to try it.
I once saw a site where fabric was natural dyed by steaming the wrapped faric with leaves. Are you familiar with that?
http://www.indiaflint.com/
Post a Comment