Thursday, June 30, 2011

June's and July's monthly calendars

Last month I had June ready before Kate at The Kathryn Wheel posted the link. This month she surprised me by having the link ready on the last day of June. She also pointed out we are officially half way through this year. Not sure I'm getting any better at these pages, but at least I added the little hand cut birds this month as my meager contribution to the page decorations.


Here is the left side of June completed and scanned. Again, sorry I'm not sure how to stitch these two together into a single page. Click to enlarge.


The right side of the page where I might be able to add a bit more embellishments. Click to enlarge.


I'm also ready for July. I had these pages finished two days ago, which surprised me. Note the red and blue motif to signify our US Independence Day (July 4).

ABC Anniversary swap: Goddess No 8

I'll take you through the steps in making my ABC anniversary swap entries that have to be the same or very similar.

For those of you who follow my blog, you saw (this post) I made some backgrounds one Saturday. When I cut the papers, something happened. I still can't figure out what I did wrong, but I didn't get enough backgrounds for my project. So, I was back outside a few days later, making a couple more background pages.


After they were dry and cut to size, I got out the supplies for the remainder of the technique. From back left top (clockwise): patching plaster, stencils, credit card, bamboo skewer, backgrounds, bowl, water, coffee, plastic sheet. The coffee is not required, just something I need. I was trying to recreate the technique I found at Connie's blog. I suggest you visit her blog, because the technique is fabulous and it works!


I began by mixing some patching plaster which I had convinced myself might work as well as Connie's drywall mud, which is pre-mixed. I finally gave up trying to stir that mess with a bamboo skewer, and went right to the faux credit card. I used the technique that Connie used to apply the mud/plaster over the top of various stencils. In her video, Connie pointed out the background colors


would turn the drywall mud a lovely color over time.


I was certainly hoping so, because I was counting on the stencils. In case you are confused, instead of cutting pages into 4 X 4 squares, I cut them 8 inches by 4 inches, then folded them in half width wise. After spreading all the plaster on the pages, but before I removed the remainder of the plaster from the bowl,


I was going to take the various stencils to the outside faucet. It was then I saw the plaster fell off like chalk. I didn't even need the faucet for the stencils' just the bowl of leftover plaster.

When it was time to bring the squares inside,


I was shocked and mortified. The plaster not only fell off my plastic stencils, it also fell off my artwork. That's when I learned that patching plaster and drywall mud are not interchangeable.

At this point, I had too much invested in the squares to quit. Story of my life, I guess. Instead of making a single piece to see how things will work, I end up doing everything at once.


The good news in all this is the stencils accepted the patching plaster, and the plaster accepted the background colors. To compliment the backgrounds, I had intended to use a different image, but decided on the Goddess because I thought she would be a lot easier to cut out than the intricate image I had planned.


Here is a completed swap square. I sewed it on three sides. I know the colors are a bit similar, but I hope my swap partners aren't too disappointed.

Tuesday, June 28, 2011

WOYWW and not a rocking horse in sight

I've been working this entire day, beginning this morning when the red trucks pulled up to my house. I haven't had time to visit anyone, including Julia at Stamping Ground, our hostess.


My art supplies had finally been returned. Or were in the process of such.


The two people were there to deliver my boxes. They were not there to help set anything up or help me unpack.


There are boxes everywhere. Big boxes,


medium sized boxes, but no


poles/spacers to assemble my shelving. So, I'm stuck. They are telling me the shelving spacers or poles or whatever you call them, are probably in a box or two somewhere and they were just there to return the boxes, not assemble the furniture. So I'm apparently on my own. I've opened a few boxes looking for the spacers for the shelving, but to no avail. In case you can't tell, there are over 100 boxes in the craft room and hallway. Each box had a number marked on it, so that's how I know how many I had.

Thanks for visiting. Sorry no rocking horses tonight, because there's no room to put one. I STILL can't leave comments to blogs with embedded comments and I can't send you an e-mail unless yours is on your blog or profile page. I'm going to repeat this rant message until Blogger, who I've contacted, actually does something about it! And, yes I unchecked the "stay signed in" box over three weeks ago to no avail.

Happy WOYWW. You know I'll be in my basement looking for ways to assemble shelving for the next three weeks or so. Then maybe I can start putting a few things away.

Tea Tuesday: Celebrating the Stars and Stripes

Today I'm celebrating Independence Day a bit early, but I checked the calendar and it's the final Tuesday before the 4th (which is next Monday). So I'm celebrating a bit early with Kimmie and my tea Tuesday friends


The tea I'm drinking today is Lavender Earl Grey by Tea-Licious. It's actually cold, because I made a pitcher of this loose leaf tea and added a lemon wedge in the cup that promptly floated to the bottom. The irony is, I poured it in an orphan cup, which gives the impression it could be either hot or cold. The flag is in honor of July 4th, a distinctly American celebration. The explosion of color on the plate is reminiscent of fireworks that will be enjoyed that evening.


The vanilla fudge was so warm by the time I finished taking photos, I finally realized how warm the day was. I hope those of you who, like me, live in the northern hemisphere, manage to stay cool today. It's going to be a scorcher!

If the heat and humidity aren't bad enough, my doors will be open much of the day, since my basement art supplies and furniture will finally be returning. So that means if you don't hear from me this morning, it will be late tonight before I come calling.

And please be aware, I still can't leave a comment on blogs with embedded comments and I can't send you an e-mail unless yours is on your blog or profile page. I'm going to repeat this rant message until Blogger, who I've contacted, actually does something about it! And, yes I unchecked the "stay signed in" box over three weeks ago to no avail.

Friday, June 24, 2011

Inspiration Avenue: Summer sun

What could be lovelier than a sunny summer day? Maggie (Magpie) asked us to interpret that for the Inspiration Avenue challenge this week. So instead of trying to make something for my Friday Inspiration Avenue post, I decided to take a photo, instead.


This photo needs little explanation. A cold glass of tea poured from a vintage tea pitcher overlooking a quilt top blowing softly in the breeze on my clothes line, is all I needed to show what summer sun means to me. Thanks for this challenge, Magpie. It was fun being outside on a warm summer day. Feel free to click to enlarge.

And please don't forget, I can't leave a comment on blogs with embedded comments and I can't send you an e-mail unless yours is on your blog or profile page. I'm going to repeat this rant message until Blogger actually does something about it!

Thursday, June 23, 2011

A new to me technique

This is a very long post, so I hope some of you find it useful.


Before I begin, I wanted to show a bit of unexpected serendipity. I laid a couple of wet fabric scraps on top of some dry paper towels I used to sop up the excess dye ink I used last week. You can see, the paper towels bled onto the fabric. The darker areas are rust, the lighter ones are from the paper towels, which lost some of their color, especially on the left.


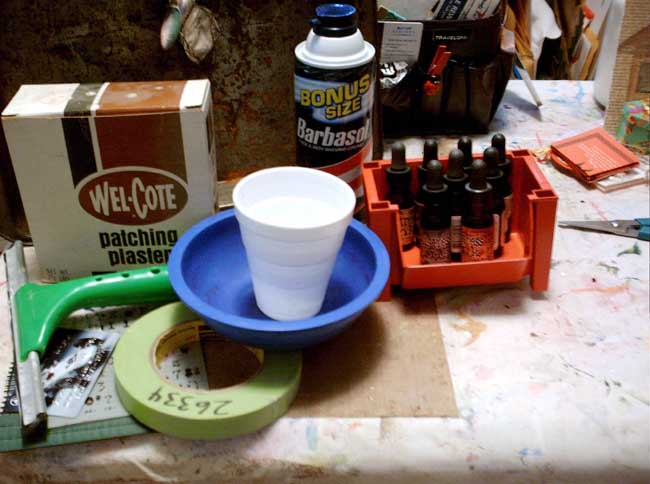
On Monday, I showed a sneak peek of some white scrapbook pages I made using dye inks. After seeing how the dye ink dyed the sheet I laid the paper on, I said I had an idea for a really cool project. Actually, I have two projects I want to work on. Here are the supplies for both minus


the distress inks I forgot to include in the first photo. I have to crop these photos because I also have another project I'm working on sitting on my desk that I don't want seen. In the back, with Wendy lounging over it, is a pan that I'm going to put the shaving cream in, then add distress ink to. I've never used distress ink for shaving cream papers before, so I hoped this would turn out well. This is NOT the same pan I used the first time. This time I used a lot more shaving cream, filling it nearly full. I should have used a thinner pan.

For those of you who have never made shaving cream papers, I have a tutorial, but it is hard to follow because I was never able to get the images lined up properly with the instructions. So, I will re-post the tutorial below, because the other one is extremely old. If you know how to make shaving cream papers, please scroll down to the last four images of this post for the "new to me" technique.


From left: Cookie sheet, pick, knitting needle, reinkers (distress reinkers were not used in this tutorial), shaving cream (not gel), various papers, photos. Not shown: credit card


Shake shaving cream, then squirt it onto your cookie sheet or baking pan. Be sure the pan is larger than the paper you will be using.


Spread shaving cream with a credit card.


Continue spreading until the shaving cream covers an area larger than your largest sheet of paper.


Make sure the shaving cream is relatively level.


Place a few drops of one reinker color randomly on the shaving cream.


Add a second color, and a third if you wish.


Don't use more than three colors at a time or your shaving cream will get muddy.


Drag your favorite tool (I used the hair pick), through the shaving cream and reinkers. Don't press too deeply, just skim the surface.


Continue doing this until you have a pattern you are happy with.


Lay a sheet of paper over the shaving cream and GENTLY press into the mixture.


Carefully lift the paper from the shaving cream. Most instructions tell you to scrape the excess shaving cream away from the page, but I'm going to offer an alternative suggestion.


As an alternative, gently lay another sheet of paper on top of the first sheet.


Press the top paper gently into the bottom sheet, being careful to not rotate or move the bottom paper.


You now have a mirror image bonus page.

At some point you're going to have to add more ink to the shaving cream. This is the time to change colors if you wish. You will not have to add any more shaving cream, especially if you used as much as I did for this latest batch.

Clean up is easy: just use warm water to remove any excess shaving cream, then follow with soap and hot water.

I like how my studio smelled so clean and fresh after I finished the paper. The shaving cream has a definite appealing scent, unless you are allergic to, or affected by, any scent. I also like how soft and pliable the paper is when finished. Since the shaving cream has very little liquid and no water, the pages don't curl or warp like they do with many other background techniques.


These are some of the papers from this very first batch, including some made from brown craft paper.

So what is the technique that is "new to me?"

First, I only used blue and red distress reinkers. Now I know all you TH fans know the names of the ink, but it is something like brick red and blue jean blue or some such. However, the papers are NOT a surprise.


It's the fabric I dyed (using that sheet I tried to color mist last week) using the same shaving cream mixture. Follow all the steps as above to get a similar look, with the following exception. At first I thought I would have to tear strips that were quiltlet size,


then realized fabric is not the same as paper. Unlike paper, it can be folded. So, I tore some fabric that can be used for visual journal covers.


And although I preferred the other one (see photo above this one) because it didn't have as much color misted colors on it, this is the one that was in focal view of my camera.

So now I can add another way to dye fabric. I'm really enjoying dyeing fabric. The appeal is in finding ways anyone can dye fabric, rather than having to invest in lots of chemicals, steamers, and dye bath times. You will be able to find this on my tutorials page, so you can find it easily when you decide to use this technique for dyeing fabric.

Tuesday, June 21, 2011

What's on your workdesk this 107th Wednesday? Mostly quiltlets!

I know this is a poor shot, but it's late here. On my desk is the "obligatory" rocking horse (one of about 450, so there are a LOT more to see), this one ceramic, along with my staz-on ink covered with a single plastic glove, and two quiltlets. Many of you ask to see what I do with my altered, dyed, or rusted fabric, so here are two quiltlets for you to enjoy. Both use the wipes I dyed last Wednesday.

In case you didn't see it last weekend, the one on the right uses rust dyed fabric and distress re-inkers with dyed wet wipes. Let me assure you, these are NOT baby wipes, which, as I understand it, are much thicker. Every time this Queen of Free visits a supermarket, I pick up two of those wet wipes. I use one for wiping the cart and put the other in a bag in my purse. The two on the right are probably a Clorox Wet Wipes. The texture is smooth and it sews beautifully. The one on the left looks like a bargain brand that I picked up somewhere, but I love the added texture.

And so you can see this one a bit better, here it is after I scanned it. It looks really wrinkled in the scan, so I hope it isn't, because it is going in the mail to a friend tomorrow.

I still can't leave comments on any blog that has embedded (as opposed to pop-up) comments.


Here is what MY screen looks like. As you can see, there is no box and nothing for the curser to click on. If you have this type of blog and an e-mail address listed on your blog or profile, I will try to send you an e-mail message. If you don't list your e-mail on your blog or your profile page, then it would be nice if you would contact me so I have your e-mail address. Mine is on my profile page. Other than that, I am at a loss for how to contact you to let you know I dropped by for a visit.

I can't even leave comments to our noble (or is it Nobel) leader Julia at Stamping Ground. Visit her to see what this bit of fun is all about.

Summertime tea

Link (click to see the details better)
Today summer officially begins, so I am spending time outside with my June journal, while waiting for the tea to "steep" in the sun. On my table are six Twining Rose Garden tea bag holders/envelopes. The bags are in the carafe. I carefully cut one side of the envelope so I could keep the woman's head at the top. Some of you may remember that Julia, WOYWW leader from Stamping Ground sent this tea to me a couple of months or so ago. I love that it always smells just like a rose garden. I'm hoping the tea bags will have a slightly pink tint.

On the right side of the journal are some little birds I cut out to decorate the right side of the journal. But it was so windy (and has been for two days), the journal wouldn't stay still and kept flipping onto itself. Before I could get a photo, the little pieces were spread all over the ground. After picking them up and repeating the procedure two more times, I finally gave up the idea of gluing these to my journal in the hot and very windy morning sun.

I'm sorry the photo is so dark on the tea, but washed out on the journal. Although it is still early in the day, the sun is already vicious here. Please join Kimmie and the rest of us Tea Tuesday gals as we enjoy our summertime tea. I bet their photos are a lot better than mine.