


.jpg)


.JPG)


 This spread used several pages from old books, including a day planner, a real ledger sheet, a German text book, and a German music book. I swiped oil pastels on the pages and around the central image to tie the ledger to the hand. The teacher's planner was dyed using leftover Rit dye. Thanks to Cindy for the German Scrap and Carol B for the heart and word.
Tuesday, June 30, 2009
Another Hand AB spread
"30 Days have September, April, JUNE . . . ." I can't believe June has flown by and I still haven't started several projects I promised myself I'd have finished by this time. So I'm off to the studio this week to catch up on catching up. I'll be posting a spread from my AB class each day this week. And maybe I'll get some breathing room along the way.
 This spread used several pages from old books, including a day planner, a real ledger sheet, a German text book, and a German music book. I swiped oil pastels on the pages and around the central image to tie the ledger to the hand. The teacher's planner was dyed using leftover Rit dye. Thanks to Cindy for the German Scrap and Carol B for the heart and word.
This spread used several pages from old books, including a day planner, a real ledger sheet, a German text book, and a German music book. I swiped oil pastels on the pages and around the central image to tie the ledger to the hand. The teacher's planner was dyed using leftover Rit dye. Thanks to Cindy for the German Scrap and Carol B for the heart and word.
Monday, June 29, 2009
My second set of Anniversary pages: some assembly required
 This is one side of my second set of Anniversary pages. As much trouble as I've had with these, I'm not sure I even want to send them. I love the backgrounds I created using plastic grocery bags I cut in half and used instead of cling wrap. Other than that, I followed the same directions, but found I liked the results better using the grocery bags..
I carved a very nice cake out of a potato, stamped it ONCE, and promptly lost it! I carved another potato into a not-so-nice cake. This time I felt it looked more like a top hat than a cake. However, time was beginning to run out and I had to use it. A few of the cakes look like the one on the left, but more than most look like the one on the right!!
Next I got out an Anna Griffin clear stamp "6" and my acrylic block and set out trying to stamp a six that would show on the page. I finally settled for silver, but it doesn't show well in the scan. As I was stamping, the stamp kept falling off the acrylic block. It wouldn't stay on and I've had trouble with this set since the very first time I tried to stamp anything with it. Can't say I'm fond of them, but they were a gift, so I can't complain. However, I really wish I knew why these stamps don't stay on a block.
Finally, I used my red Zig pen to make a "flame" on the "6." Did I mention I can't draw even the most simple shapes? Did I mention I love the backgrounds?
So is this the front or the back? I will leave that to the swapper.
 Last week I showed this photo of my 2nd set of skinny pages. I failed to mention there was SOME ASSEMBLY REQUIRED.
 Here is the actual skinny page as it will appear when the swapper unwraps his/her package. This is also what it will look like after the swapper does some work on it! Did I mention some assembly is required?
As for the design, it was a combination of inspiration from Dana and prodding by Donna. For the background, I started by brushing gesso over the card stock. I wanted texture on the pages, so made swirls and heavy brush strokes. When dry, I brushed gold glaze on the pages, then took a sponge and added more texture.
 The seersucker on the left is the lovely material I bought to make these little surprises. After tearing it wrong, I used a slippery polyester blend from my very limited material stash, which was as close to the right color as I could get. Right color, wrong material.
These two were tied with bows and took me 23 minutes to do these two. My fingers cramped and I had to take a break after only two bows. Then the light bulb came on. What is the FIRST thing the swapper will do when s/he gets the package. Come on now, I know you know the answer. Say it louder!! Yep, they will UNTIE THE BOW and look inside. It was insane to spend all that time trying to tie a bow that left my arthritic hands cramped for hours, when none of it would be appreciated in the end.
 So I did the only "honorable" thing (grin) and tied the ribbon once and taped it to the material. Now each swapper can open his/her package, then tie his/her own bow and fiddle with getting the material straight, etc.
 I began by sewing background paper left over from the other side, to the material.
 Then I glued the burnt lids and the word "six" to the paper. However, the little packages are too wide for every conceivable binding process, even a single hole punch. Therefore, the swapper gets to not only tie his/her own bow, s/he gets to place it on the background after punching holes. As I said in the very beginning, I almost wish I hadn't started these. A really cute concept turned into a nightmare for me and added work for the swappers. OH well, I'm sure that in a year or five, I'll look back on this skinny page and laugh!
Sunday, June 28, 2009


Saturday, June 27, 2009
Asian cucumbers in my recipe book
 While cleaning my garage, I found a sack of old seed packets. Instead of planting them (they were from 1998), I decided to use this image from the seed packet for art. Right there on the packet was the word "Asia," and since I still had Dana's Asian background stamp, I prepared this spread in my recipe book.
I'm not a rubber stamper, so didn't realize that the stirrer sticks used to simulate lattice on the other side, caused them to sit above a good stamping surface. As a result, the rubber stamp did not properly adhere to the page. I had to restamp by placing the stamp (which was wood mounted) as close to the original orientation as possible, then turning the page over and pressing the page onto the stamp. Every time I stamp something, I learn a bit more about stamping.
Friday, June 26, 2009
We 3 Art Play Day: Solder
We began our play day by looking at images and various projects that Kathy was planning to make. We spent a great deal of time just discussing various projects and such. It was then that Dana suggested we should just get together once in awhile to talk about our art.
 In this photo, Kathy has her work station already set up, while Dana sips her tea, looks at some instructions, and admires her new soldering iron. The day was starting out good.
 There wasn't enough room on the table for all the charms, embellishments, and such that each of us brought for the project,
 so Kathy and Dana's boxes of goodies were stuck in every nook and cranny we could find. This is less than half of what they brought. Of course we had to ooh and ahh over what each was planning to make, then we finally got down to business.
 Dana was now eager to start and wanted to cut one of the glasses, so she grabbed a glass cutter and went to it. However, it didn't want to cut, and I suggested we use the bottle glass cutter she brought, rather than my hand held one.
 Dana suggested we practice on a bottle, so she grabbed one of my many bottles and went to town.
 We could hear the glass scoring and grinding as she turned the cutter around the bottle. After tapping it, we decided she sort of knew what she was doing, so it was off to cut the stemware. That's when things got a bit dicey.
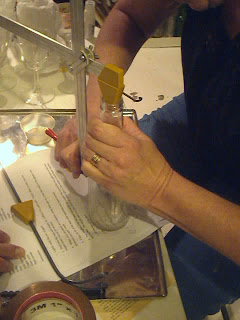
 Dana tried to position the bottle cutter around the glass, but we just couldn't get it at a 90 degree angle that was needed for a good cut. So she took a different tact and tried cutting it by standing it up on a shelf on my workbench. She dipped the cutter in oil and went to town, turning the glass as she went.
 After scoring all the way around the glass, she tried to "whack" the base away, but had no luck. When that didn't work, I laid the glass on its side, held it in place with the black rubber coaster you see in the photo. My problem was the shelf was about six inches too high for me, so I was working with my arms above my shoulders and got no leverage, although I could see I had scored the base.
Next, Kathy tried it, and determined, after several attempts that all we were doing was beating the paint off the glass cutters. Determined not to be defeated, I suggested we look through my various jars and make something in a jar. Since the glasses were so small, each of us had images for a small jar.
 Kathy cleaned all the jars with Goo Gone and/or alcohol, depending on which was needed, then Dana spotted my Play Dough, which I had never used (I don't even know when or where I got it except that it was brand new and never opened). Here, Dana has created a small scene using the green Play Dough as a base for the tiny jar she will be using.
 Kathy created a scene using the Play Dough as a base, images she cut, and tiny flowers. She also added a winged horse after I took this photo. If you click on the photo, you can see her scene better and my instructions showing what I thought we were going to make from the stemmed glasses.
We almost ate before we assembled and soldered our jars, but decided to finish our pieces first. I think we were all a bit frustrated. I didn't take a photo of my scene outside the jar, but I didn't use Play Dough as my base. Instead, I used hot glue and the shredded paper I called "seltzer," but I think Dana called it something else. After it was cool, I added shells at the base, and placed my back-to-back images between two shells. Dana had to leave after we ate, so took hers before I got a photo of it. I cut off the top of the jars in this photo, but you can see our final results better if you click on the photo. Kathy's is on the left, mine on the right. Kathy chose to place copper foil higher than I did. I just wanted a good solder joint, while Dana and Kathy both wanted to cover their lids. I didn't use a lid, since mine was an old baby food jar. We all decided that we would not be soldering any time soon, unless it was to practice. However, we had fun, ate till we dropped, and had a wonderful day of friendship.
After we ate lunch, Dana left to visit her husband in the hospital, while Kathy helped me clean up the mess we left in the basement. She then packed up and went home around 5:30. It had been such a long, exhausting (and a bit frustrating) day, I simply collapsed and slept for several hours before documenting this for posterity. I wish I had taken more photos, but sometimes you get caught up in the process and forget to click. I gave Kathy the glasses to see if her husband could cut them. I really think we needed a wet saw for the bases, something I don't have, since we think the stems are solid glass.
Next month we will meet at Kathy's, and I bet soldering is NOT on the agenda! I'll try to remember to take another photo of my finished project tomorrow that doesn't chop off the top of the jar.
 In this photo, Kathy has her work station already set up, while Dana sips her tea, looks at some instructions, and admires her new soldering iron. The day was starting out good.
 There wasn't enough room on the table for all the charms, embellishments, and such that each of us brought for the project,
 so Kathy and Dana's boxes of goodies were stuck in every nook and cranny we could find. This is less than half of what they brought. Of course we had to ooh and ahh over what each was planning to make, then we finally got down to business.
 Dana was now eager to start and wanted to cut one of the glasses, so she grabbed a glass cutter and went to it. However, it didn't want to cut, and I suggested we use the bottle glass cutter she brought, rather than my hand held one.
 Dana suggested we practice on a bottle, so she grabbed one of my many bottles and went to town.
 We could hear the glass scoring and grinding as she turned the cutter around the bottle. After tapping it, we decided she sort of knew what she was doing, so it was off to cut the stemware. That's when things got a bit dicey.
 Dana tried to position the bottle cutter around the glass, but we just couldn't get it at a 90 degree angle that was needed for a good cut. So she took a different tact and tried cutting it by standing it up on a shelf on my workbench. She dipped the cutter in oil and went to town, turning the glass as she went.
 After scoring all the way around the glass, she tried to "whack" the base away, but had no luck. When that didn't work, I laid the glass on its side, held it in place with the black rubber coaster you see in the photo. My problem was the shelf was about six inches too high for me, so I was working with my arms above my shoulders and got no leverage, although I could see I had scored the base.
Next, Kathy tried it, and determined, after several attempts that all we were doing was beating the paint off the glass cutters. Determined not to be defeated, I suggested we look through my various jars and make something in a jar. Since the glasses were so small, each of us had images for a small jar.
 Kathy cleaned all the jars with Goo Gone and/or alcohol, depending on which was needed, then Dana spotted my Play Dough, which I had never used (I don't even know when or where I got it except that it was brand new and never opened). Here, Dana has created a small scene using the green Play Dough as a base for the tiny jar she will be using.
 Kathy created a scene using the Play Dough as a base, images she cut, and tiny flowers. She also added a winged horse after I took this photo. If you click on the photo, you can see her scene better and my instructions showing what I thought we were going to make from the stemmed glasses.
We almost ate before we assembled and soldered our jars, but decided to finish our pieces first. I think we were all a bit frustrated. I didn't take a photo of my scene outside the jar, but I didn't use Play Dough as my base. Instead, I used hot glue and the shredded paper I called "seltzer," but I think Dana called it something else. After it was cool, I added shells at the base, and placed my back-to-back images between two shells.
 Dana had to leave after we ate, so took hers before I got a photo of it. I cut off the top of the jars in this photo, but you can see our final results better if you click on the photo. Kathy's is on the left, mine on the right. Kathy chose to place copper foil higher than I did. I just wanted a good solder joint, while Dana and Kathy both wanted to cover their lids. I didn't use a lid, since mine was an old baby food jar. We all decided that we would not be soldering any time soon, unless it was to practice. However, we had fun, ate till we dropped, and had a wonderful day of friendship.
 After we ate lunch, Dana left to visit her husband in the hospital, while Kathy helped me clean up the mess we left in the basement. She then packed up and went home around 5:30. It had been such a long, exhausting (and a bit frustrating) day, I simply collapsed and slept for several hours before documenting this for posterity. I wish I had taken more photos, but sometimes you get caught up in the process and forget to click. I gave Kathy the glasses to see if her husband could cut them. I really think we needed a wet saw for the bases, something I don't have, since we think the stems are solid glass.
Next month we will meet at Kathy's, and I bet soldering is NOT on the agenda! I'll try to remember to take another photo of my finished project tomorrow that doesn't chop off the top of the jar.
Thursday, June 25, 2009
A quiltie giftie, a discourse on pink, and a sneak peek
So where are the photos of the We 3 play day? Well, it didn't happen yesterday. Due to unforeseen circumstances, we had to postpone the play date until today. Hopefully everyone will be OK and we can have our solder day.
I'd like to answer a comment left by Donna who said I must like pink. Actually, pink is one of my LEAST favorite colors. You won't find any pink in my house. I tend toward the cool colors, mostly blue and green. So why all the pink in my art? I guess because I'm always trying to find that perfect red that won't turn into pink. One example is my anniversary pages made with Staz-on reinkers. I used their bright red reinker, which turned pink when mixed with the 91% alcohol. I have some really red dye and pigment ink pads that turn into pink on the pages or the stamp, and the red fluid acrylic I bought is on the pink or warm side of the spectrum. I also bought a box of used cheap bottle acrylics at a garage sale once, and when I got them home, six of the eight were pink. So, although I don't care for pink, it seems my supplies appear to make it seem that way.
 When the play day didn't materialize, I wanted to stay busy. I had made a quiltlet for Cindy McMath months and months ago, but she never got it. It's the first thing I've sent her that didn't arrive in Canada. For those of you who don't know Cindy's work, she is known as the Queen of Bingo. I used all the bingo material in a swap and on her lost quiltlet, but Kathy had some, and gave me enough to make a replacement for her. I put the material away and forgot it, until I ran across it a week or so ago. Now was the day to take my mind off the missed play day and create something that was long, long overdue. I began by layering the bingo material, some of the hand dyed table cloth, and hand dyed cheese cloth. Next I needed a bingo card.
 Color is OK, but the card is too big. It swallows the background.
 Better size, but it's square, where the quiltlet is rectangular, and the "white" on the bingo card is not the bright white of the material.
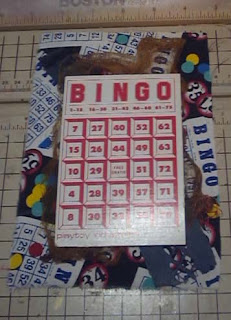 Much better. this color is great, the red compliments the background, the white is better, but it's still too big. So I scrounged through my stash of supplies until I stumbled onto a gem.
 It was the same design as above, but smaller. It was just what I was looking for. That's when I got caught up in the process and forgot to continue taking pictures.
 Here is the completed piece. OK, pink again, but this time by design. Cindy's studio is called "Pink Bird," so why not honor her bird? I had no pink embossing powder, so mixed red and white trying to make pink. Such irony: since I try hard to get rid of the pink in my stash, all of a sudden I'm trying to make pink. I also used pink pigment ink to stamp the bird. The large red "chip" at the bottom was punched and colored with red fluid acrylic (by Golden). See how "pink" it looks up against the lovely red bingo card and the red bingo number in the upper middle?
  Here is the back, hand dyed using scarlet dye and an old striped blouse. The sentiment tells it all: Cindy is the Queen of Bingo and I am the Queen of Free. I hope she likes it, because I put a lot of love into making it.
 OK, here is a sneak peek of the second set of anniversary skinny pages. I finished them yesterday also, and "packaged them." You'll just have to wait till Monday to see the finished project. By then, all the swaps should be on their way to me.
I'd like to answer a comment left by Donna who said I must like pink. Actually, pink is one of my LEAST favorite colors. You won't find any pink in my house. I tend toward the cool colors, mostly blue and green. So why all the pink in my art? I guess because I'm always trying to find that perfect red that won't turn into pink. One example is my anniversary pages made with Staz-on reinkers. I used their bright red reinker, which turned pink when mixed with the 91% alcohol. I have some really red dye and pigment ink pads that turn into pink on the pages or the stamp, and the red fluid acrylic I bought is on the pink or warm side of the spectrum. I also bought a box of used cheap bottle acrylics at a garage sale once, and when I got them home, six of the eight were pink. So, although I don't care for pink, it seems my supplies appear to make it seem that way.
 When the play day didn't materialize, I wanted to stay busy. I had made a quiltlet for Cindy McMath months and months ago, but she never got it. It's the first thing I've sent her that didn't arrive in Canada. For those of you who don't know Cindy's work, she is known as the Queen of Bingo. I used all the bingo material in a swap and on her lost quiltlet, but Kathy had some, and gave me enough to make a replacement for her. I put the material away and forgot it, until I ran across it a week or so ago. Now was the day to take my mind off the missed play day and create something that was long, long overdue. I began by layering the bingo material, some of the hand dyed table cloth, and hand dyed cheese cloth. Next I needed a bingo card.
 Color is OK, but the card is too big. It swallows the background.
 Better size, but it's square, where the quiltlet is rectangular, and the "white" on the bingo card is not the bright white of the material.
 Much better. this color is great, the red compliments the background, the white is better, but it's still too big. So I scrounged through my stash of supplies until I stumbled onto a gem.
 It was the same design as above, but smaller. It was just what I was looking for. That's when I got caught up in the process and forgot to continue taking pictures. Here is the completed piece. OK, pink again, but this time by design. Cindy's studio is called "Pink Bird," so why not honor her bird? I had no pink embossing powder, so mixed red and white trying to make pink. Such irony: since I try hard to get rid of the pink in my stash, all of a sudden I'm trying to make pink. I also used pink pigment ink to stamp the bird. The large red "chip" at the bottom was punched and colored with red fluid acrylic (by Golden). See how "pink" it looks up against the lovely red bingo card and the red bingo number in the upper middle? Here is the back, hand dyed using scarlet dye and an old striped blouse. The sentiment tells it all: Cindy is the Queen of Bingo and I am the Queen of Free. I hope she likes it, because I put a lot of love into making it.
 OK, here is a sneak peek of the second set of anniversary skinny pages. I finished them yesterday also, and "packaged them." You'll just have to wait till Monday to see the finished project. By then, all the swaps should be on their way to me.
Wednesday, June 24, 2009
Second We Three Play Day
The nice thing about being a Play Day host is I get to choose the medium we'll be working in. This month I have chosen solder and Dana, Kathy, and I will actually be making a completed item (or three), as opposed to last month, when we practiced a technique (dyed fabric).
A while back, I found an article in Somerset that I wanted to try. Try as I might, I could not find that article. I only have a general idea of the technique, so most of this will be improvisation. I made up the directions based on my poor memory, so they are pretty basic.
 I made a list of supplies we would need:
Stemmed glasses
Soldering iron (each person will bring her own)
Solder
Flux
Acid brush
Copper foil
Glass cutter
Paper towels
Sand paper
Glue gun
Hot glue
Ammonia
Latex gloves
Embellishments
Images (each person will bring her own)
Charms
Craft sheet (each will bring her own)
Poppy seed muffins are poised and ready to get us off to an artful beginning, along with jasmine flower tea for Kathy and Dana, and coffee for me.
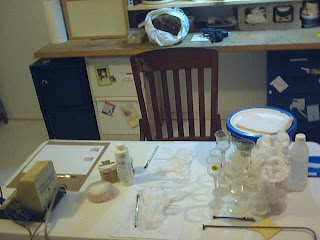 You can see we'll have a full table when everyone gets their things here. At least all Kathy and Dana have to bring are their soldering irons, craft sheets (to protect my table from errant solder), and their own drink mugs.
 I have set up the hot glue gun on the workbench, along with a block of moss and some crinkled, shredded paper to decorate the base of each glass. Now to put the other two chairs out, and I'll be ready to go. It should be an interesting day.
 Tuesday, June 23, 2009
Paper towel fusion background
Here's another quick and easy background to try while I'm finishing my second set of swap pages. I call this "Paper Towel Fusion," but I have no idea what it's really called, or even if I made it up while playing around with paint and paper towels.
 Supplies (clockwise from left):
Various paints and pens
water spritzer and/or mister
food coloring
Lumieres
foam brushes
freezer paper taped to surface using low tack tape
Not shown: paper towels, latex gloves
 Prepare surface by taping freezer paper shiny side UP to water resistant cloth. Squirt out two or three colors of acrylic paint onto freezer paper. For this background, I used metallic pink, purple, and lime green.
 Using a foam brush, smear the paint in a pattern of your choice. Note how the green is lost to the vibrant pink and purple. Don't overwork, or the colors will get muddy.
 Once you are pleased with the pattern, spritz the paint with water and lay a paper towel on top. Spritz your paper towel, too. Make sure your paper towel is wet, or it won't absorb the paint. The picture shows the paper towel has been spritzed on the right side, but has not been spritzed on the left.
 When the paper towel is saturated, gently remove it from the freezer paper. I found it was easiest to leave a small area on one corner dry, then gently peel it away from the freezer paper.
 Note how much paint is left on the freezer paper.
 You can spritz the freezer paper and repeat the process until you have no more paint. This is what my freezer paper looked like after two paper towels had been colored.
 When most of the paint has been absorbed, or you want to change colors, wipe the freezer paper clean using a new paper towel.
 Next, dribble food coloring on the freezer paper, then add a bit of other color. I added copper Lumiere for accent.
 Spritz just a tad of water on the freezer paper this time, since the food coloring doesn't need to be watered down as much as the acrylics. No need to use a brush to spread the food coloring. Be careful where you point the mister/spritzer, though. Food coloring stains everything it touches, including fingers.
You can also use re-inkers or concentrated watercolors instead of the food coloring. You can get some beautiful papers with food coloring, but it isn't light fast and will fade over time.
Pull paper towels apart while still wet because when the paint blobs dry, you will never get the paper towels apart without tearing them.
 Here are a couple of my finished pages. Yours will probably look better than mine because I have a tendency to simply swipe my brush across the freezer paper. Try mixing it up, by drawing circles, swirls, or squiggles.
 Supplies (clockwise from left):
Various paints and pens
water spritzer and/or mister
food coloring
Lumieres
foam brushes
freezer paper taped to surface using low tack tape
Not shown: paper towels, latex gloves
 Prepare surface by taping freezer paper shiny side UP to water resistant cloth. Squirt out two or three colors of acrylic paint onto freezer paper. For this background, I used metallic pink, purple, and lime green.
 Using a foam brush, smear the paint in a pattern of your choice. Note how the green is lost to the vibrant pink and purple. Don't overwork, or the colors will get muddy.
 Once you are pleased with the pattern, spritz the paint with water and lay a paper towel on top. Spritz your paper towel, too. Make sure your paper towel is wet, or it won't absorb the paint. The picture shows the paper towel has been spritzed on the right side, but has not been spritzed on the left.
 When the paper towel is saturated, gently remove it from the freezer paper. I found it was easiest to leave a small area on one corner dry, then gently peel it away from the freezer paper.
 Note how much paint is left on the freezer paper.
 You can spritz the freezer paper and repeat the process until you have no more paint. This is what my freezer paper looked like after two paper towels had been colored.
 When most of the paint has been absorbed, or you want to change colors, wipe the freezer paper clean using a new paper towel.
 Next, dribble food coloring on the freezer paper, then add a bit of other color. I added copper Lumiere for accent.
  Spritz just a tad of water on the freezer paper this time, since the food coloring doesn't need to be watered down as much as the acrylics. No need to use a brush to spread the food coloring. Be careful where you point the mister/spritzer, though. Food coloring stains everything it touches, including fingers.
You can also use re-inkers or concentrated watercolors instead of the food coloring. You can get some beautiful papers with food coloring, but it isn't light fast and will fade over time.
Pull paper towels apart while still wet because when the paint blobs dry, you will never get the paper towels apart without tearing them.
 Here are a couple of my finished pages. Yours will probably look better than mine because I have a tendency to simply swipe my brush across the freezer paper. Try mixing it up, by drawing circles, swirls, or squiggles.
Monday, June 22, 2009
Anniversary Swap on ABC
First, I would like to say that the image for Silent Sunday was one I found at a garage sale last week. It was in bad shape, and I had intended to alter it, but ran out of time before Sunday. I have NO idea who the man was and didn't ask the lady I bought it from. Now on to today's post.
 Here is my first set of skinny pages for the ABC 6th anniversary swap. Although these were lightened in Photoshop, the color is somewhat poor, except for the six boxes, all made of polymer clay.
 Here is a closeup of the back (on the left) and the front (with the gift boxes). It's ironic that the color is washed out on the polymer clay in the scan and were much more true in the above color corrected photo. Yes, the "box" with the lattice is bright yellow, but came out nearly white in the scan.
I actually began by printing "ABC sisters" on the left and adding all the names of the swappers. I misplaced the pages I printed, so reprinted using the words "ABC participants." Glad I did, because we now have a male swapper who became an angel swapper when one person had to drop out due to illness. Since I couldn't find the original pages, I set about making the polymer clay gift boxes using clay, some of which Halle sent me, and texture plates that Dana left after our play day. I used various mica powders (Pearl-Ex) as a release agent on the texture plates.
After I printed the second set of pages and sorted all the clay pieces, I sprayed the pages with sealer, then set to work making reinker and alcohol backgrounds. I began by making the side opposite the names as the side I added the reinker/alcohol mix to. That made the side with the names all washed out and the side that would hold the boxes too bright. I had to print MORE pages, spray them, then adhere the reinker/alcohol mix to the name side.
Next I stamped the two little girls on the back side. I love this stamp made by River City Rubber. It's a good thing I had extra pages. I placed a bit of the extra reinker/alcohol mix on the wording side of my rejects, then set out to find the best ink to use. Staz-on black was too dark, gold too light. The stamp image was too detailed for embossing, so I ruled that out having recently learned that lesson. After trying three or four more colors, I settled for lime green and the image showed, as did the names.
After the images were stamped, I started adding polymer clay to the other side, then remembered I wanted to stamp the date and number on the background. Luckily, I had only done two of them. It was a lot easier to stamp before the boxes were on than after. I used what was supposed to be red (but always comes out pink) and the same lime green from the other side. I wanted some continuity for the two sides.
I sincerely hope the swappers like them. My biggest fear is that the tower of polymer clay boxes will not go through some of the many binding machines on the market. I have, however been told (after I measured a few) that they should go through most of them.
Sunday, June 21, 2009

Subscribe to:
Posts (Atom)


