


.jpeg)


.JPG)


I've been working on this tutorial all day and night. I just got it uploaded, so if some of the instructions are a bit hazy, please just ask in your comments.
After recently working with my shimmering mists, I decided to get out my Twinkling H2Os and see if I could figure out a few ways to play with them.
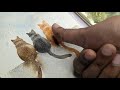
 I've obviously used them in the past, as you can see. One thing I would like to reiterate is to use distilled water with these in case you have to close them before they are dry. That way, they won't mold. These tiny pots are extremely expensive, even on clearance. You can buy them in the "regular" size or mini size. Most come in sets, but I bought all mine on clearance at my local stamping and mixed media store.
 My first task is to compare 110 lb (pound) white cardstock and 140 lb black cardstock.
 I'll begin by misting the pots and allowing the water to
turn the hardened cakes into wonderful mica infused watercolors.
I'll begin by misting the pots and allowing the water to
turn the hardened cakes into wonderful mica infused watercolors.  The same color looks so different on white than it does on black.
  However, it was then I realized the white cardstock was NOT going to hold up to the water,
 so I grabbed a sheet of 90 lb cold press watercolor paper and laid down the same color as before. At least now, it actually looks about the same color. Please don't ask about the colors because I could care less. All I know is they are made by Luminart and their names are on the bottom of each jar (a silly place to put the name if you decide to find out what color it is AFTER you have added water to the pot!).
 I used the same color on the white as I did on the black.
 Once they were dry, I realized:
1) 110 lb cardstock will not hold up to the water in these H2Os.
2) Light colors look better on dark paper.
 My next experiment was to use sea salt on the H2Os.
 First, I laid down very, very wet H2Os.
 You can see I also cleaned my brush on the tags I cut from cardstock. The salt had already absorbed the H2Os and would hopefully leave evidence of that on the paper. Again, light colors for dark paper, dark colors for light paper. I'll remember that after a few more of these experiments, I'm sure!
 Next, I tried table salt. After all, I don't use it in my cooking!
 The table salt wasn't as noticeable as the sea salt. I hope there will be evidence of it after the salt dries.
 One thing I was happy about was this color green showed up well on both black and white paper.
 Next I decided to do a bit of "stamping" using different sized bubble wrap.
 I spread the H2Os on the bubble wrap,
 flipped the bubble wrap over, got some unwanted drips, and some fairly decent results.
 Then I decided to try the reverse. Although I would have preferred a single color, the drips proved to be quite pretty.
 This time I painted the H2Os on the paper, then laid the bubble wrap on top of the still very wet H2Os.
 The impressions I got were superb. I loved it on both the white and black paper.
 I decided to use a very light color to delineate the two ways of using bubble wrap, but because the drips were still quite wet on the white paper, I got a mixture of blue and off white. It's odd how this color is SO different on the two different colored papers.
 Next it was time to try my hand at resist.
 Same color H2O, different color paper.
 My embossing ink was long gone, but I had this white I thought I could use.
 After inking the stamp and pressing like crazy, I realized the ink had dried up. So I grabbed some metallic ink, hoping it would work. I also chose copper embossing powder.
  Inked
Inked and embossed.
 It was lovely, but a total failure to what I was hoping for. That's when I realized I needed CLEAR embossing powder for this to work properly. Guess I finally got my head on straight.
 Oh great! Guess my head wasn't on as straight as I thought. I didn't allow the H2Os to completely dry before I began stamping.
 That meant the embossing powder wasn't going to stick properly, either.
 That didn't deter me, though! It actually sort of worked. The idea was to use the embossing powder as a resist. It would show the base color through the colors I laid on top. Unfortunately, it didn't work as well as I hoped, but it worked.
 Next it was time to do a bit of stamping. I grabbed my water pen and applied various H2O colors to the stamp.
 I'm a lousy stamper, but as you can see, there is a 3 bear effect when it comes to these H2Os and stamping. Not too much, not too little, just right. And I didn't exactly get it right.
 By now the H2Os were definitely dried on my stamp, so I rehydrated the stamp and stamped again.
 This is what the stamp looks like when it's stamped with staz-on.
 I realize it's a pretty bad demonstration, but it works for people who know how to stamp (and color)!
 It is now 11:33 pm and I still need to get these photos off my camera. Here are the final results. I wanted to create something using these, but I simply ran out of time because they take so long to dry.
 My favorites: embossed using copper embossing powder,
 large bubble wrap laid on wet H2Os,
 and salt.
 Tags were my way of saving excess product from being wasted when I cleaned my brush.
I hope you enjoyed this tutorial. I know it's a bit late, but I've been working on it all day and night. I will add it to my Tutorials page if I can figure a way to get the link to open in a new window. If not, I'll add it Sunday (Aug 13).
Thank you beyond belief for visiting. I am always grateful for your input and your encouraging comments.


20 thoughtful remarks:
Glad you had fun playing with the twinkling H2O paints. I have a set I won some years back, and must confess I was very disappointed with them and have therefore not used them a lot. Perhaps I should try them on dark paper. Thanks for sharing your experiences. Hugs, Valerie
Your experiments are super - you came up with a lot of fabulous papers and I bet they will come really handy for future projects!
I don't have twinkling H2Os, I just have some very cheap shimmering watercolors from the Dollar store for kids - but if I take less water to use them they have a similar appearance as this more expensive stuff. But I haven't tried them on black paper or black gesso yet- must have a try on it. You are always an inspiration dear Elizabeth!
oxo Susi
Great ideas Elizabeth. I have lots of those that my daughter gave to me because she never used them and I haven't used them must either so must get them out and try some of your ideas. Never thought of most of the ideas at all--brilliant and thank you.
Love Chrissie xx
Another great tutorial. I can imagine the effort you put into making the tutorials and it is much appreciated. I don't do a lot with stanps but I really like the effect you got with the bubble wrap.
Great experiments. I don't have the Twinkling H2O, but I do have mica powders which I mix in watercolor or gouache.
Great tutorial on how to use these lovely Twinkling H2O's. I love using these paints and usually colour in my stamped picture. I like the bubble wrap idea and using the, for the background d also. Great ideas!
You never know what is going to come out, but I love the bubble wrap pictures, very interesting textures Elizabeth.
Oh my, Dr. E! you gave me such inspiration, I think I will try some experiments with watercolor and mono prints and I totally forgot about those little H2O's in my drawer!! woohoo.. x
I really enjoyed seeing your experiments Elizabeth! Now I'd like to get out my set of Twinkling H2Os. But I'm not exactly sure where they are right now as I'm still in the process of consolidating my two houses. When I find them I will definitely do something with them. I liked how you used all the fun watercolour techniques with these paints and I'm not sure why I never thought of that as I know they are watercolours! I think you would have better luck stamping with a stamp that is more solid, as the liquid pools up on the rubber - it is almost impossible to get a good impression from a detailed stamp like you were using. Probably one of those foam 'craft stamps' would be ideal.
Thanks for this thorough investigation. I found some useful tips I am going to have to remember. Especially using a spritzer to wet these. Makes so much more sense.
WOW! Really loving your play with the Twinkling H20s here!! They really look amazing on the dark background! I also love that you've tried out the different experiments!! Thanks for sharing! :)
I don't do art projects, but it was interesting to see the results you got.
What really struck me, though, was that lovely salt shaker lol What a pretty color. I've never seen one like that.
Wow, Elizabeth. You put in a lot of work on this.
And I didn't realize distilled water fights mold. So thanks for that. I love the copper embossing and bubble wrap effect too!
It may have been late but it looks like you had some fun with these experiments with the colours. I have a few H2O's somewhere in my messy space, i will have to get them out again.
Yvonne xx
I loved this tutorial - I shall be digging my H2os out tomorrow! You have set me thinking!!! Hugs, Chrisx
You had some extensive playtime and experimentation with these. I really love how they look on the black paper. I was not familiar with the H2Os, but will look into them. Thanks for the distilled water tip- I would not have thought of the potential problem.
Great experiments! I never thought about using distilled water with these. Fun to play and play!! :)
I need to bookmark this for future reference. I've never used these -- your post is VERY complete! Thanks!
NIce tutorial. I've got a few of these paints but haven't used them in ages. I should pull them out and play. You really tired out lots of techniques here 😀I think I've only painted in images with them. Happy new week. Hugs erika
Oh Elizabeth, this is just tremendous. I have six of these pots someone gave me and I really didn't give them much of a go, just wet them and tried some brush marks, but now I have a much clearer idea of what to do with them. Thanks for all the photographs and accompanying chat. Your tutorials are unique because they also say what not to do and what can go wrong which is every bit as, if not more useful than, showing a perfect demo.
Post a Comment