


.jpg)


.JPG)


 (Photo courtesy of Evie's Tool Emporium)
What a surprise and joy to learn that my project had been approved and I had actually won this steel forming block from Evie's Tool Emporium on Etsy.
I had proposed making an altered book from copper, left over from my counter top installation a few years ago. To fulfill my obligation, here is the tutorial I proposed to Michelle nearly a month ago. Please be aware this is a very detailed tutorial, with many photos and a ton of steps. I have tried to keep it as simple of possible, but this is not a project you can whip through in a few hours. As with all projects this month, it uses only recycled materials.
 Supplies: Unlike my other tutorials, I am not going to name all the supplies needed for this project that can be seen in this photo. You would get confused and, as with most of my tutorials, I have invariably left a few supplies out of the original photo. To make things less complicated, I have shown and named the supplies I use with each step.
 Before we begin, I would like to discuss this copper. It is not craft foil. It is heavy, and if you are not a jewelry maker, or someone who routinely plays with copper, you might find it intimidating. Using my calipers to measure the thickness, you can see it is .020 (twenty thousandths of an inch). It is sold by weight, by gauge, or by thickness. It is often called "copper flashing" used in roofing. It is sometimes used as counter top material because it comes in sheets that are about the width of a standard counter. In fact, it is a favorite in some bars because it cleans up so quickly.
 Now that we have that out of the way, lets cut a piece of this heavy material using a steel rule and black Sharpie to measure
 and tin snips to cut it. The piece I cut was 3" by 6". I had a 1" X 3" piece left over (see above) that I will use later.
 Always use safety precautions and sturdy gloves when handling metal. After you cut the metal, be sure to file all edges and corners using a file and rasp.
 Always wear safety glasses any time you are cutting or forming the copper.
 Once the metal has been cut and filed, throw it in a fire to anneal the copper. Annealing relaxes the molecules and makes this thick metal turn to butter.
 Copper is the one metal that will visibly turn colors once it is heated. It is also one of the reasons I love working with it. Here I have a bucket of water by my chiminea, tongs, and my leather gloves on. I am about ready to pop the heated copper into the water to quench it.
 At this point, the copper is very soft, so be careful to not damage it. Note how I bent one corner. The extra screws and other bits on the table are not part of the project.
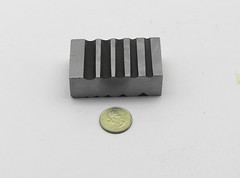
 Next I got out my new cool tool, the steel forming block. Two sides have grooves (one side rounded, the other "v" shaped), two sides are flat, and the two ends are hardened. Before beginning this project, I had to clean it to remove the machine oil it was packed in.
 I was now ready to use the steel forming block. Granted, I didn't expect to use it so early in the project, but it was nice to grab when I needed to "repair" my bent corner.
 Using a rubber mallet, then a rawhide mallet (not shown in this view, but shown above), and the steel forming block,
 it didn't take long until the copper was once again straight.
 It was at this point that I grabbed the smaller piece of leftover (and annealed) copper, along with the steel forming block, tin snips, and a ball peen hammer.
 I cut two hearts freehand from the copper
 then surprised myself when I reached for the steel forming block to make some unexpected accents in the hearts.
 Although it's hard to see, the hearts now have grooves in them.
 Next I cut a template from an old file folder the size of the book cover using my paper cutter (not shown) .
 I found the center line using my steel rule and a red pencil,
 then placed three dots to represent the holes I spaced equal distances from the center.
 At this point, I got out two paper bags to see how many pages (often called folios in American bookbinding terms) I could make from one bag. I was quite surprised to see that I could get 11 folios out of the brown bag. Since this would give me a total of 44 pages in one signature in the completed book, I decided one bag was enough. In case you don't know what a signature is, it is a section of pages sewn together at their folds. This will be a single signature book, one of the easiest ways to hand bind a book.
 Using a foam brush, I dry brushed gesso to one side, then the other.
 While the paper bag was drying, I clipped my hole template to the copper using two clothes pins. I punched holes in my template using an awl and my ball peen hammer.
 Using the forming block on the rounded side, I dimpled the holes using an awl and a hammer. At this point, I was able to remove the template.
 I finished poking the holes using a soft piece of plastic, my awl, and hammer.
 Since I had worked the metal by pounding on it to make the holes and straighten the corner, I once again annealed the copper piece. If you look closely, you can see the fire peeking behind the center hole.
 I cut my brown bag pages 1/4" smaller than the book on all four sides. I then punched 3 holes down the center of the pages. I used my crop-a-dile for the two outer holes that I made 1/8" diameter, and a hand held punch and hammer to make the 1/4" center hole. I protected my surface using a self healing mat. I made the center hole larger on purpose so there would be some "give" or "slack" in case the holes in the copper didn't match up exactly with the pages. I held the pages together using two clothes pins.
 At this point, I did a dry run to make sure the holes would all align.
 I measured a length of fiber at least three times the length of the spine of the book. You can see I wanted plenty of fiber to hold beads or charms when the book was completed.
 Now it was time to decorate the front of the book. For this I used 1/4" and 5/16" stamping sets. Although I didn't get these through Evie's Tool Emporium, Michelle also sells stamping sets and sometimes gives them in exchange for tutorials. Other supplies included E6000, a gold leafing pen and a black Sharpie. I had a hard time making the copper hearts show against the copper background, so I first outlined them in gold leafing pen, then the black Sharpie. I glued the hearts in place and set them aside to dry overnight. I then stamped the saying.
 Once the cover was decorated and the glue had dried, it was time to assemble the book. For this I used a dental flosser shown in the photo being held by a clothes pin (which is also the way I store it). I taped one end of the fiber so it wouldn't ravel.
 If you have never sewn a book together, you are not alone. Although it turned out to be a relatively easy process, it was difficult to photograph. Of course I would have to start wrong. I put the fiber and flosser through the center hole from the inside.
 You actually begin by bringing the flosser through the center hole from the outside. You want your "tail" on the outside of the book. Now it's correct. Be sure to leave a length of thread to tie a knot and add decorative charms or beads,
 Next, it is up and out of the top hole, making sure all pages are caught,
 then down the outside and into the bottom hole. Be sure to skip the middle hole. Bring the fiber to the outside at the center hole. Tighten or adjust the fiber and straighten your signature if necessary. Tie a knot, catching the long fiber which ran from the top hole to the bottom hole, then trim fiber to the desired length. In case this is not clear, here is a great file that shows the simple pamphlet stitch I used much better than I can.
Originally, the only thing I was going to use the steel forming block for was the spine of this book. It turned out that I used it far more often than that, and bending the spine was only a very small part of what the steel forming block was capable of.
 The top view shows how the fibers and stitching look from the outside when the book has been bound. It has now been formed and you can see how nicely the spine formed since I used one of the round grooves in the forming block.
 Here is a closeup of the front
 and this shows the completed book sitting on a stand. If you don't want your copper to "rust," or acquire that lovely green patina over time, be sure to seal it with a spray adhesive right before sewing the pages to the book.
I actually had a lot of fun making this project. It took a long time, there are a lot of steps, but I really enjoyed learning all the ways I could use the steel forming block. I found it far more versatile than I expected. If you work with metal, you will find many uses for it, too.
Today I'm celebrating this project by featuring Evie's Tool Emporium's blog as my blog of the day. Michelle is a super person who hails from Minnesota. She was always available to answer questions when I had them and coordinate her schedule with mine. She is quite well informed and often provides free tools in exchange for tutorials. Please head on over to her blog today. My project will be featured there (direct link to my project), so please tell her hello, then check out all her cool tools on her Etsy site, too.


27 thoughtful remarks:
This is gorgeous, and WOW, what a process! I love the patina you coaxed from the copper, and the way the hearts work with it not standing out too much- it really completes this piece. WOW!
What a great tutorial, Elizabeth!! And your right--there are alot of steps involved, but the end result is beautiful!
Elizabeth-
Thank you for a wonderful, detailed tutorial! I love the finished book! I have enjoyed working with you!
Michelle @ Evie's Tool Emporium
Your journal is amazing and so creative, Elizabeth! I admire your patience and perseverance in this project. The results are so worth it! Don't know how you found the time to document everything - outstanding tutorial too! Hugs, Terri xoxo
really cool...i have copper...i have hammer....i have heat....i have to do this!
:)
You are a Woman of many talents E... Just a fab tutorial and wonderful piece of ART.
A great tute and a whole lot of work but worth it copper when heated is amazing.
TT tomorrow Chris and I thank you it is an honour for us to be featured on your blog.
And yes pleae do add us as a link.
Many thanks and see you for Tea on Tuesday.
Chriss x
Wow an amazing tutorial Elizabeth- you certainly put alot into this lovely project with beautiful results. Great copper work!
Love how you dive into a project...metal no less (you talk almost like a blacksmith ... I have heard some of the same terms from Mr M)
I am also impressed with how you document projects, that really takes focus and concentration. I find I start and then get carried away forgetting steps...there goes the tutorial LOL
Wonderful copper heart book you've created, really amazing!
oxo
Wow your book cover rocks! I love it. I need one of these metal forming tools and Bluebeard can be my crafting assistant any day xx
Elizabeth:
Very very cool..... what did you use to emboss the words? Or did you tell us that and I skimmed over it?
Gina
Blimey Elizabeth this is amazing!!
Congratulations on winning your tool and boy what a fabulous tutorial showing how you used it. You certainly have lots of patience and it really paid off because your book is stunning :D
I am in awe!!
hugs
Chris xx
This posting must have taken you hours and hours. I love all of the wonderful tools used. What a book.
All I can really say is I am speechless. FANTASTIC job, Elizabeth. The post and tutorial was great! Congratulations!
Thus is sensational. I can see why you were selected to win. And what a tremendous post. Thank you so much for taking the time and the energy to show the process step by step! Wow!
Way, way Awesome Elizabeth! I totally enjoyed this tutorial (though not sure I'll ever do it) not that I do not like metal, I do...and I LOVE copper. It's just with my compromised limbs not sure I would have the strength to work with it.
I would like to know, how you cut or folded the paper bag to get that many pages out of it, and what the actual finished size of your book is.
Thanks so much for sharing this...SUGGESTION...give one or two of these away next OWOH blog hop!!
What a great book. Bet it took forever to make.
Rachel
Wow! What a cool book! Your tutorial is great, i loved seeing all the steps with the copper. It's a lot of work! I would love to see other things you can do with your new tool!
Outstanding Elizabeth! You never cease to amaze me! Thank you for your generousity for sharing all this.
I think I have most of the supplies you mentioned in your fabulous tutorial. Hmmmm.... might have to dig those out and experiment....
All my best-
Ingrid
Wow, beautiful piece !
Superb, Elizabeth! A great tutorial! Thanks for all your nice comments about my video- I think you worked a WHOLE lot harder than I did- lol - I love this book- it shows your beautiful art heart!!! :))
Wow! Amazing! Very beautiful and personal. Sweet idea.
This is the coolest book "E" you did a super job and I bet the new toy made it that much easier ... Linda F
Good going Elizabeth. I know how stiff that copper is to hold having seen the leftovers from her counter top. I never know what you will try next friend.
Kat
I love, love this book! Your tutorial intructions are so clear, too. I enjoyed reading the steps and end results. You are an inspiration to me. I may have to start collecting metal working tools now-lol. I do some jewelry making, so these tools could do double duty. Thanks for sharing this with us!
I LOve It !!! Thanks,
this is pretty interesting but if you have done this procedure with its own tools or with embossing machine then its could be more nice and pretty. but now its look like a little rough. but any ways thanks for sharing and idea.
Stuart Elliot
Post a Comment