Showing posts with label shaving cream dyed fabric. Show all posts

Wednesday, July 11, 2012

Seth's Buried Treasures (Shaving cream fabric: a tutorial)

I just learned that Seth at The Altered Page is having another edition of his famous Digging for Buried Treasure events. The last couple of times I joined this, I visited many wonderful altered artists, artists who think and make art like me. This post originally hit the internet airways on July 14, 2011. If you've been with me since then, or if you have read my tutorials, this will be old news. If you're a recent or new visitor, please enjoy. I have drug this out of the archives, shown the spotlight on it, and put it center stage. Thanks for visiting. Even though I made a couple of mistakes, it's still a good tutorial and produced a fabric surface technique I'm very proud of, especially since I have never seen it on the internet.

In case you're wondering, I'm # 42 on the list, so please check out the other artists. You'll be glad you did.

As promised, here is my tutorial and it is on dyeing fabric using dye based ink and shaving cream.

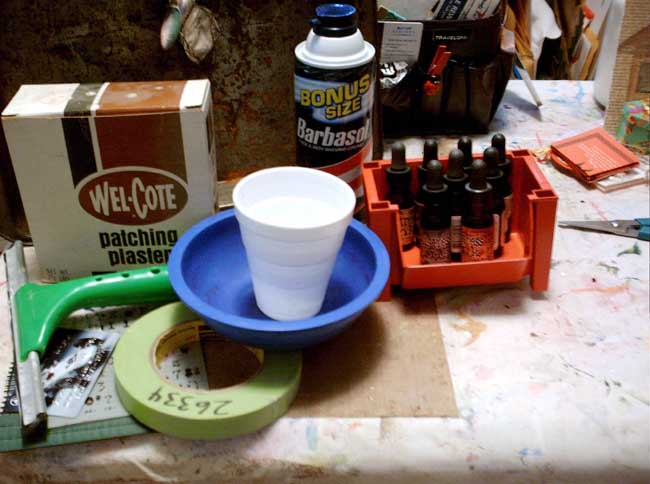
Materials and tools from upper left, clockwise:

Empty plastic containers
Credit or old hotel card
Shaving cream, inexpensive and not gel
Dye reinkers (I ended up not using these)
Distress reinkers
Stencils of your choice
Fabric of your choice, prepared for dyeing (please note I used part of an old bed sheet that I saturated with water)

Instructions:

Place a bit of shaving cream into a small plastic container. You need to use plastic instead of foam or paper containers, which will absorb the ink and dilute the color. I remember reading that somewhere years ago, but don't remember where. I just remember that you don't want to lose any ink to a paper or foam cup.

Once you have placed shaving cream in each of the cups, begin adding a few drops of dye based ink in each of the containers.

I used various distress inks, because the fabric I chose had previously been subjected to rust and white paint, but left a lot to be desired. Using the distress inks seemed like a good choice for a more vintage look I was sure I would accomplish.

I have found dye based ink, including the brand marked "distress ink," works best when using shaving cream. Although I have used pigment ink with shaving cream, I don't recommend it. Pigment ink is sticky and thicker than dye ink. It ends up making a mess on paper, so I would hate to think what it would do on fabric. Also, you don't want to add solvent based ink or embossing ink to shaving cream (EDIT: apologies for my old camera that took really illegible photos).

Once you have added your ink to the shaving cream, mix it as little or as much as you choose. Mix it a lot and the color will be the same throughout the cream. Mix it a little, and you will get mottled effects.


Lay your stencil in place, then spread the shaving cream and dye ink mix over it.


The big problem with these "vintage" style colors is the light colored ones seem to blend into the background. Perhaps if I try a darker color, it will help. Remember what I said about a mottled look?


Continue the previous steps until you have used all your shaving cream and dye ink mixtures.


Once complete, I laid the fabric out to dry so I could take a photo. It was at this time I realized I should never have wet the fabric. What gave me that idea was you are supposed to wet fabric before dyeing it. However, when using shaving cream, you don't need to wet the fabric. So, do as I say and not as I did and don't wet your fabric before using this technique.


Shaving cream and dye ink dry very quickly, and don't need the fabric to be wet.


Use bright colors for this technique. The dull, drab, vintage-y colors that are prevalent with these distress inks, only blended into the fabric I was using.


You can see that some of the images were nearly lost due to the colors being so similar to the background.

Ruminations:

1. I should never have wet the fabric. These inks spread water around as it is, and wetting the fabric only gave the ink a place to migrate.

2. Choose your ink colors carefully with your background in mind. Perhaps once the fabric has dried, some of the colors will show better.

Overall, I was quite pleased with the results, and if I've saved anyone from making my mistakes, it was well worth it. I hope you enjoyed this and I will add this link to my page of tutorials, so it is easy to find.

Friday, January 27, 2012

Inspiration Avenue: Alphabet quiltlet

Maggie's (Magpie's) prompt for us at Inspiration Avenue this week was Alphabet. "Art with words," etc. was what Maggie suggested when she issued the challenge. All kinds of images danced in my head, as I contemplated making art using stencils and hand made stamps. Of course, I had limited time, because I have a leak in my pipes (OK, not mine, but my house's) that I have been dealing with.

As I was further contemplating the challenge, I remembered back in July of last year, I wrote a tutorial featuring shaving cream on fabric. At that time, I used an alphabet stencil. Please check it out, if you are not familiar with the process I used.


I began with the fabric I stenciled using shaving cream, and tore a piece to quiltlet size (about 9 X 12 inches). The piece I used is in the upper left side of the above photo. Remembering what my friend Dianne of Art Beneath the Cottonwoods suggested in the comments of that post, I decided to outline each of the letters with my black ink pen. Not sure what kind it is, but I think it's a Rollerball or something like that. I just know it's not a Micron, because my Micron is deader than a . . .


I then colored an apple rubber stamp using Staz-on reinkers and stamped onto a portion of a dictionary page.


To the back of the quiltlet, I cut batting and drew a backward "A" using the same stencil as I used on the front of the quiltlet. To attach the batting to the quiltlet, I added my "free motion" stitching of the "A." It didn't show as well from the front as I had hoped, but I did like the technique of adding "free motion" stitches from the back of the fabric. Now if only I had a way to make real free motion stitches. In retrospect this is one technique I will definitely try again. Next time, the thread I use will be a much more distinct shade from the stamp or image I choose to use.

Thanks again to Magpie for challenging me to create this alpha inspired quiltlet. And, please check out all of Inspiration Avenue's entries this week.

Tuesday, July 12, 2011

WOYWW #110

It seems Blogger has been behaving rather badly lately. Now that I have my comment box back, people seem to be having trouble with my blog. But you're not here to cuss and discuss Blogger, you are here because you want to see what's on my work table today, just like lots of people who link with Julia at Stamping Ground.


And of course you want to see a rocking horse, this one a napkin (or serviette) holder from the kitchen.


Also taking up space on my table are the supplies for a tutorial I'm creating. I'll have the tutorial ready tomorrow. And in order to have enough room for all the supplies, I will now need to move the rocking horse. Have a great day and I'll see you sometime this week.

Thursday, June 23, 2011

A new to me technique

This is a very long post, so I hope some of you find it useful.


Before I begin, I wanted to show a bit of unexpected serendipity. I laid a couple of wet fabric scraps on top of some dry paper towels I used to sop up the excess dye ink I used last week. You can see, the paper towels bled onto the fabric. The darker areas are rust, the lighter ones are from the paper towels, which lost some of their color, especially on the left.


On Monday, I showed a sneak peek of some white scrapbook pages I made using dye inks. After seeing how the dye ink dyed the sheet I laid the paper on, I said I had an idea for a really cool project. Actually, I have two projects I want to work on. Here are the supplies for both minus


the distress inks I forgot to include in the first photo. I have to crop these photos because I also have another project I'm working on sitting on my desk that I don't want seen. In the back, with Wendy lounging over it, is a pan that I'm going to put the shaving cream in, then add distress ink to. I've never used distress ink for shaving cream papers before, so I hoped this would turn out well. This is NOT the same pan I used the first time. This time I used a lot more shaving cream, filling it nearly full. I should have used a thinner pan.

For those of you who have never made shaving cream papers, I have a tutorial, but it is hard to follow because I was never able to get the images lined up properly with the instructions. So, I will re-post the tutorial below, because the other one is extremely old. If you know how to make shaving cream papers, please scroll down to the last four images of this post for the "new to me" technique.


From left: Cookie sheet, pick, knitting needle, reinkers (distress reinkers were not used in this tutorial), shaving cream (not gel), various papers, photos. Not shown: credit card


Shake shaving cream, then squirt it onto your cookie sheet or baking pan. Be sure the pan is larger than the paper you will be using.


Spread shaving cream with a credit card.


Continue spreading until the shaving cream covers an area larger than your largest sheet of paper.


Make sure the shaving cream is relatively level.


Place a few drops of one reinker color randomly on the shaving cream.


Add a second color, and a third if you wish.


Don't use more than three colors at a time or your shaving cream will get muddy.


Drag your favorite tool (I used the hair pick), through the shaving cream and reinkers. Don't press too deeply, just skim the surface.


Continue doing this until you have a pattern you are happy with.


Lay a sheet of paper over the shaving cream and GENTLY press into the mixture.


Carefully lift the paper from the shaving cream. Most instructions tell you to scrape the excess shaving cream away from the page, but I'm going to offer an alternative suggestion.


As an alternative, gently lay another sheet of paper on top of the first sheet.


Press the top paper gently into the bottom sheet, being careful to not rotate or move the bottom paper.


You now have a mirror image bonus page.

At some point you're going to have to add more ink to the shaving cream. This is the time to change colors if you wish. You will not have to add any more shaving cream, especially if you used as much as I did for this latest batch.

Clean up is easy: just use warm water to remove any excess shaving cream, then follow with soap and hot water.

I like how my studio smelled so clean and fresh after I finished the paper. The shaving cream has a definite appealing scent, unless you are allergic to, or affected by, any scent. I also like how soft and pliable the paper is when finished. Since the shaving cream has very little liquid and no water, the pages don't curl or warp like they do with many other background techniques.


These are some of the papers from this very first batch, including some made from brown craft paper.

So what is the technique that is "new to me?"

First, I only used blue and red distress reinkers. Now I know all you TH fans know the names of the ink, but it is something like brick red and blue jean blue or some such. However, the papers are NOT a surprise.


It's the fabric I dyed (using that sheet I tried to color mist last week) using the same shaving cream mixture. Follow all the steps as above to get a similar look, with the following exception. At first I thought I would have to tear strips that were quiltlet size,


then realized fabric is not the same as paper. Unlike paper, it can be folded. So, I tore some fabric that can be used for visual journal covers.


And although I preferred the other one (see photo above this one) because it didn't have as much color misted colors on it, this is the one that was in focal view of my camera.

So now I can add another way to dye fabric. I'm really enjoying dyeing fabric. The appeal is in finding ways anyone can dye fabric, rather than having to invest in lots of chemicals, steamers, and dye bath times. You will be able to find this on my tutorials page, so you can find it easily when you decide to use this technique for dyeing fabric.