
I have always loved the look and feel of vellum, but it can be quite expensive. If you are like me, and love how vellum looks and feels, this tutorial is for you. As a bonus, it is CHEAP, too. Not just inexpensive, but cheap.
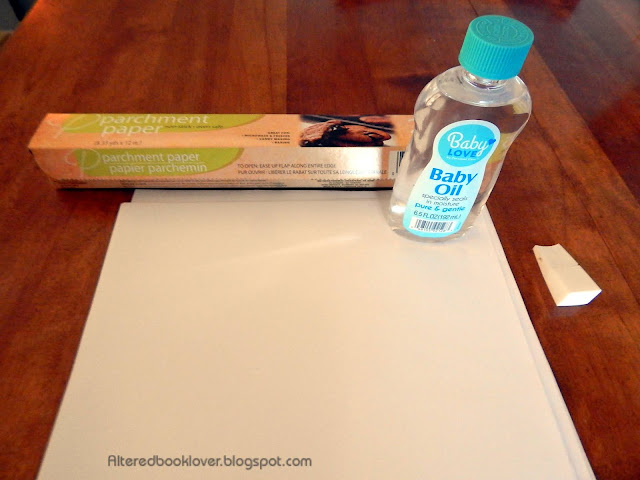 Supplies back to front:
Parchment paper or any leak resistant material to protect your furniture
Baby oil (found at Dollar Tree)
Makeup sponge (pack of 20 can be found at Dollar Tree, but this was in my stash)
Printer/copier paper or equivalent (do not use cardstock)
 Cut a piece of parchment paper or equivalent that is larger than your printer/copier paper. Make sure it is larger than the paper before you begin.
 Saturate your makeup wedge with baby oil.
 Pounce or spread the baby oil on the paper. No need to turn it over, it will saturate both sides. This is where I wish I'd worn disposable (and easily removable) gloves, because I had to keep wiping my hands in order to take photos.
 I tried to show how translucent the paper is now. It even feels like vellum.
 In order to create more vellum, I needed a place for the other paper to dry.
 That's when I decided to see if I could print an image and turn it into vellum paper, too. The graphic is from The Graphics Fairy that I printed on my laser printer. Note how the baby oil is already starting to show through from what was left on the parchment paper.
 This turned out great.
  I decided to see if it would work if I used my ink jet printer. I was equally impressed. This image is also from The Graphics Fairy.
 Then I waited for all the papers to dry. Can you imagine my surprise and dismay the next day when I returned and saw I still had a wet dripping mess? It was time to pull out a couple of towels and wipe the papers down. This is vital, because these papers will never dry on their own.
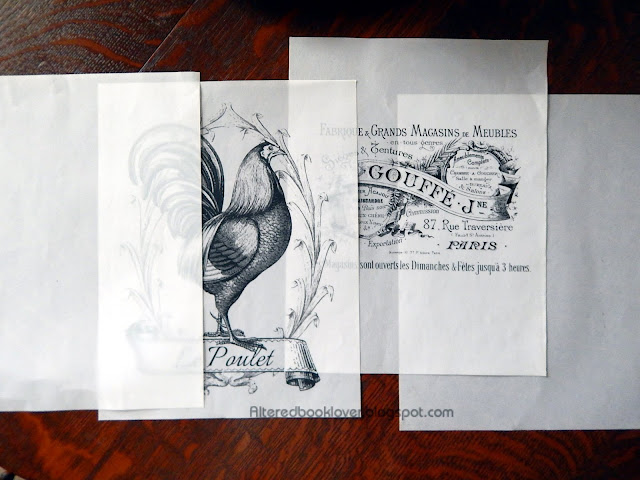 Here are four of the finished and dried papers. You should be able to tell they are translucent by the way I positioned them.
Ruminations:
1. My parchment paper became saturated and I got baby oil all over the table.
2. I probably should have warned that this was going to be a very messy project.
3. I had no idea the papers wouldn't dry on their own, but thinking back, I should have realized after seeing how saturated the papers were on the parchment paper even before I added more baby oil.
4. I spent about $0.25 (USD) on this project, although I spent about $1.10 (USD) on the initial investment because I purchased a new jar of baby oil.
5. Did you know baby oil has an expiration date? I didn't, and didn't want to take any chances.
Thank you
ever so much for joining me today. I greatly appreciate it and you.
Once this post goes live, you will find, and be able to access it forever on my
Tutorials page.
Ewww, I had to google vellum. Made from the skin of a fetus.
ReplyDeleteBaby oil is a bit better then, LOL. Is it made from babies? Kidding.
Oh, thank you - I have an earworm now!...
Did you know that dettol and baby oil mixed (should) make a repellent against mosquitoes? (An Australian Ranger told us).
The papers came out great!
Wow.
ReplyDeleteMuch, much better than 'real' vellum. And yes, oil is messy. Very, very messy. Some years back as I picked up a large olive oil container the bottom fell out. I had several litres of oil across the kitchen floor. It seeped under the cupboards and took an age (and multiple washes) to get clean.
This is a fun tutorial, I did this once with the kids at school, and the cleaner threatened never to clean my room again if I repeated it! Your pages are super. Hope Squiggles is feeling better. Hugs, Valerie
ReplyDeleteI learned a new word and what is vellum. That is a fun and interesting tutorial. Oil can get very messy. The finished product is well done.
ReplyDeleteVery clever. I bet it smells good too!
ReplyDeleteThat is a very cool technique
ReplyDeleteI would never think about it. And I love this easy technique, Elizabeth. Thank you so much for sharing. Your "vellum" paper looks amazing. Hugs, my friend.
ReplyDeleteWow this is a fantastic project. I will try this. I love the feel of vellum. Also that you can put it through both a laser and inkjet. Brilliant.
ReplyDeleteI’m always amazed when I see a homemade recipe for products we normally buy retail. Making our own vellum is a surprise. Your tutorial is great! Especially as you’ve shown we can do this for printed items from either a laser OR ink jet printed paper.
ReplyDeleteThis is an interesting tutorial. It does look cool, but messy. And I didn't know baby oil had a expiration date. I guess because it is organic it will break down in time. Thanks for sharing this Elizabeth. Hugs-Erika
ReplyDeleteGreat results! Thanks for sharing:)
ReplyDeleteBRILLIANT...JUST BRILLIANT, thank you for this informative tutorial and now I can make my own vellum xx
ReplyDeleteThat is a very cool technique
ReplyDeleteHi, just popped over from Annie's blog to see your tutorial- what a clever technique, the results are amazing- can't wait to try it. Thank you xx
ReplyDeleteA cool technique Elizabeth! Thanks for sharing.
ReplyDeleteJUst popped over from Annies blog and thank you for sharing your brilliant technique
ReplyDeleteCarol x
oooooo just when you think there's nothing new under the sun, you show up with this!
ReplyDeleteLove
lEEANNA
that is so cool, thanks for sharing!
ReplyDeleteSo cool! And the baby oil will be good for dry hands ;)
ReplyDeleteThe expiration date on baby oil is for use on Baby. It won't hurt to use it for non-human uses. Or that's my understanding.
Fantastic method. I'm going to add this to my "how to" links on my blog.
ReplyDeleteFascinating tutorial E! I think I'll leave it to you though, not enough drying space here! Hugs, Chrisx
ReplyDeleteThis is outstanding. Very cool and interesting and excellent step-0uts. (I can imagine it was very messy!) I loved the end photos -- it really works well. Parchment is so beautiful and it's nice to know you can do it yourself. I wonder if it would dry faster hanging outdoors, like on a clothesline so it could get air going through it -- of if that might make oil drip in a bad way. Fascinating and well done. I wouldn't hesitate on using the oil for art -- just on a baby!
ReplyDeleteHave come over from Aussie Annies blog to see your tute and its amazing, will have to try this out, thankyou.xx
ReplyDeleteJust come over from Annies post. This looks great albeit somewhat messy. I didn't know that baby oil had an expiry date either. Didn't know about dettol and baby oil either. hugs Mrs A.
ReplyDelete