
Sorry this post has so many photos. Click on any to enlarge.
 This is what the fabric I rusted last week looked like on Thursday.
 Here is some of the fabric after it was washed in baking soda water to stop the rusting process and dried.
 Detail of the rusted fabric from last week.
 As promised, here is how to rust paper. You will need:
Paper (I prefer plain, but also included some book pages)
Rusty flat pieces (nails, screws, cut metal, anything with a nice pattern)
Pizza pan or cookie sheet (well rusted with a lip)
Vinegar
 And of course, latex or other protective gloves and a large plastic bag. Since I keep all these supplies in my basement studio, that's where my work desk is this week.
 Begin with a rusty flat pan that has a lip. Protect your work surface from the rust. Put on your gloves.
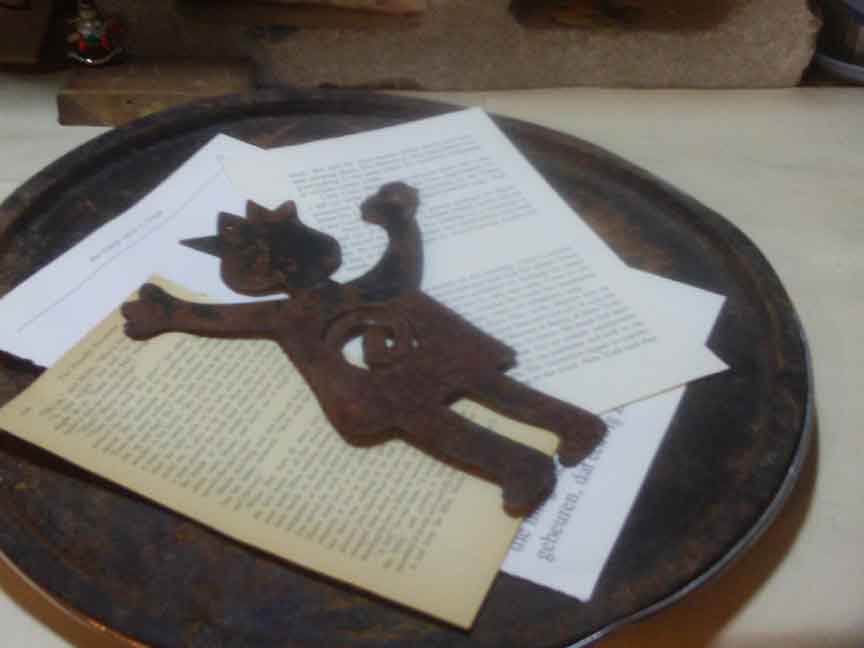
 Lay down a few pages and a rusty piece you want to make an impression.
 Keep adding more paper and rusty pieces. Keep as flat as possible.
 Your final layers can utilize 3-D pieces.
 Saturate your papers with vinegar. Make sure they are well saturated, but don't allow the vinegar to go over the lip of the cookie sheet.
 Press on the papers so they will absorb any extra vinegar.
 Cover and wrap the "bundle" using a large plastic bag. Seal the bag, if possible. Allow to sit in a cool, dark place for at least a day. Check your results and return to the plastic bag if the pieces haven't rusted to your liking, or if you want to move some of the rusted embellishments around. Again, wear gloves to check your paper. When pieces have rusted enough, remove the protective bag and allow to air dry. I'll show results next week.
Today's blog is another WOYWWer. Most of you know her as Andrea who lives in Wales in the UK. Yep, I had to look up Wales, and learned it was not just part of the UK, but also part of Great Britain and located to the west of England. After the geography lesson, I noticed that Andrea always visits and leaves a comment. I am always touched when someone visits week after week, and Andrea is no exception. Andrea is a professed frustrated crafter, who asks "Where Can I Buy Time?" It is also the name of her blog. Andrea makes beautiful art. She recently made an assemblage of houses that blew me away. Andrea also stamps, makes tags, and cards. Her art is lovely, so please stop by and say hi to her today.
how interesting. i never thought of keeping a rusted pan but now i know better than to throw it out. i like those rusty pieces you used to rust your paper!
ReplyDeleteGreat tutorial I love how the fabric has turned out.
ReplyDeleteElaine
Great tut, am having to think about doing this now :))
ReplyDeleteHappy Woywwing!
Great tutorial. I promise I will try and use my new dress form stamps soon!
ReplyDeletewow! thanks for showing xx Hugs Tina xx
ReplyDeleteWow! Am impressed as usual! You seem to have such an interesting workshop with all sorts of things going on! can't wait to see how that'll turn out! Although I have to confess to being a little scared of playing with rust!
ReplyDeleteLove the effects on your material from last week's tut. Look forward to seeing the results of the paper rusting. Does it all end up smelling of vinegar?
ReplyDeleteA x
Another Great tutorial ... must give this one a go! Have a great day Elizabeth!
ReplyDeleteThanks for the tips on how to rust. I'll have to try it sometime.
ReplyDeleteGood morning Bleubeard! Oh, and good morning to you too Elizabeth! I'm going to have to find a rusty pan now, methinks... thanks for the tute!
ReplyDeleteoh morning hun this is one great tutorial hun so well explained too cant wait too see the finished piece hugs cheryl xxxx
ReplyDeleteOhh very kewl all those rusty shapes are amazing can't wait to see the results
ReplyDeletehugs Nikki
ooh now I have to try rusting too..
ReplyDeleteSlow Down - I can't keep up with all the new idEAS, and I can't stop looking either...
dx
Fantastic - got to try this for sure now, thank you :-)
ReplyDeleteMorning, wow what a great tutorial, and so explicit. I will now have to try that, your art pieces always look so fabulous when you finish.
ReplyDeleteHave a nice WOYWW big Hugs JO.xxx
Thanks for the tutorial, I will have to give this a go.
ReplyDeleteThe rusted fabric looks great. Thanks for the tutorial on rusting paper - looking forward to seeing your results next week.
ReplyDeleteThat is a great idea I will be doing for sure. Thanks so much! I'm quite excited about it more than for the fabric as I will make more use of the paper. I can see I'm going to be in trouble as I'll be picking things up off the ground now as well as charity shops and car bootys. I never cease to embarass DH with my scavenging/ oops I mean recycling.
ReplyDeleteOff to throw a baking sheet out into the garden and hope it rust quick!
Hope you got my email but you have to spy something on my desk this week!
Love JoZarty x
Greetings Elizabeth,
ReplyDeleteAn interesting tutorial that daddy will find of interest as he likes rusty paper and things.
The name of Andrea's blog 'Where can I buy time' is super. We feline creatures seem to have all the time in the world but as for our human counterparts, they seem not to have enough time and so end up chasing their own tail.
Thank you for sharing,
Miss Kitty
Thank you so much for this I have lots of rusty bits and bobs - now I can use them in a crafty way I will be having a go of this soon lol and Hugs ;o)
ReplyDeleteThanks for sharing ^_^. this is a great idea to use rusty things
ReplyDeleteLove to see more of your craft desk next week :)
hugs
yenni
wow not even a desk an entire basement - I am envious from my desk of indeterminate purpose in the living room :)
ReplyDeletestill not round to trying the rusty fabric yet lol.. but thanks again for the instructions both look so much fun..xx
ReplyDeleteOh excellent tutorial, thank you! very timely too, I have been thinking about rusting some paper but didn't know how. One question.... where is the rocking horse?!!
ReplyDeleteHi there, thanks for the great tutorial, may have to play, I need to get out of my comfort zone and do something different. Great craft basement, loved all of your photos,hugs Heidi x
ReplyDeleteThanks for sharing again :) Looking forward to seeing the rusted papers....I just knew there would be a reason rusty stuff was cluttering up my greenhouse! LOL
ReplyDeletexoxo Sioux
great tutorial, thanks for sharing
ReplyDeleteC
xx
Hi ya
ReplyDeletewow what a great tutorial, i have seen so many brill things on WOYWW, will be hunting out them rusty nails now, lol,happy WOYWW, sue,x
Thank you for sharing this interesting "rusting! I can't wait to see the results!
ReplyDeleteHugs,
Cardarian
Another great technique this week just need to distract the other half so I can liberate some suitable materials from his workshop, vehicles etc
ReplyDeleteHi Elizabeth
ReplyDeleteAs always, I am WOWed by your tutorials - every visit, I learn something cool! Thanks so much for sharing your knowledge and talents with us all!
Have a wonderful week and will ttys!
Hugs
Ramona :-)
http://create-with-joy.blogspot.com
Great tutorial- I can't wait to see how they turned out!
ReplyDeleteThank you for sharing your unique techniques. I await with anticipation your rusted paper results.
ReplyDeleteI'd love to know how you come up with all of these amazing ideas.
Wow, is all I can say.
Kind regards
Sue xxxx
Enjoyed all the info on rusting. While tidying my shed I came across some items that would be perfect for this process !
ReplyDeleteMarilyn
Can't wait to see the finished project!
ReplyDeleteGreat tutorial babe, I have so got to have a play with rust!
ReplyDelete*hugs* Heather x
This is a great idea! I can't wait to see the finished papers!!!
ReplyDeleteWow love the idea of rusting paper and fabric, great info. Thank you very much, I'm glad I stopped by, good luck with your projects:) xxx
ReplyDeleteLove this technique but will leave it to you as like Andrea there aren't enough hours in the day. If you liked the look of Wales look up Pembrokeshire which is a part of Wales -it is like heaven on earth-especially the Blue Lagoon and Pendine sands. I could go on. It has inspired many artists Hugs BettyXXX
ReplyDeleteHi there - wondered how it would turn out from last week - love it...but I sooo love those little rusty figures - go on - you made those too?
ReplyDeleteHi Elizabeth,
ReplyDeleteLoved the tutorial. I have a question, which might be a silly one to you. Do you let the paper dry in one large clump, for surely they have stuck together as they sat in the vinegar, or try to remove them piece by piece. I'm also surprised that they don't disentegrate in the vinegar?
Another very creative way to "paint" papers--great tutorial.
ReplyDeleteCor, thanks for showing how to rust the fabric... I love love love it loads! Can't wait to see what you do with them hun x
ReplyDeleteAlways interesting reading your blog Elizabeth! Thanks for the latest inspiration and hope your Wednesday is a good one!
ReplyDeleteamazing tutorial thanks you so much for sharing! xx
ReplyDeleteOoh, brilliant technique with perfect instructions. Ta for that - much appreciated. Unfortunately, I don't have many rusted items around at the moment but will begin a collection, he, he.
ReplyDeleteLove this. I am going to rummage through my DH's workshop and find some fun things and give this a whirl. Thanks so much for posting this!
ReplyDeleteLol - now I know why crafters never throw anything away!!! Look forward to seeing all your rusty papers next week.
ReplyDeleteHi, I can't thank you enough for choosing me today and for all the lovely things you wrote too, you are so kind and I really appreciate them.
ReplyDeleteAnother fab tutorial and to improve your knowledge further on Wales.......It rains an awful lot here, so there are lots of rusty things lying around the garden, just got to be greatfull I haven't turned rusty yet!!
Thanks again for your kind words, see you next week.......A.xx
Wow - very interesting.
ReplyDeleteHugs
Penni
x
WOW at 5 weeks in a row visiting everyone
ReplyDeleteI try to visit a bunch but it's such a long list now soo hard to do
Hey, great tutorial, thanks!!!
ReplyDeletegreat tutorial - thank you for sharing. Fab workspace. Happy WOYWW! Thank you for showing us your workspace.
ReplyDeleteWell this is what I'm going to do with them....Just leave me your email in a comment on mine and I won't publish it and if you let me have your address they are your's!
ReplyDeleteJoZarty x
Never tried this rsuting.....need to have a go I think !!
ReplyDeleteSounds a fab technique. I had a basement once when I lived in Virginia, but now I have a very tiny craft room!
ReplyDeleteGreat tutorial, thanks so much!
Chrissie
Oh my that fabric looks fantastic..am very interested in the paper - Mr D will be slack jawed as I start rummaging in the workshop for rusty stuff!! My dear friend, the stamp cleaning was, for sure, you tidy gals rubbing off on me..I can't quite equate the rest of my house being relatively neat and clean if my work room looks like a bomb-site! As for phallic illusions, well that's not always a bad thing!!!
ReplyDeleteAmazing rusting technique - I'm not sure if I'm brave enough to try it, being somewhat of a freakishly neat crafter, but I love seeing others get down and dirty!!! Thanks for sharing!
ReplyDeleteJulie :o)
I like those funky figures, very cool!
ReplyDeleteCiara
xx
Thank you E for the tutorial!!! those rusted metals are soo cool...can't wait to see the results next week..
ReplyDeleteHi Elizabeth, hope you and Bleubeard are keeping well. Love the idea of rusting paper so can't wait to see the results. I like the look of some of your rusty bits too especially the first piece on the first layer. Thanks for the technique. The rusted fabric looks fantastic. Have a good evening, Tracy Evans x
ReplyDeletewhat a great tutorial lovin' the effect
ReplyDeletehugs
Hi - well were you impressed today when I appeared so early!! got up specially to link my post before I headed off for work..unfortunately didn't work the other way round and I'm now only just getting to blog hop and it's nearly bedtime...great tutorial - look forward to seeing how the paper comes out...Happy WOYWW...Esther xx
ReplyDeleteOh..and by the way - my secret is a circle template and blade that does all the cutting out for me !!
ReplyDeleteThis is so informative, now I'm sure I saw a rust related challenge on my travels this week?
ReplyDelete** Kate **
I love all the cool stuff you show us! can't wait to see how that paper turns out. Btw, the piggy bread from your last post looks delicious! I love them, but I never thought of having them with ice cream! thanks for the peek ;)
ReplyDeleteNow here you go again... one problem, everything in my kitchen is brand spanking new, not a rusty pie tin to be seen so this little experiment may have to wait a bit!!
ReplyDeleteI love your piggies... they look good enough to eat! LOL I have never seen them before so perhaps it is a local delicacy to you?
Oh and I just celebrated my first ever Labour Day here in Canada... so it must be North American and not just the US.... (just thoguht I would mention it)!! LOL
So looking forward to seeing how the different shapes appear!
ReplyDeleteYour rusting technique always intrigues me, but I am way to timid to try it myself! I like all the pictures you show of the process.
ReplyDeleteOooh great tutorial there cant wait to see the finished paper next week! Glad you now know what Bunting is too! a banner in England is just one long piece of paper or material with the saying on - buntings usually are made up of lots of little triangular flags but I couldnt resist a break from the norm with my castle turrets! Have a great week.
ReplyDeleteThank you so much for the tutes. Shouldn't have much trouble in rusting a pan up here in the north of England.
ReplyDeleteThanks for sharing - I just love dropping in here.
Yea! Thanks for showing the neat rust technique.
ReplyDeleteHappy WOYWW ! :) Nan
How interesting. Thanks so much for sharing.
ReplyDeleteLuv Joanne xx
Love the look of the rusted fabric!
ReplyDeleteRust appeals to me so much in every form and fashion ... my father spent a lot of his life fighting rust and keeping things shiney ... great tut once again Ms E!
ReplyDeletethank you for sharing the fun and the process!
oxo
Thats it - I'm leaving the cutlery drawer out in the rain!
ReplyDeleteThis is great. Hugs pam x
ReplyDeleteNever heard of the rusted technique. I'll have to check back next week to see the results.
ReplyDeleteNice to see your rusted papers! thanks for the tut.
ReplyDeleteLove the results they are fab, the only thing rusty I have is me, can't wait to see the paper.
ReplyDeleteLove those piggly wigglies too.
xx
Good grief Elizabeth, the things you get up to!! Your creativity blows my mind! Have a wonderful crafty weekend. Hope it's cooled down in your neck of the woods.
ReplyDeleteHugs
Brenda
wow, that is one seriously cool tutorial - tfs
ReplyDeleteVery cute! I'll have to try my hand at rusting some time.
ReplyDeletecant wait to see what the paper looks like next week and where do you manage to find such nicely shaped rusted pieces
ReplyDeletewow a great tutorial and yep cleaning as you go so if a 0 is totally brand new and spotless squeaky and 10 is a right bloomin mess then this week you come in at a 1/10 for the cleaning in between as you went
ReplyDeletethanks for the very belated return snoop, due to blogger errors
Hugs Kate
You got to me before I got to you LOL. I shall still be hopping around all the Woyww's well into next week and still won't get round them all so you're a better man than me!!!
ReplyDeleteYour tutorials are fantastic. I am learning loads since I joined WOYWW and there just aren't enough hours in the day to try everything out.
See you next week.
Hugs Lisax
Great tutorial Elizabeth, thankyou. And thanks for your visit to my blog. I'm afraid I'm going to have to post an apology next week to all the WOYWWers. I've been having similar problems to you and my computer keeps freezing up so badly that I never do manage to get the comment to go through. I'm hoping this one will as I have managed to comment on your today's very important post (9/11).
ReplyDeleteI think my computer needs the nice lady who makes it better when it has a bug, Lol! I'll be calling her after the weekend so hopefully see you next Wednesday.
Hugs
Lesley Xx
looks fascinating, thanks for sharing
ReplyDelete